Scheduling Exports
Scheduled Exports must be pre-defined and configured using the following high-level steps:
- Create an Export Template, User Preference or define the SQL Query depending upon the type of export being created.
- Create a new record in the Scheduled Exports Repository, specifying the mapping or template created in the first step.
The details for these steps are provided in the following sections.
Scheduled Export Repository
All scheduled exports are defined in the Scheduled Exports repository.
Note: When the repository is opened in aRepository View, the default Preference View does not show all attributes.
Each attribute from this repository is described in the following table:
|
Attribute |
Description |
|
Additional Conditions |
Additional SQL conditions to filter Delta records. Alias 'v' can be used to reference the view. For example: v.[Portal Status] in ('Submitted - Request Pending', 'Reviewed') |
|
Additional Conditions (AND/OR) |
This allows the user to select if all or any one of the conditions (if multiple) should be used to filter records |
|
Compress File |
Compress the export file into a zip file if “Yes”. |
|
Created Attribute Name |
Name of attribute representing the creation date for the record. |
|
Custom Source File Name |
Sets the file name for a Custom export for the registered post-processing class (since no file was generated by EnterWorks). It is the responsibility of the post-process class to actually generate the file. |
|
Delta Export |
<blank> - No Filtering of records Add – Include only new records since last export Change - Include only changed records since last export Add or Change - Include only new or changed records since last export Full – Include all records subject to Additional Conditions |
|
Delta Export Offset |
Number of minutes to offset the Delta export end time to give concurrent updates time to complete. The value should be set based on the EnterWorks batch size and database performance. For example, if the batch size is 200 and it may take the SQL Server database 30 seconds to save all 200 records, an offset of 1 or 2 minutes should be ample. |
|
Dependent Keys |
List of keys to be passed to each dependent operation. The keys must match attribute names in the dependent repository. The corresponding value in the Dependent Values attribute is then used to set the value of the key attribute when the Job is created. The value can reference attributes from the source job by surrounding the attribute name with double-pipe characters. For example, if an export is dependent on an import and that export should specify the same user, the Dependent Key would be set to “Manager Login” and the value would be “||Manager Login||”. Conversely, if the same dependent Export needs to be set to the admin user regardless of its initial definition, the Dependent Key would be set to “Manager Login” and the Dependent Values set to “admin”. |
|
Dependent Operation |
Name of dependent Import, Export, or Promotion to be initiated upon successful completion of this job. |
|
Dependent Operation Immediate |
Initiate the dependent operation immediately if “Yes”. Otherwise the operation will be queued and processed by the scheduler. |
|
Dependent Operation Type |
Type of dependent operation: Promotion, Import, or Export |
|
Dependent Values |
Values corresponding to the Dependent Keys that are passed to the dependent operations. Values may reference attributes by surround the attribute name with double-pipe characters. For example, to reference the Import Job number, the Dependent Values might contain: “Job||Export Job||”. If Export Job in the current record is set to 1234, the resulting value will be “Job1234” |
|
Description |
Optional description for export. It is strongly recommended that the Description be populated with all the details for the export, including any job that launches this job, any pre-processing performed, and what jobs this job launches. If ParameterX attributes are used, each should be detailed as to their content and purpose. |
|
Email Body |
Override e-mail body for successful jobs. Attributes in the job record can be referenced by surrounding them with double-pipe characters (e.g., ||Manager Login|| is replaced with the value of the Manager Login attribute). |
|
Email Notify Failure |
Send an Export Failed e-mail to the owner if Yes and the export fails to process successfully. |
|
Email Notify Success |
Send an Export Successful e-mail to the owner if Yes and the export processes successfully. |
|
Email Subject |
Subject for success e-mail. May contain references to any other job attribute by surrounding it with double-pipe characters (e.g., ||Manager Login|| is replaced with the value of the attribute Manager Login). |
|
Email To |
Email address(es) to which success/failure notifications will be sent. If not defined, the e-mail address(es) associated with the Manager Login user/group will be used. |
|
Empty File Action |
Identifies the action to be taken if the export file is empty.
|
|
Error Dependent Keys |
Optional keys for arguments to be passed to any Dependent jobs (as properties) when this job fails with an error. |
|
Error Dependent Operation |
List of Promotions, Imports, and/or Exports (based on Dependent Operation Type) that should be triggered on successful completion of this one. |
|
Error Dependent Operation Immediate |
Execute dependent operation immediately if Yes when this job fails with an error. |
|
Error Dependent Operation Type |
List of operation types for each Dependent Operation when this job fails with an error.
Promotion – launch a promotion job |
|
Error Dependent Values |
Optional values for dependent keys when this job fails with an error. |
|
Export Encoding |
File Encoding for Export (UTF-8, Windows-1251, etc.) |
|
Export Execution Datetime |
Date and time at which this export was last executed. |
|
Export File Name |
Name of file to be generated by the export. This attribute can include references to other attributes by surrounding the attribute name with double-pipe characters. For example, to include the job number in the export file name, the file name could be “MyFile_||Export Job||.csv” |
|
Export Include Images |
[DEPRECATED] Include images with the export if Yes. |
|
Export Include Null Values |
Include Null Values in XML Export if Yes. |
|
Export Language |
Language to generate for export. |
|
Export Name |
Name of the export. |
|
Export Now |
Process the export immediately if Yes. |
|
Export Priority |
Relative priority for the export determines the order of exports ready to be processed. The lower the number, the higher the priority. |
|
Export Template |
Name of Export Template (if Export Type is Template) |
|
Export Type |
Type of export:
|
|
Group Lock Action |
Group locks allow for multiple concurrent jobs to all attach to the same lock. The lock is not freed until all processes have detached from it. Action to be taken with the lock identified in Group Lock Name:
Group Locks will always acquire the designated lock, even if another process has acquired or attached to the same lock. If multiple jobs attach to the same lock via Group Lock, the lock is not free until all of the processes have freed the lock. |
|
Group Lock Name |
Name of the group lock. |
|
Image Context |
[DEPRECATED] List of Image Contexts to be included if Export Include Images is Yes. |
|
ImageType |
[DEPRECATED] List of image types to be included if Export Include Images is Yes (e.g., Original, Thumbnail, Detail, Low, or Web) |
|
Include Status |
[DEPRECATED] Identifies export records to be included matching the designated list of Status values (e.g., Active, Inactive, Retired, or Reactivated) |
|
Include Timestamp |
Include date and time in Export_<job>.log file if Yes. This can be helpful in troubleshooting post-processing for an export as it shows how long processing steps took (providing the appropriate messages are being reported). |
|
Last Export Datetime |
Date and time of when the export was last executed. |
|
Last Export Update Datetime |
Date and time of when last DELTA export was executed |
|
Last Scheduled Export Datetime |
Date and time the export was last scheduled |
|
Linked Repository Name |
Optional list of repositories included in the Export Template |
|
Linked Repository Saved Set |
Saved set to be used for each corresponding linked repository to identify which linked records are to be included. |
|
Linked Repository Search Config |
List of predefined searches on the linked repositories to be applied to limit the records in the export. |
|
Linked Search Repository Name |
For more information on Linked Search Repository Name, contact your EnterWorks account representative. |
|
Lock Action |
Action to be taken with the lock identified in Lock Name:
Locks will only be acquired if they are currently free. If the designated lock has been attached to by multiple jobs using the Group Lock, the lock does not become free until all of those jobs have freed the lock. |
|
Lock Name |
Name of the lock to acquire or free (depending upon Lock Action). If more than one import shares the same lock, then they will be processed serially. The name may contain references to other properties by surrounding each property name with double-pipe characters. For example, to ensure only one instance of an import is processed at a time for each user, the Lock Name can be set to: “Import||Manager Login||”. This will produce a lock name of “Importjdoe” for John Doe and “Importjsmith” for John Smith. |
|
Manager Login |
Login ID of the user or the name of the EnterWorks role who will receive notification e-mails for the export. |
|
Next Export Datetime |
Date and time the export will be processed if Scheduled Export is “Yes”. |
|
Output Null Extended Value |
[DEPRECATED] Include extended attributes that are empty or null if “Yes”. |
|
Output to File |
Generate an export file if Yes for Export Template type |
|
Output to Table |
Saved the publication table if Yes for Export Template type |
|
Parameter1-5 |
Five attributes that can serve as parameters when jobs are connected through the Dependent Operation attributes. They are not used directly by the export processing but can be referenced in other attributes. |
|
Postprocess Class |
Fully-qualified path, identifying the Postprocess class to be invoked for this import. It must be a subclass of com.enterworks.services.BaseCustomProcessFile |
|
Postprocess File |
Export file must be postprocessed after being generated using the designated class and arguments if “Yes”. |
|
Postprocess Keys |
Argument keys identifying the Postprocess Argument Values to be passed to the designated postprocess module. |
|
Postprocess Values |
Values for corresponding Postprocess Argument Keys to be passed to the designated postprocess module. Values can contain references to properties from this job by surrounding the property name with double-pipe characters. For example, to pass the Export Job, the value would be set to “||Export Job||” |
|
Publication As Of Date |
Effective date for Export Template type if not the current date and time. |
|
Publication Hierarchy |
Hierarchy used by the Export Template |
|
Repository Format |
Format for Repository type export (e.g., CSV, XLS, XML, or DB) |
|
Repository Name |
Name of repository for Repository or Template exports |
|
Repository Preference |
User Preference to be used for Repository export. |
|
Repository Timeout (Minutes) |
Number of minutes before a Repository type export has timed out. |
|
Root Repository Saved Sets |
Saved set for root repository in Template export. |
|
Root Repository Search Configs |
List of predefined searches on the root repository to be applied to limit the records in the export. |
|
Saved Set |
Saved set for Repository type export. |
|
Schedule Days |
Identifies the days of the week if Schedule Type is Days of Week |
|
Schedule Exclude Dates Code Set |
If set to a code set listing dates as code values, the scheduling logic will skip to the next scheduled date if the calculated date is one of the dates in the code set. |
|
Schedule Period |
Number of minutes between exports if Scheduled Export is “Yes”. |
|
Schedule Type |
Type of schedule:
|
|
Scheduled Export |
Export is scheduled if “Yes”. |
|
Scheduled Folder |
Logical folder in which the scheduled job is assigned for organization purposes. If set, and the Scheduled Folder hierarchy is selected in the repository list view, this import job can be found by clicking a node in the Scheduled Folder hierarchy. |
|
Scheduled Folder Sequence |
Used to control the order of scheduled jobs in the Scheduled Folders |
|
Skip if Busy |
Skip the scheduled export if the same named export is already busy processing if Yes. This can be used to prevent a backlog of exports if an export has been delayed or takes longer than the schedule period to complete. |
|
Status |
Status of export (Active, Inactive, Retired) |
|
Target Email |
Email address if Target Type is Email |
|
Target FTP |
FTP server name or IP address if Target Type is FTP |
|
Target FTP User |
FTP user name |
|
Target FTP User Password |
FTP user password |
|
Target Overwrite File |
Overwrite output file (vs. append) if Yes |
|
Target Path |
Directory location for export file if Export Type is File |
|
Target Type |
Type of target (Email, FTP, File) |
|
Transmission Option |
Identifies the transmission option to be invoked upon completion of the export file generation. |
|
Updated Attribute Name |
[DEPRECATED] Name of attribute represented date and time the data in a record was last updated. |
|
View Format |
Format for View or Data Mart Export Type:
|
|
View Name |
Name of View for Export Type View or DataMart (if View SQL is not defined). |
|
View SQL |
SQL Query for Export Types of View or DataMart. The value can contain references to other attributes by surrounding them with double-pipe characters. For example, to filter data by the user who initiated the import, the SQL would be: SELECT * FROM RepositoryView WHERE [Updated By] = ‘||Manager Login||’ If the View export is a Delta export, then the snapshot table view columns Created and/or Last Updated can be compared to the ‘[DELTA_DATETIME]’ keyword which is converted to the date and time the export was last executed. For example, to create a Delta (Add) export for the repository named “RepositoryView”, the SQL would be: SELECT * from RepositoryView WHERE Created > ‘[DELTA_DATETIME]’ To create a Delta (Add or Update) export, the SQL would be: SELECT * from RepositoryView WHERE Created > ‘[DELTA_DATETIME]’ OR Last_Updated > ‘[DELTA_DATETIME]’ |
Scheduled Export Jobs Repository
The Scheduled Export Jobs repository contains records representing the currently active or recently completed export jobs. Whenever an export is initiated, the details for that export are copied from the Scheduled Exports repository. This record is subsequently updated to reflect the current status of the export.
Note that when the repository is opened in a Repository View, the default Preference View does not show all attributes.
In addition to the attributes define in the Scheduled Exports repository, the Scheduled Export Jobs repository also has the following attributes:
|
Attribute |
Description |
|
# Errors |
Total number of records with errors. |
|
# Exported |
Total number of records exported. |
|
# Processed |
Total number of records for the export file that were processed. |
|
Download Link |
URL to download the export file. Requires setting up a virtual directory in IIS |
|
Export Errors |
Error messages encountered during export if there is a failure. |
|
Export Job |
Unique number for the Export job. |
|
Export Status |
Status of the Export job
|
|
Submitted By |
Login ID of the user who submitted the Export Job. |
|
System Log Directory |
Directory containing the system (EnterWorks) log file for the export (not set for View, Data Mart, or Custom exports) |
|
System Log File |
Name of the system (EnterWorks) log file for the export (not set for View, Data Mart, or Custom exports). |
|
Target FTP Port |
FTP Server port (21 default, 22 SFTP). |
Creating a Scheduled Repository Export
A user with authority creates a Scheduled Repository export by performing the following steps:
- Open a Repository View for the repository for which a Repository Export is to be generated.
- Select or create the User Preference view that defines the attributes to be included in the export as columns.
-
In the Feature Sidebar, open the Repository tab, open the Scheduled Activities group, and open the Scheduled Exports repository.

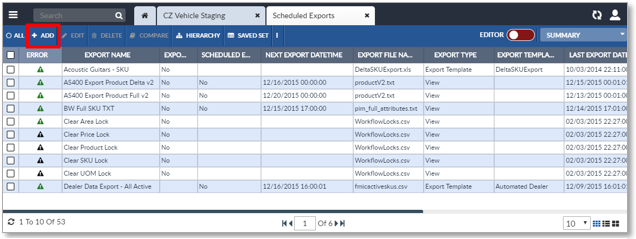
Open Scheduled Exports

Scheduled Exports -- Add a Record
-
Click the Add button on the Repository View’s Activity Bar. A new Scheduled Export
record appears in the Detail Editor Tab.

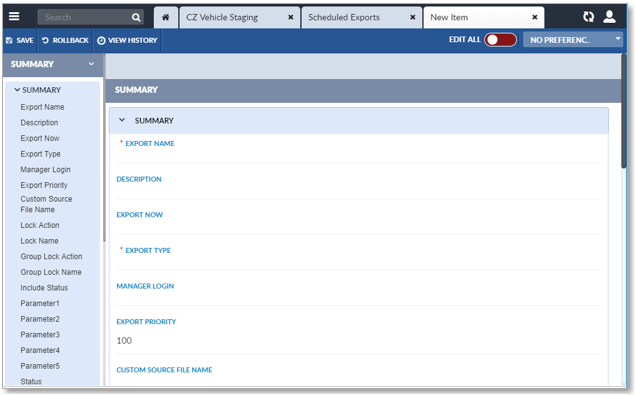
A New Scheduled Exports Record
- For details on the attributes for a Scheduled Export record, see Scheduled Export Repository .
- Enter a Name for the export.
- Enter the login ID of the user who will receive e-mails for this export in the Manager Login field.
- Select Repository in the Export Type dropdown selection list.
- Click the Export Details sub-tab.
- Select the repository in the Repository Name dropdown selection list.
- Optionally enter the name of the Saved Set to export a subset of the records.
- Click the Export Type - Repository sub-tab.
- Select the output format in the Repository Format dropdown selection list.
- Click the Export Target sub-tab.
-
Enter the target details:
- Target File
- Target Email
- Target FTP
- Enter the Export File Name, the name of the export file.
- To overwrite an existing file, set Target Overwrite File to “Yes”.
- Click the Schedule sub-tab.
- Set the Schedule Export field to “Yes”.
- Set the Schedule Type to the desired type and the Schedule Period to the desired interval (based on the
selected type).
For example:- To produce an export nightly, set the Schedule Type to Days and the Period to 1.
- To produce an export nightly, set the Schedule Type to Days and the Period to 1.
If the Schedule Type is set to Days Of Week, the Schedule Period is not used. Instead the days listed in Schedule Days determine which days of the week the export will be triggered.
-
To enter a Scheduled Days value:
- Click the
 at the bottom of the Schedule Days list.

Add a Schedule Day
-
A Schedule Days dialog will open.

Select the Schedule Days.
-
The Available Days list is on the left; the Scheduled Days list is on the right. Select days and use
the right arrow
 and left arrow
  to move them to the desired list.
- Click Apply to save your changes and exit, or Cancel to exit without saving your changes.
- Click the
- Set the Next Export Datetime field to the date and time when the export is to run. For Schedule Types other than Minutes, the time portion of this field will determine the time of day the export will be triggered.
- Save the new Scheduled Exports record by clicking the Save button in the upper left of the Repository View.
If the date and time are in the past, the export will be initiated immediately and the Next Export Datetime will be used in conjunction with the Schedule Type and Schedule Period to calculate the next time the export should be initiated.
When the current date and time passes the Next Export Datetime, the Repository Export will be initiated. Once triggered, the Next Export Datetime will be updated using the Schedule Type and Schedule Period.
Creating a Scheduled View/DataMart Export
A user with authority creates a scheduled View or DataMart export by performing the following steps:
- Open a Repository View for the repository for which a Scheduled View or Scheduled DataMart export is to be generated.
-
In the Feature Sidebar, open the Repository tab, open the Scheduled Activities group, and open the Scheduled Exports repository.

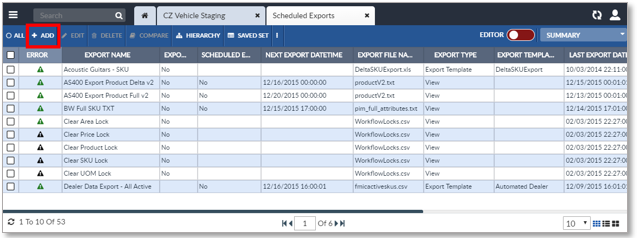
Open Scheduled Exports
Scheduled Exports -- Add a Record
-
Click the Add button on the Repository View’s Activity Bar. A new Scheduled Export
record appears in the Detail Editor Tab.
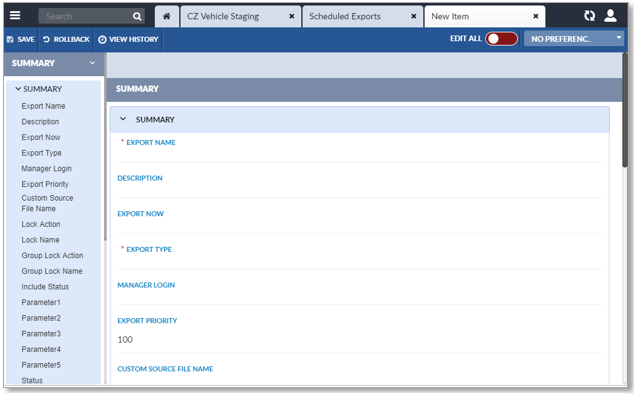
A New Scheduled Exports Record
- For details on the attributes for a Scheduled Export record, see Scheduled Export Repository.
- Enter a Name for the export.
- Enter the login ID of the user who will receive e-mails for this export in the Manager Login field.
- In the Export Type dropdown, select View for a SQL View or DataMart for Data. A View export will be against the EnterWorks 10 snapshot table views. A DataMart export will be against the Data Mart database.
- Open the Export Details tab and open the Export Type - View/Datamart sub-tab.
- In the View SQL field, enter the SELECT SQL query.
- In the View Format field, select TAB, COMMA or ~ to specify the character to be used as a delimiter.
- Click the Export Target sub-tab.
-
Enter the target details:
- Target File
- Target Email
- Target FTP
- Enter the Export File Name, the name of the export file.
- To overwrite an existing file, set Target Overwrite File to “Yes”.
- Click the Schedule sub-tab.
- Set the Schedule Export field to “Yes”.
- Set the Schedule Type to the desired type and the Schedule Period to the desired interval (based on the
selected type).
For example:
- To produce an export nightly, set the Schedule Type to Days and the Period to 1.
- To produce an export for every 2 weeks, set the Export Type to Weeks and the Scheduled Period to 2.
If the Schedule Type is set to Days Of Week, the Schedule Period is not used. Instead the days listed in Schedule Days determine which days of the week the export will be triggered.
-
To enter a Scheduled Days value:
-
Click the at the bottom of the Schedule Days list.

Add a Schedule Day
-
A Schedule Days dialog will open.

Select the Schedule Days.
- The Available Days list is on the left; the Scheduled Days list is on the right. Select days and use
the right arrow and left arrow to move them to the desired list.
- Click Apply to save your changes and exit, or Cancel to exit without saving your changes.
-
Click the
-
Set the Next Export Datetime field to the date and
time when the export is to run. For Schedule Types other
than Minutes, the time portion of this field will
determine the time of day the export will be triggered.
If the date and time are in the past, the export will be initiated immediately and the Next Export Datetime will be used in conjunction with the Schedule Type and Schedule Period to calculate the next time the export should be initiated.
- Save the new Scheduled Exports record by clicking the Save button in the upper left of the Repository View.
When the current date and time passes the Next Export Datetime, the Repository Export will be initiated. Once triggered, the Next Export Datetime will be updated using the Schedule Type and Schedule Period.
Creating a Scheduled Template Export
A user with authority creates a Scheduled Export Template by performing the following steps:
- Log into EnterWorks.
- If the Export Template does not already exist, create it, taking note of its name. (For information regarding creating Export Templates, see Export Templates.)
- In the Feature Sidebar, open the Repository tab, open the Scheduled Activities group, and open the Scheduled Exports repository.

Open Scheduled Exports
Scheduled Exports -- Add a Record
-
Click the Add button on the Repository View’s Activity Bar. A new Scheduled Export
record appears in the Detail Editor Tab.
A New Scheduled Exports Record
- For details on the attributes for a Scheduled Export record, see Scheduled Export Repository.
- Enter a Name for the export.
- Enter the login ID of the user who will receive e-mails for this export in the Manager Login field.
- Select Template in the Export Type dropdown selection list.
- Open the Export Details sub-tab.
- Select the root repository in the Repository dropdown selection list.
- Open the Export Type – Template Publication sub-tab.
- Enter the name of the defined Export Template.
- Set Output to File to Yes.
- Open the Export Target tab.
- Enter the target details:
- Target File
- Target Email
- Target FTP
- Enter the Export File Name, the name of the export file.
- To overwrite an existing file, set Target Overwrite File to “Yes”.
- Click the Schedule sub-tab.
- Set the Schedule Export field to “Yes”.
- Set the Schedule Type to the desired type and the Schedule Period to the desired interval (based on the
selected type).
For example:- To produce an export nightly, set the Schedule Type to Days and the Period to 1.
- To produce an export for every 2 weeks, set theExport Type to Weeks and the Scheduled Period to 2.
- To enter a Scheduled Days value:
- Click the at the bottom of the Schedule Days list.

Add a Schedule Day
- A Schedule Days dialog will open.

Select the Schedule Days.
-
The Available Days list is on the left; the Scheduled Days list is on the right. Select days and use
the right arrow and left arrow to move them to the desired list.
- Click Apply to save your changes and exit, or Cancel to exit without saving your changes.
- Click the
- Save the new Scheduled Exports record by clicking the Save button in the upper left of the Repository View.
When the current date and time passes the Next Export Datetime, the Repository Export will be initiated. Once triggered, the Next Export Datetime will be updated using the Schedule Type and Schedule Period.
Scheduled Export Configuration Properties
Note: When the repository is opened in aRepository View, the default Preference View does not show all attributes.
The Scheduled Export behavior is controlled by several configuration properties:
|
Property |
Description |
|
export.directoryName |
Full path to the directory where the Scheduled Export files will be placed (e.g., D:/Enterworks/shared/Exports) |
|
export.epimDirectoryName |
EnterWorks directory for export files (e.g., D:/Enterworks/shared/export) |
|
export.expireActiveDays |
Number of days before export jobs that still show “Processing” are deleted from the Scheduled Export Jobs repository. |
|
export.expireCompletedDays |
Number of days before export jobs that have completed or failed are deleted from the Scheduled Export Jobs repository. |
|
export.logDirectoryName |
Full path to the directory containing the EnterWorks export log files (e.g., D:/Enterworks/logs/EnableServer/export) |
|
export.publicationDirectoryName |
Full path to the directory containing the EnterWorks publication files (e.g., D:/Enterworks/shared/publication |
|
export.publicationLogDirectoryName |
Full path to the directory containing the EnterWorks publication log files (e.g., D:/Enterworks/logs/EnableServer/publish |

Copyright 2007, 2023 Precisely