Manage User Accounts Locally
To create or delete a user account locally in EnterWorks:
- Log into EnterWorks 2020 as an Administrator.
-
Open the Users tab: open the Feature Sidebar, open the Administration
tab, open the Users and Groups folder, and select Users.
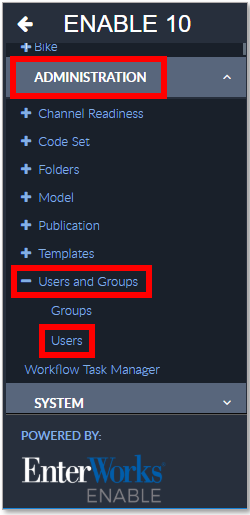
Open the Users Tab
-
The Users tab will open. It displays a list of all the
EnterWorks users.

The Users Tab
-
To delete a user, select the user and click the Delete User on the Users tab’s Activity Bar. Skip the rest of this steps.
To add a user, complete the rest of these steps.
- Select the Add User button from the Users tab’s Activity Bar. A new user entry will be added to the top of the list of users.
- Double-click the attribute values to edit the user account.
Attribute
Required
Login
Required.
Password
Required.
First Name
Required.
Middle Name
Optional.
Last Name
Required.
LDA
Required. Defaults to “No”.
Use Security Context
Required. Defaults to “No”.
Security Context
Not Required
Optional fields such as Company, Employee Number, . . . , Address, . . . , Country
Not Required
System maintained fields such as Created By, Creation Date , . . . ID.
Not Editable
- After values have been entered for the required attributes, the new user record will automatically be sorted alphabetically into the list of users. Be careful not to accidentally edit the first user in the list because your new user was automatically sorted without you noticing.

Copyright 2007, 2023 Precisely