Edit an Import Template
While users with sufficient permissions can create and edit import templates, it is recommended that the system administrator verifies and tests them to make sure they work correctly. Import templates should be tested with one or two records on your development environment before using it on your production system.
To edit an import template, open the Repository Dashboard for one of the repositories the template will be used to import data into (see Repository Dashboard). Go to the Import Templates pane at the bottom of the Repository Dashboard by either scrolling down to the pane or by clicking the Import Templates button on the top right of the Repository Dashboard.
|
Import Templates Pane |

Select the import template and click the Edit button in the Import Template pane’s Activity Bar. The import template will be opened in the Manage Import Template editor tab.
|
|
 Manage Import Template Details
The Manage Import Template editor has three pages of configuration options:
Edit the configuration options as desired. To save your changes to the import template, open the Attribute Mapping page of theManage Import Template editor and click Save. To exit the Manage Import Template editor without saving, close the Manage Import Template editor tab.
Import Template Details
The Manage Import Template editor opens in the Details page.
|
Manage Import Template Details |
The Import Template Details page contains the following configuration settings:
- Name: (Required) The name of the import template. This field can support multi-language translations.
- Description: (Optional) A description of the import template. This field can support multi-language translations.
- TypeCode:Standard or Category as defined below.
|
Option |
Pros |
Cons |
|
Standard (All versions of EnterWorks.) |
Able to use VTL scripts or triggers to alter records that have been imported. |
Default system configuration limits an import file to 1000 columns or less (depending on the data types of the columns). The limit can be changed by modifying the max.file.download.size setting in the sharedConfig.properties file. |
|
Category (Enable 9 and later only.) |
Able to import files with a virtually unlimited number of columns. (Typically, in files with a large number of columns, most columns are mapped to category attributes.) |
Not able to use VTL scripts or triggers to alter records that have been imported. |
- Advanced Import Class Path: Specifies a class path for the JAVA class that will be invoked upon using the import template.
- Contents Replacement: If the Contents Replacement checkbox is marked, all records in the root repository will be replaced with the imported records. This option is only available if the import only affects the root repository (no link repository records can be replaced).
WARNING: This option should be used only if all repository records are to be deleted and replaced with the data being imported.
In order to use the Contents Replacement function, the repository must include a status attribute that will be used to mark records that existed in the repository prior to the import but were not replaced with a record from the import file. This status attribute is defined with the special function indicator of Status. The value indicated in Inactive Status Value is entered into the status attribute in records that were not replaced.
- Inactive Status Value: (Required if Contents Replacement is marked): Defines the value to be entered in the status attribute used to indicate records that were not replaced when a file was imported.
Edit the Details page’s configuration options as desired. Click Next to continue to the Related Repositories page.
Import Template Related Repositories
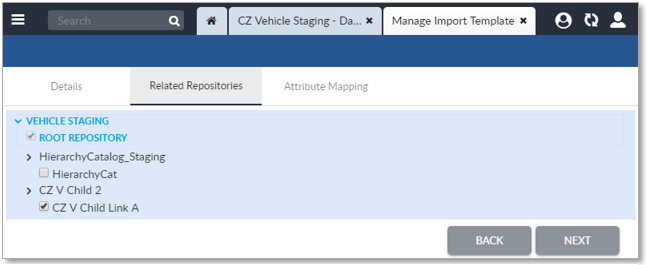
The Related Repositories page allows the user to specify which repositories to include in the import.
|
|
 Import Template Related Repositories
Click the down arrow icons to expand the repository tree to expose any linked repositories.
To include a repository in the import template, click the checkbox to the left of its name.
Edit the Related Repositories page’s configuration options as desired. Click Next to continue to the Attribute Mapping page.
Import Template Attribute Mapping
The Attribute Mapping page allows the user to specify which attributes will be included in the import template.
|
Manage Import Template Attribute Mapping |

To add, delete or change the order of the target attributes, click the Manage Attributes button on the Attribute Mapping page’s Activity Bar.
|
|
 Manage Import Template Manage Attribute Mapping
The Manage Target Attributes dialog will open.
|
Manage Import Template Manage Target Attributes |

The configuration options for the Manage Target Attributes dialog are as follows:
- Repository: The Repository dropdown will list the target repositories included on the Related Repositories page. The Target Attribute list will display the chosen repository’s attributes for inclusion in the template.
- Attribute Filter: Repositories can have thousands of attributes. To filter the Target Attribute list, type in consecutive alpha-numeric characters that appear in the desired attribute name(s). The Target Attribute list will display all attributes in all tabs that contain the filter string.
- Current Attributes: Expand or filter the Target Attribute list to display the attributes to be added to the Current Attributes list.
Use the right arrow ![]() and left arrow
and left arrow ![]() buttons to include or exclude target
attributes in the Current Attributes list.
buttons to include or exclude target
attributes in the Current Attributes list.
Use the up arrow ![]() and down arrow
and down arrow ![]() buttons to sequence the attributes as
desired. Note that the order of the target attributes does not need to
match the order the source columns are listed in the source file.
Specifying the order of the targeted attributes may be useful If the
generated import template will be used to create an export template.
buttons to sequence the attributes as
desired. Note that the order of the target attributes does not need to
match the order the source columns are listed in the source file.
Specifying the order of the targeted attributes may be useful If the
generated import template will be used to create an export template.
To save the Current Attribute list and return to the Attribute Mapping page, click the Add button, or click the Cancel button to exit without saving.
|
Manage Import Template Manage Attribute Mapping |

The configuration options for each target attribute listed on the Attribute Mapping page can be edited by clicking its value. The options are:
- Source Column: The name of the column in the source file that will be mapped to the target attribute. Note that this name must match the name of the column in the source file.
- Target Attribute: The name of the column in the target file that the source column will be mapped to.
- Target Repository: The repository that contains the target attribute.
- Is Key: Specifies if the attribute is a primary key. EnterWorks will use primary key(s) to determine if a record already exists in the target repository and it should be updated, or if a new record needs to be created.
- Default Value: If the source file does not include a value for a record’s attribute, the default value will be stored.
The only column in a source file that is required is the primary key.
To save the configuration options for the import template click Save.

Copyright 2007, 2023 Precisely