Enabling LDAP
EPX allows Administrators to employ an organization’s existing centralized user management capabilities through LDAP to manage users. EPX can import users from an LDAP service, and provide authentication against this service. Once the users are imported from the LDAP server, the user data that is stored locally in the EPX database is automatically kept in sync with the LDAP user population. To achieve this, EPX keeps an open connection with the LDAP service using an anonymous user account in order to be notified when user information is modified. Administrators have the option of performing periodic synchronizations or an automatic synchronization, or disable synchronization completely. Administrators also have the option of using a predefined LDAP application account for import and synchronization of user data, instead of an anonymous account.
If a directory server is available on your network with entries already configured for the users you intend to add to EPX, you can set up the EPX Application Server to connect to the LDAP server, allowing you to import the user details to EPX and automatically create users.
You are not allowed to modify the user details or the password of a user imported from LDAP, nor import a user who has already been added. However, if user makes updates or deletions in the LDAP server, these changes are reflected in EPX.
To enable the LDAP mode for EPX:
- Go to the <EPX>\bin directory and open the config.properties file.
- Find the LDAP Provider configuration settings. There are two LDAP Provider options in this release: Microsoft Active Directory and Sun Directory Server. Set the directory.provider property to directory.provider=0 if you are using Microsoft Active Directory or set it to directory.provider=1 if you are using the Sun Directory Server.
- Open your EPX Design Console. In the Navigator pane, right-click the name of the server that the users will be added to, and then click Open in the shortcut menu.
- In the Server editor, click the LDAP tab.
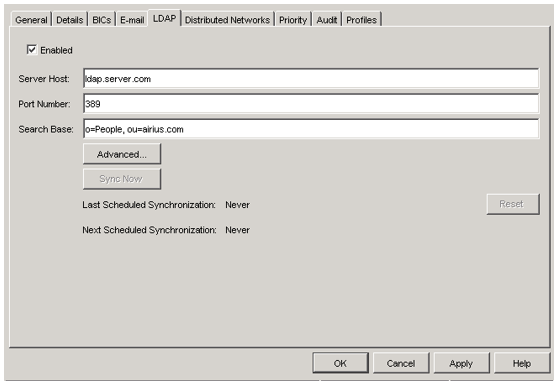
- Select the Enabled checkbox to enable LDAP.
- Specify an LDAP Server Host, Port Number, and Search Base for connecting with the LDAP server.
Important: In order for LDAP login authentication to work, the O=Enterworks and OU=people object classes must be specified on the LDAP server to which you are connecting. For example, given that O=Enterworks and OU=people are the values set in your LDAP server, these values must be specified as the search base values to be able to retrieve a successful user search.
Note: When you enable the LDAP mode, you will be able to create users from LDAP data, but you will not be able to use any other EPX administrator functions for user administration. To return to the regular EPX mode, uncheck the Enabled checkbox on the LDAP tab.
Configuring LDAP Settings
The LDAP Settings dialog allows an administrator to specify advanced LDAP settings. To open LDAP Settings:
- In the Navigator pane, right-click on the name of the server that the users will be added to, then click Open in the shortcut menu.
- In the Server editor, click the LDAP tab.
- Select the Enabled checkbox to enable LDAP.
-
Click on the Advanced... button. The LDAP Settings dialog appears. The
General tab can be used to enter the application user account and
synchronization settings.
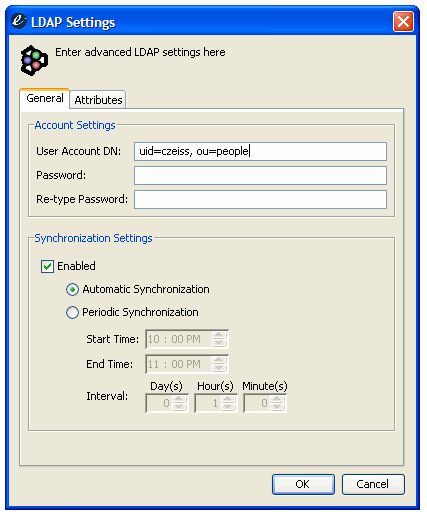
- In the Account Settings area, type in the Distinguished Name (DN) of the application account to use for LDAP related system actions such as, the import of users and during user data synchronization.
Note: If this field is left empty, an anonymous user account will be used.
- Next, type in the password of the application account. This field will always be empty unless the user types in a password. In which case, the typed letters will appear as asterisks (*) and the user will have to re-type the password to ensure that the password is correct. When the OK button is clicked and the two passwords do not match an error message will be shown indicating that the passwords do not match.
Note: Validation of these entries is not possible other than performing an LDAP search (see the Adding Users From LDAP for more details) and verifying that user information is returned.
- In the Synchronization Settings area, LDAP synchronization can be disabled by unchecking the Enabled checkbox. If synchronization is disabled, no synchronization will occur and the radio buttons will be disabled.
Note: By default, synchronization is enabled and Automatic Synchronization is selected.
- If you will be synchronizing your LDAP database then select a schedule for synchronization. Select either an Automatic Synchronization or a Periodic Synchronization by clicking on their radio buttons. An Automatic Synchronization automatically updates the LDAP database.
Note: The interval setting fields will be disabled if Automatic Synchronization is selected.
If you selected a Periodic Synchronization, you need to specify the Start Time, the End Time and the delay Interval. The start and end times specify the time of the day during which synchronizations should occur and the interval specifies the delay between each sync process.
When the OK button is clicked and the start time does not proceed the end time, an error message will be shown indicating that the start time does not proceed the end time.
Note: The default Start Time is 10:00 PM while the default End Time is 11:00 PM.
The value range of minutes is from 0 to 59, the hours range from 0 to 23 and the days range from 0 to 999. The minimum delay interval allowed is 1 hour. These settings will take effect immediately after saving, without having to restart the Control Manager.
-
Click on the Attributes tab.
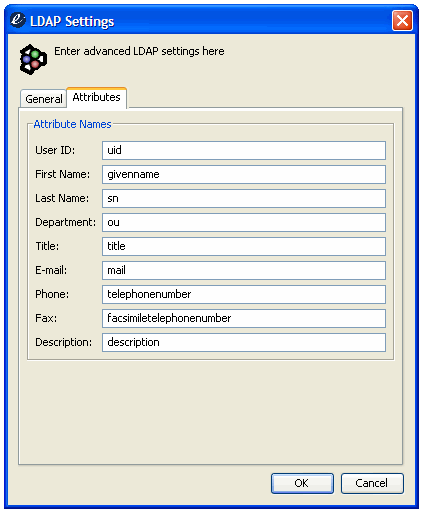
The Attributes tab can be used to specify custom attribute names that map to EPX user properties. Most LDAP implementations use commonly used “out of the box” attribute names, however, this tab allows organizations that have customized names to be included as user properties. The fields will initially be populated with default commonly-used attribute names. If a field is left empty and a name is not specified, that user attribute will not be imported. However, for certain attributes such as UserID, First Name, and Last Name, which are essential in creating users, defaults will be used if none are specified.
- Click OK to save the LDAP settings in the database. For more information on configuring EPX to use LDAP, see Adding Users From LDAP and Synchronizing with LDAP .

Copyright 2007, 2023 Precisely