Using Design Console
Overview
Design Console is the easy-to-use graphical user interface (GUI) that allows you to perform administration and development tasks in EPX. Design Console allows you to create, retrieve, update, and delete EPX business objects by providing easy access to the two major functional areas of EPX: Administration and Process Modeling.
Design Console provides for the administration of data for process integration in the following areas:
- User and group management
- Security management
- Audit logging
- Import/export functionality
- Process configuration parameters
- BIC server management
- E-mail notification
- LDAP services
- Distributed networks
- Work item priorities
Design Console also provides for management of process modeling in the following areas:
- Managing Web sources
- Managing connectivity to data sources (DSN registration, linking tables and views)
- Query Builder
- Roles — Abstract actor categories that group users together so that work can be assigned in a flexible manner. Roles can be defined for pools of users, aliases (e.g., “Supervisor”), cascading work escalation, or work schedules.
- Work item types — Data structure definitions that define the data that is captured and tracked along the various activities, which make up a process flow. When a process flow is started, the resulting data structure that is created is called a work item, and this work item will be defined according to the definition of work item type.
- Work item viewers — HTML- or Java Server Page- (JSP) formatted Web pages that are used to expose one or more portions of a work item at an activity in a process flow.
- Process flow — Design Console provides a graphical process-modeling tool where process flows can be defined in a visual manner as a sequence of activities and transitions.
- Subflow — A reusable sequence of activities and transitions that can be included in one or more process flows.
- Personal subflow — A reusable sequence of activities and transitions with a named actor (a user or role) that can be included in one or more process flows.
- Remote subflow — A reusable sequence of activities and transitions that is defined on some central installed EPX environment that can be included in one or more process flows defined on remote installed environments.
- Business Integration Component (BIC) management — BICs are automated applications that can be used as actors in a process flow to provide integration to external systems. Design Console tools allows for the BICs to be configured for inclusion or exclusion as actors in a specific installed environment.
- Process flow monitoring — The function which allows the monitoring of all work items or an individual work item in a process flow.
- Work item purge — Allows an administrator to delete work items in bulk when they are no longer required by the enterprise.
- Box Profile - Pre-defined filters that can be applied to Inbox views in TaskManager.
Starting Design Console
If your operating system is Windows 2000 or Windows 2003, make sure that the services for the EPX Application Server and the BIC manager or managers are running before starting Design Console.
Please refer to the Installation and Configuration guide for information on starting these services, or contact your system administrator.
- To start and log into Design Console:
- From the Windows NT or Windows 2000 desktop, click the Start button and selectPrograms > Enterworks > EPX Design Console.
- In the Windows XP desktop, click the Start button and select All Programs > Enterworks > EPX Design Console.
- Alternatively, in Windows Explorer select: C:\Enterworks\EPX\bin\DesignConsole.exe
Note : This directory path reflects the default installations for EPX on each platform. If EPX was installed to an alternate directory, launch EPX from the alternate path accordingly.
- In the Navigator pane, do one of the following to open a server:
- Double-click a server name
- Right-click the server name, and then click Login in the shortcut menu
- Click the expand button [+] next to the server name
- Type your username and password, and then click OK. Depending on your access permissions, you are now ready to perform administration, and other functions that have been installed.
Setting Viewing Options
Design Console is installed with a number of viewing options preset. If you like Design Console’s default look and feel, you can leave the settings as is. Otherwise, follow the instructions below to change Design Console’s appearance:
- In Design Console’s menu bar, click the Tools menu, and then click Options.
Note : Some changes in the viewing options will require that you restart the Design Console in order for the changes to take effect.
-
In the Options dialog, click the General button.
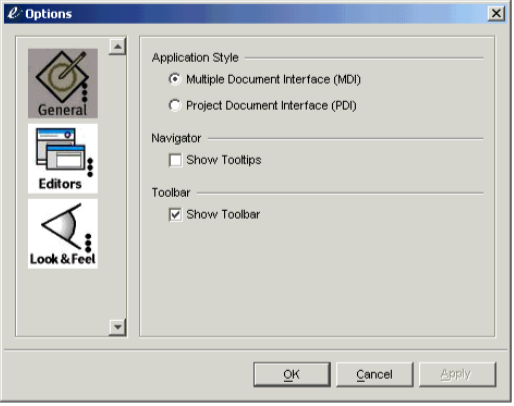
- Select the Show Tooltips check box to enable tooltips to appear when you drag your mouse pointer over tools. Select the Show Toolbar check box to display the toolbars.
- Click Apply to save any changes that you have made.
- Click the Editors button.
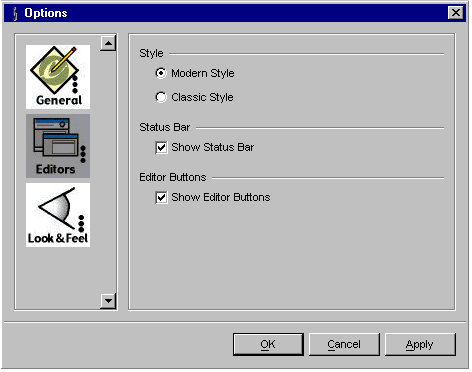
- There are two editor styles available, Modern (the default) and Classic, which affect the general appearance of Design Console’s editors, such as their fonts and colors. In addition, the Classic style maximizes available screen space by not displaying the description area that appears at the top of editors when the Modern style is selected. If the Modern style appeals to you, leave the Modern Style option selected. Otherwise, select the Classic Style option.
- Select the Show Status Bar check box to display a status bar at the bottom of each editor.
- Select the Show Editor Buttons check box to display OK, Cancel, Apply, and Help buttons at the bottom of each editor (above the status bar). You can maximize available screen space by not displaying these buttons. When the editor buttons are not displayed, you can access their functions via keyboard shortcuts or the Design Console menu bar.
- Click Apply to save your changes.
- Click the Look & Feel button.
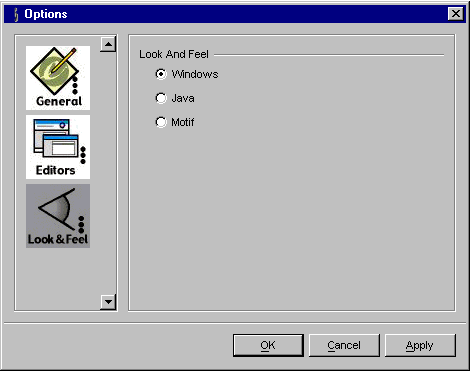
- Select one of the options — Windows, Java, or Motif — to change Design Console’s overall look and feel. (To implement a change to Design Console’s look and feel, you must close and restart Design Console.)
- When you have finished making any desired changes, click OK.
There are two application styles available, Multiple Document Interface (MDI) and Project Document Interface (PDI). The style selected determines how Design Console displays the assorted editors and dialogs of EPX. The default style is MDI, which presents Design Console in a single window. When opened, all editors and dialogs are contained within the work area of the Design Console window. If this style is preferable, leave the Multiple Document Interface (MDI) option selected.
The other available style, PDI, presents Design Console and each of its available editors and dialogs as within their own individual windows. You can manage and arrange the Design Console windows as you like on your desktop. To implement this style instead, select the Project Document Interface (PDI) option.
Positioning the Navigator Pane
When using the MDI application style (set through the Options dialog), you can detach and re-anchor the Navigator pane, which allows you to reposition it on the screen, if desired.
When the Navigator pane is attached to Design Console’s toolbar, its title bar looks like this:

To reposition the Navigator pane:
- Click the pushpin button to the left of the close button to detach the
Navigator pane. The pushpin button disappears from the Navigator pane title
bar.
To re-attach the Navigator pane, click the re-attach button . The Navigator pane’s title bar returns to its original state.
- To hide or show the Navigator pane, click Navigator in the Window menu.
Arranging Editors
To modify how Design Console arranges multiple open editors:
-
In the Window menu, click Arrange.
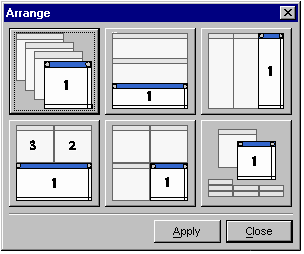
- The Arrange dialog displays six different editor layouts as buttons. Click any of the buttons to apply its displayed arrangement to any currently open editors. The editor numbered 1 represents the most recently selected editor.
- Click Apply to implement and view the new arrangement. To try a different arrangement, click another layout button. When you are satisfied with the layout, click Close.
Note : The Arrange option is available from the Window menu only when at least one editor is open.
Printing from Design Console
To print from Design Console:
- On the menu bar, in the first menu on the left (the title of which changes depending on the active screen object), click Print. You can also preview the information before printing it by clicking Print Preview. The Print Preview dialog contains a Print button that you can click to print the information after previewing it.
- As with any print dialog, you can select the printer that you wish to print to; click Properties to change the printer properties; and select the page range and number of copies to print.
- Click OK.
Design Console Components
The key components of the Design Console user interface are as follows:
|
Description |
Function |
|
Navigator pane |
Displays server objects and folders containing all Administration and Process Modeling objects. |
|
Editor pane |
Displays the object editors after they have been opened. |
|
Menu bar |
Provides administration actions. |
|
Object/Navigator menu |
This menu will be named according to the object selected, and lists basic file commands specific to that object. |
|
Edit menu |
Basic edit commands. Visible only when a property editor is selected. |
|
Tools menu |
Displays tools available to the object selected. |
|
View menu |
Use this menu to change the view of a process flow or subflow. |
|
Window menu |
Basic window view commands. |
|
Help menu |
Provides access to online help. |
|
Toolbar |
Provides administration actions. |
|
Status bar |
Displays system status. |
|
Object editors |
Allow you to make and save changes to objects. |
Navigator Pane
The Navigator pane appears along the left edge of the Design Console interface. Use this pane to select EPX objects that you wish to work on. You can also create and delete objects via the Navigator pane.
To expand or open a folder or object in the Navigator pane, you can double-click the folder or object; click the expand button [+] next to the folder or object; right-click the folder or object, and then click Open in the shortcut menu; or click the folder or object to select it, and then click Open in the Navigator menu.
Editor Pane
The Editor pane, located on the right side of the screen, displays object editors after they have been opened. You can open, close, and re-arrange editors within the Editor pane.
Menu Bar
The menu bar provides access to administrative, viewing, and help options. The number of menus on the menu bar may change depending on the type of object selected.
Object/Navigator Menu
This menu changes depending on the object selected. Please see the documentation for a specific EPX component for more information on this menu.
Edit Menu
The Edit menu appears when you open an editor.
|
Menu Option |
Description |
|
Undo |
Un-does an action when editing any type of flow. |
|
Redo |
Repeats an action when editing any type of flow. |
|
Cut |
Cuts selected information from an area, to be pasted into another area. |
|
Copy |
Copies selected information. |
|
Paste |
Pastes information that has been cut or copied to a selected area. |
|
Delete |
Deletes the selected objects. |
Tools Menu
Please see the documentation for the specific object (each object is described in the guide in which its function is described) for more information on this menu and its options.
|
Menu Option |
Description |
|
Import/Export |
Opens the Import/Export tool, see the Administration Guide for details. |
|
Work Item Transfer |
Utility to distribute work items from one process flow or subflow to another, see the Administration Guide for details. |
|
Monitor |
Opens the Process Flow Monitor (which shows where work items are in a process flow), see the Process Modeling Guide for details. |
|
Purge Work Items |
Allows you to purge work items from EPX, see the Process Modeling Guide for details. |
|
Interactive SQL |
Opens the Query Builder tool (an interactive SQL window), which allows you to build and execute SQL commands. |
|
Options |
Allows you to set general viewing options for Design Console (described above in Setting viewing options). |
View Menu
This menu appears depending on the object selected. Use the commands on this menu to change the view of a process flow or subflow.
|
Menu Option |
Description |
|
Zoom In |
Increases the view magnification. |
|
Zoom Out |
Decreases the view magnification. |
|
Zoom |
Click this option, and then select the desired magnification level. |
|
Fit to Window |
Expands or contracts the editor to fit into the current window. |
|
Guides |
If clicked, guidelines appear on the process flow canvas. |
|
Align |
Click this option, and then select from the alignment options displayed (Left, Right, Center, Top, Middle, and Bottom). |
Window Menu
The Window menu contains basic commands that affect the general appearance of Design Console.
|
Menu Option |
Description |
|
Navigator |
Opens and closes the Navigator pane. |
|
Arrange |
Allows you to arrange icons. |
|
Refresh |
Refreshes the view. |
Help Menu
The Help menu contains options that display basic product information and online help.
|
Menu Option |
Description |
|
About Design Console |
Displays product information, including release number, build date, and copyright information. |
|
Help Contents |
Displays online help. |
Toolbar
The toolbar provides shortcuts for most menu functions. The following actions are available from the Design Console toolbar. Some toolbar buttons only appear when certain objects or components are selected.
|
Button |
Action |
Description |
|
|
Save |
Saves the object. |
|
|
Save All |
Saves all open objects. |
|
|
Print Preview |
Displays how the selected information will appear when printed. |
|
|
|
Prints the information contained in the highlighted object. |
|
|
Cut |
Cuts information from an area, to be pasted into another area. |
|
|
Copy |
Copies highlighted information. |
|
|
Paste |
Pastes information that has been cut or copied to a selected area. |
|
|
Delete |
Deletes selected information. |
|
|
Stop |
Stops the current process, such as when opening an Inbox or Work Item Versions editor. |
|
|
Validate the Process Flow |
Checks whether the process flow is valid. |
|
|
Refresh |
Refreshes the contents of a Navigator pane folder, or of an editor, with updated information. |
|
|
Monitor |
Opens the Process Flow Monitor, that allows you to view the progress of work items as they move through the steps of a flow. |
|
|
Interactive SQL |
Opens the iSQL Query Builder. |
|
|
Options |
Allows you to view and change the current Design Console interface appearance. |
|
|
Help |
Opens the Help viewer to display information about the selected editor. |
Status Bar
A status bar appears at the bottom of each editor. The status bar displays a progress indicator and messages concerning system status, and identifies the database server that the editor uses.
Object Editors
Each time you open an object, an object editor appears. Within the object editor, you can make and save changes to the object, or you can just view information, if desired. For details on a particular object and its editor, refer to the documentation for that object.

Copyright 2007, 2023 Precisely