A function transformation allows you to apply functions of string, numeric,
conversion, and datetime to define an attribute of a logical entity, or one of the
parameters of a parent function transformation.
-
On the Create Mapping <logical model name> page,
select the entity corresponding to the attribute to which you want the
transformed value applied, and click the Transformations
collapsible tab on the right side of the page.
The
Transformations panel is displayed showing
the name of all the attributes in the selected entity. The
Transformation column remains blank initially. It
displays the transformation type after you save the transformation.
Note: The Transformation panel doesn't
display details of the physical model table. In case you click a physical
model table after an entity and open the
Transformation panel, it displays details of the
last selected entity.
-
Select the attribute to which you want the transformed value applied, and click
the Transformation icon
 .
.
The Transformation of column '<column name>'
pop-up window is displayed.
-
Select the Function option, and from the
Category drop-down list, select the category for the
function you want to apply. You can choose from String,
Numeric, Conversion, and
Datetime.
-
From the Name drop-down list, select the function you
want to apply.
Note: The options in this drop-down depends on the function
Category you select.
The function is defined and is displayed on the window below the entry
fields.
Note: You can see the description of the function by hovering the
mouse on

icon below the
Name drop-down list.
-
Define the parameters of the selected function by expanding it and using one of
these options: Column, Constant,
or Function.
Note: Ensure that the resulting data type matches the expected datatype of the
parameter in the function.
-
Click OK.
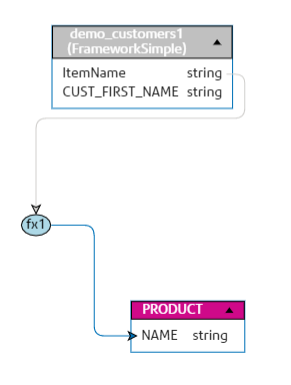
The applied function transformation is reflected on the canvas with a
transformation node.
-
Click Save.
The mapping is saved and the mapping icon changes from read to green for this logical
model in the Models tab of the
Modeling page.
Example - Applying a Function Transformation to an attribute of a logical model
entity
For example, if you wish to trim spaces from the right of each value
of the column
ItemName of the physical model table
demo_Customers1 and fill in the trimmed value into the linked
Name column of the logical table
Product:
- Select the
Product table on the canvas.
- In the Transformations panel, click
 adjacent to the
 Name column, and in
the Transformation of column 'NAME' pop-up window, select
the Function option.
- In the Category drop-down list, select
String.
- In the Name drop-down list, select the
rtrim(string string) function.
- The String function gets added to the pop-up below the
entry fields. Click this function, and define the parameter on which this
function needs to be applied by using the Column option
such that the resulting data type of the parameter is a string.
- Click OK.
The applied function transformation is depicted on the canvas as below:
 adjacent to the