Aggregator
Aggregator converts flat data to hierarchical data. It takes input data from a single source, creates a schema (a structured hierarchy of data) by grouping the data based on fields you specify, and then constructs the groups in the schema.
Group By
Choose the field you want to use as the basis for aggregating into a hierarchy by selecting Group by in the tree then clicking Add. Records that have the same value in the field you choose will have their data aggregated into a single hierarchy. If you select multiple fields then the data from all fields must match in order for the records to be grouped into a hierarchy.
For example, if you want to group data by account number you would select the account number field. All incoming records that have the same value in the account number field would have their data grouped into a single hierarchical record.
Output Lists
The fields you choose under Output lists determine which fields are included in each record created by Aggregator. To add a field, select Output lists then click Add and choose one of the following options:
- Existing field
- Select this option if you want to add a field from the dataflow to the hierarchy.
- New data type
- Select this option if you want to create a parent field to which you can then add child fields.
- Template
- This option allows you to add a field based on data in the stage connected to the Aggregator's output port.
If you want the field to have child fields, check the List box.
Enter the name of the field in the Name text box, or leave it as-is if it auto-filled and you are satisfied with the name. Keep in mind that the Aggregator stage does not allow invalid XML characters in field names; it does allow alphanumeric characters, periods (.), underscores (_), and hyphens (-).
Click Add to add the field. You can specify another field to add to the same level in the hierarchy or you can click Close.
To add child fields to an existing field, select the parent field then click Add.
Example of Aggregator
An example of the Aggregator's function is to take a group of street addresses and
turn them into driving directions. You could do this with two points, such as a
start point and an end point, or you could do this with multiple points along a
route. The dataflow for this type of function might look like the following:
The dataflow performs the function as follows:
- The Read from File stage contains street addresses in a flat file.
The fields in this file include the following:
- an ID, which identifies a particular address in the file
- a Type, which indicates whether the address is a "From" address or a "To" address
- an AddressLine1 field, which provides the street address
- a LastLine field, which includes such information as a city, state, and/or postal code
- The Field Transform between the Read from File stage and
the Math stage changes the format of the ID field from string to double because
the Math stage does not accept string data.

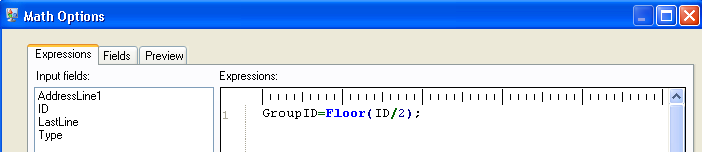
- The Math stage creates an expression that establishes a
Group ID field to be used downstream in the dataflow. In this example, it
calculates the Group ID as the floor of, or rounds down, the value of the ID
field divided by 2. So, if the ID is 3, then the expression is 3/2, which equals
1.5. When you round down 1.5, it becomes 1. If the ID is 2, then the expression
is 2/2, which equals 1, and there is no need to round down. Therefore, IDs 2 and
3 have the same Group ID of 1.
- Geocode US Address obtains latitudes and longitudes for each address.
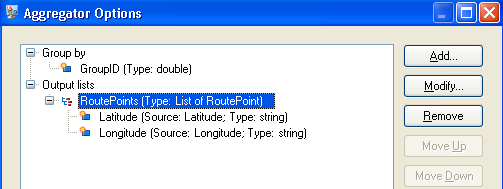
- The Aggregator stage establishes that the data should be
grouped by the GroupID field and that the output lists should include Route
Points devised of latitudes and longitudes. The instructions below show how to manually configure the Aggregator stage for this dataflow:
- Double-click the Aggregator stage, and then double-click Group by.
- Select the GroupID field and click OK. Using this field will allow us to include route points for the next stage in the dataflow. Route points are essential for a dataflow that produces directions.
- Double-click Output lists. The Field Options dialog box appears.
- Select New data type. In the Type name field enter RoutePoint. In the Name field enter RoutePoints. By default, this is a list and cannot be changed, so the checkbox is grayed out.
- Press OK.
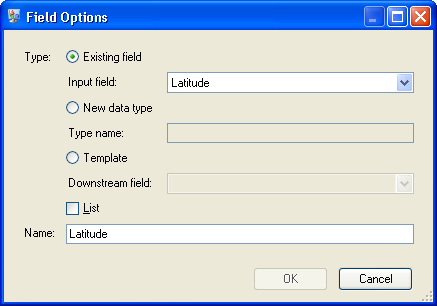
- Click RoutePoints and click Add. The Field Options dialog box appears again.
- Route Points are made up of latitudes and longitudes, so we need to
first add an Existing field from the existing
input field Latitude. The
Name field will auto-populate.
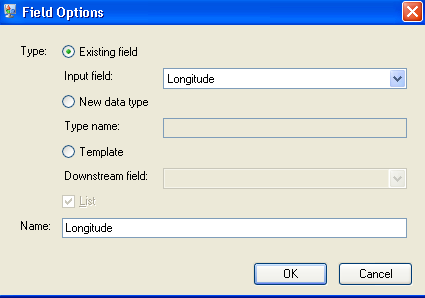
Repeat this step for Longitude.
The completed Aggregator stage will appear as follows:
- Get Travel Directions provides driving instructions from point IDs 0, 2, and 4 to point IDs 1, 3, and 5, respectively.
- The Splitter stage establishes that the data should be split at the Route Directions field and that the output lists should include all of the possible fields from the Get Travel Directions stage.
- The Write to File stage writes the directions to an output file.