Inspecting a Dataflow
To view the effect of your dataflow on the input data at different points in the dataflow, use the inspection tool in Enterprise Designer. Inspection enables you to confirm that the dataflow is having the desired effect on your data, isolate problems, or identify records that contain defects.
-
Specify the data to use for inspection.
The data should be representative of actual data, or, if you are troubleshooting a specific issue, should be the data that causes the issue you are troubleshooting. There are two ways to specify the data to use for inspection, depending on whether you are inspecting a service or a job.
Scenario Description To specify inspection data for a job When inspecting a job, the data used for inspection is the data specified in the source stage. The inspection tool can process a maximum of 50 records, which by default is the first 50 records in the input file or database. If you want to use data that starts somewhere other than the first record, double-click the Read From File stage and complete the Starting record field in the Runtime tab. To specify inspection data for a service Service dataflows use an Input stage to define the input to the dataflow. Because an Input stage does not have access to data when you are editing the dataflow, you must define inspection data in the Input stage on the Inspection Data tab. You can specify a maximum of 50 records.
There are a few ways you can enter inspection data in an Input stage.- If you want to use just a few records for inspection, you can
manually type in the data.Tip: If want to save the inspection data you enter to use again in another stage, you can export the inspection data to a text file by clicking Export Data.
- If you have data in a CSV or TXT file, you can import the data
by clicking Import Data. The data must
use one of these delimiters:
- \t
- |
- ,
- ;
- You can copy delimited data from another application and paste it into the inspection data editor.
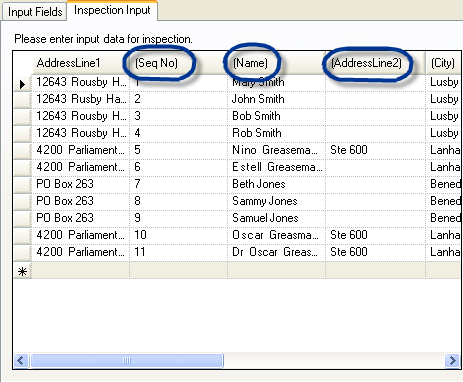
The Inspection Input tab indicates pass-through data by enclosing the field name in parentheses, as shown here:
 Note: Certain field types have restrictions when used for inspection:
- Double and float fields must contain numeric data only. The field may have up to 16 digits and 6 decimal places. Exponential notation is not supported in inspection.
- Integer and long fields must contain numeric data only.
- If you want to use just a few records for inspection, you can
manually type in the data.
-
Indicate the points in the dataflow where you want to view data.
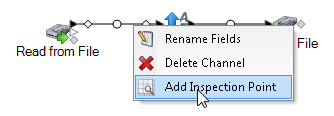
Scenario Description To add an inspection point to a channel Right-click to the left of the Rename node on a channel and select Add Inspection Point.
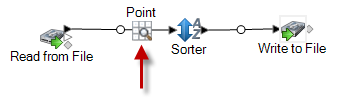
A point is added to the job:
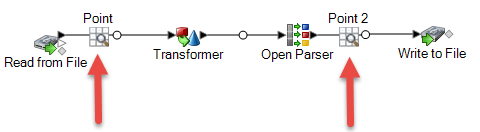
To compare records at two points in a dataflow Add two inspection points at the points in the dataflow that you want to compare:
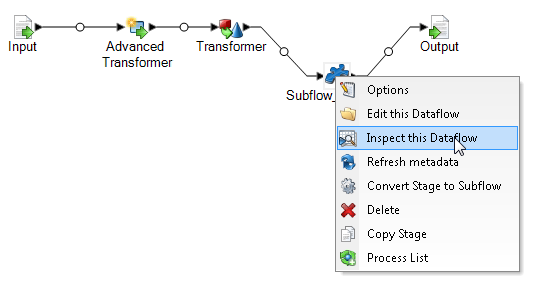
Tip: If you are using inspection to identify a problem, inspect outer points on the dataflow first then move inward to narrow down where a problem may be.To inspect a subflow embedded in a job or service Right-click the subflow stage and select Inspect this Dataflow:
The input data (in a job) or the inspection data (in a service) is automatically passed to the subflow, so there is no need to enter inspection data in the subflow's Input stage.
Note: When you inspect a subflow, the exposed version of the subflow is shown. If make a change to the subflow and want to re-run inspection, you need to expose the new version. -
Select or click the Inspect Current Flow button
on the toolbar.
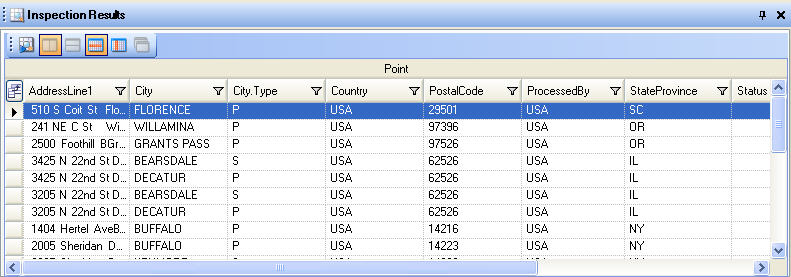
If you specified one inspection point, the Inspection Results pane shows the inspected data in horizontal view. You can change the layout of the view using the toolbar icons above the table. If your inspection data is hierarchical, it cannot be viewed vertically.
Note: Date and time data is displayed in the format specified in the type conversion options.Tip: You can move an inspection point by dragging it to another channel. The inspection data updates automatically.If you specified two inspection points, the Inspection Results pane displays the records as they exist at the two points. The left pane shows the left-most inspection point in the dataflow and the right pane shows the right-most inspection point in the dataflow. Click a record in the right pane to highlight the corresponding record in the left pane to see how the record has changed between the two inspection points.
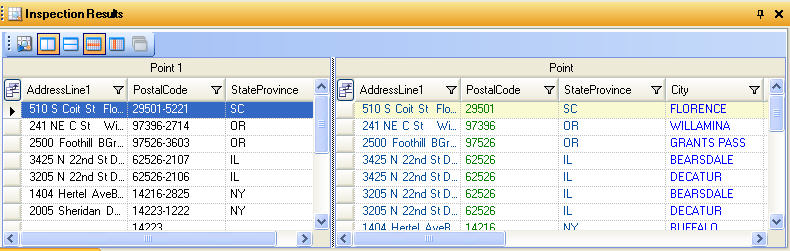
Each column represents a field in the dataflow. Columns are arranged in alphabetical order. New fields added between the inspection points are shown in the right pane after the original columns. To reorder columns, click and drag them into the order you want.
These situations influence how the inspection results are displayed for two inspection points:
- If there is a Sorter stage between the two inspection points, the records in the inspection results will be sorted as they were before the Sorter stage. Sorting is ignored in the second inspection point so that you can compare corresponding records from each inspection point side by side.
- If there are stages between the two inspection points that create new records, such as an Aggregator stage, the records shown in the second inspection point will not have a corresponding record in the first inspection point.
- Records that exist at the second inspection point but not at the first are displayed at the bottom of the list of records in the second inspection point.