Populating a Time Dimension Table

A time dimension table is a table in a database that makes it possible to analyze historic data without using complex SQL calculations. For example, you can analyze your data by workdays versus holidays, weekdays versus weekends, by fiscal periods or by special events.

The following procedure describes how to use Spectrumâ„¢ Technology Platform to populate a time dimension table in your data warehouse.

Note: Before beginning this procedure, you must have defined connections to the data warehouse in which you want to create a time dimension table. If you have not defined the necessary connection, see Data Source connections.
  1. In Enterprise Designer, select File > New > Dataflow > Job.
  2. Drag the Generate Time Dimension stage onto the canvas.
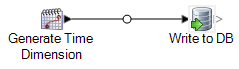
  3. Drag a Write to DB stage onto the canvas and connect the Generate Time Dimension stage to it.
    The dataflow should now look like this:

  4. Double-click the Generate Time Dimension stage and configure it to produce the time dimensions you want. For more information, see Generate Time Dimension.
    Note: The Julian day is usually used as a key value for a time dimension table if the grain is a day or more. If the grain is less than a day then you can generate a separate key by adding a Unique ID Generator stage to the dataflow. If you use the Julian day as the key, configure Generate Time Dimension to produce an integer column for Julian day values, and a column with the data type of date or datetime for date values.
  5. Double-click the Write to DB stage on the canvas and configure it to point to the database and table where you want to create the time dimension table. For information on configuring Write to DB, see Write to DB.
  6. To preview the time dimension values before writing them to the time dimension table:
    1. Right-click the channel connecting the Generate Time Dimension stage and the Write to DB stage, and select Add Inspection Point.
    2. Select Run > Inspect Current Flow.
      The inspection pane appears at the bottom of the Enterprise Designer window and shows the data that will be written to the time dimension table. If necessary, you can make adjustments to the Generate Time Dimension stage and then re-run the inspection process to view the effect of your changes.
  7. When you are satisfied with the dataflow, select Run > Run Current Flow to execute the dataflow and populate the time dimension table.