Splitting Entities
This feature enables you to split one entity into two entities. If your model contains entities that perform multiple functions within that model, you could create one entity for one function, and a second entity for the other function. Using the organization chart example from Write to Hub, you might want to create two entities out of the entity for Jim Waterman, who has employee ID 3. Jim is a manager to Marcus David (employee ID 12), but he is also an employee of Tom Smith (employee ID 1). Therefore, in that model, you might want a manager entity and an employee entity.
- With an existing model open, click the entity you want to split.
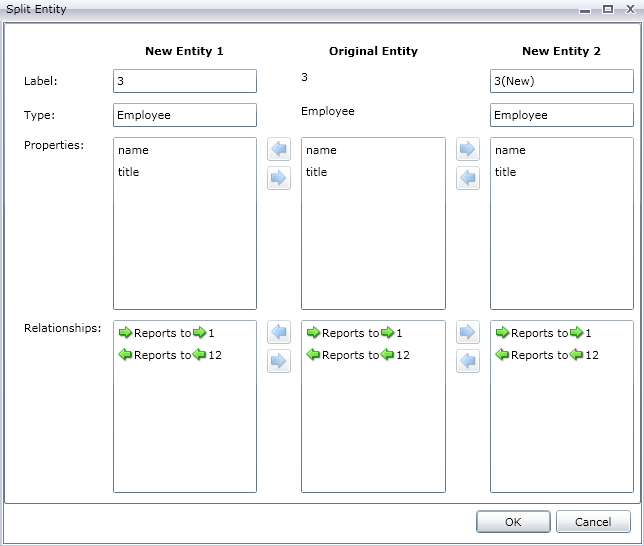
- Click the Split button on the Editing ribbon or right-click and select Split entity. The Split Entity dialog box will appear, with the Original Entity in the middle, New Entity 1 on the left, and New Entity 2 on the right. By default, all properties and relationships will appear for all three entities.
- If you want to change the labels for the new entities, enter new names in the Label field. In our example, we will keep the label as "3" because using the employee ID is consistent with the rest of the entities in the model.
- If you want to change the types of the new entities, use the
Type field. In our example, we will keep the type
for New Entity 1 as "Employee," but we will change New Entity 2 to
"Manager."Note: Each entity must have a unique combination of label and type. In our example, we can have two entities with the label of "3" since the types are different, but we could not have two entities with the label of "3" and a type of "Employee."
- Determine which properties you want tied to each entity by clicking a property and then using the blue arrows in between the entities in the Properties field. Our example will keep the "name" and "title" properties for both new entities because this information is useful as an employee and as a manager.
- Determine which relationships you want tied to each entity by clicking a relationship and then using the blue arrows in between the entities in the Relationships field. In our example, we will keep the outgoing "Reports To" relationship for New Entity 1 because that represents the relationship between Jim as an employee and his manager Tom. We will keep the incoming "Reports To" relationship for New Entity 2 because that represents the relationship between Jim as a manager and his employee Marcus.
The completed Split Entity dialog box for our example looks like this:
The model for our example has been updated with the two new entities. You can see that New Entity 1 is shown as an employee to Tom Smith, and New Entity 2 is shown as a manager to Marcus David.
