These instructions are specific to Windows platforms.
Attention: Ensure you have logged in to the client machine with
administrative rights.
-
From the Start menu, go to .
-
Double-click Data Sources (ODBC).
The ODBC Data Source Administrator window
opens.
-
Click either the User DSN tab or the System
DSN tab, depending on the type of DSN you wish to create.
-
Click Add.
-
From the list of installed drivers on the machine, select PostgreSQL
ANSI, and click Finish.
The
PostgreSQL ANSI ODBC Driver (psqlODBC) Setup
popup opens.
Attention: Select PostgreSQL ANSI
or PostgreSQL Unicode, based on the client
application through which the ODBC connection is to be
used.
-
In the popup, enter the following details to map this DSN to the desired model
store:
-
In the Data Source field, enter the name you
wish to assign to the DSN.
-
In the Database field, enter the name of the
model store to which you wish to connect through this DSN.
-
In the Server field, enter the name of the
machine on which the Spectrum™ Technology Platform server is
running.
-
In the Port field, enter the value of the
property
edf.odbc.socket.port, as configured in the
federation_config.properties file. See Common Configuration Properties.
By default, the port is 32751.
-
In the User Name field, enter the username of
the Spectrum™ Technology Platform server.
-
In the Password field, enter the password of the
Spectrum™ Technology Platform server.
-
Click Datasource in the
Options section.
The Advanced Options (PostgreSQL30) popup
opens.
-
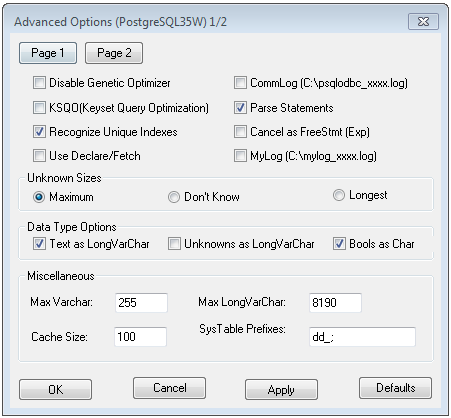
On Page 1, configure the options as below:
-
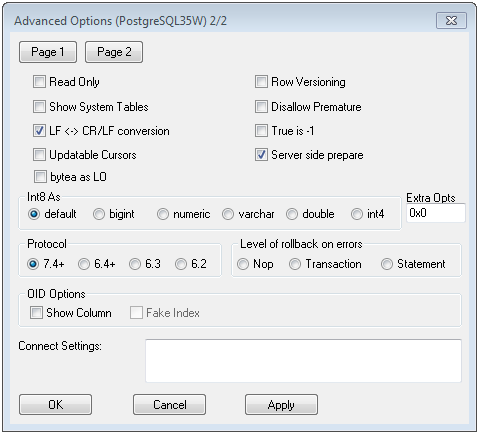
Click Page 2, and configure the options as
below:
-
Click OK to close the Advanced Options
(PostgreSQL30) popup.
-
Click Test to check if the created DSN connects
to the configured model store successfully.
Important: Ensure the model store is deployed to test the
DSN successfully.
-
Click Save.
The created DSN allows you to connect to the configured model store using
applications like MS Excel, MS Access.