Integrating with SAP Interaction Center WebClient

Before continuing verify these:

  • The Interaction Center WebClient user has the CRM_UI_PROFILE parameter ID with IC_AGENT as the Parameter Value
  • The duplicate option is activated in SPRO under ICWC (SPRO > CRM > ICWC > Define Account Identification Profiles)
To integrate Spectrum™ Technology Platform with SAP Interaction Center WebClient, you need to install supporting databases and dataflows on the Spectrum™ Technology Platform server, then configure your SAP system to communicate with Spectrum™ Technology Platform. Once you do this, users of SAP Interaction Center WebClient will have access to address validation and geocoding functionality from within SAP Interaction Center WebClient.
Note: The SAP Interaction Center WebClient is supported only for new installations of Data Quality connector.
  1. On the Spectrum™ Technology Platform server, install the databases required to perform address validation, geocoding, and tax jurisdiction assignment and define database resources for each database.

    You must give the database resources the following names.

    Database Required Name for Database Resource
    Enterprise Geocoding Module - Canada Database IGEO_CAN
    Enterprise Geocoding Module - U.S. Database EGM_US
    Enterprise Tax Module Database ETM
    Universal Addressing Module - Canada Database Canada
    Universal Addressing Module - Loqate Database Loqate
    Universal Addressing Module - U.S. Database UAM_US
  2. When you install the SAP Module, several dataflow files are automatically installed. Other dataflow files must be manually copied into Spectrum™ Technology Platform.
    1. If you are adding the Address Now Module, Enterprise Tax Module, or Universal Addressing Module to an existing installation, open Spectrum™ Technology Platform Enterprise Designer, select View > Server Explorer, and delete this dataflow: SAPValidateAddressWithCandidates.
    2. Go to: SpectrumFolder\server\modules\dataflows\sap.
    3. Review the following table then copy the applicable dataflow files to:

      SpectrumFolder\server\app\import

      If you are installing this set of modules Copy these dataflow files to the import folder
      Universal Addressing Module SAPValidateAddressWithCandidates.df SAPValidateAddressWithCandidates.UAM.df
      Enterprise Geocoding Module

      SAPValidateAddressWithCandidates.EGM.df

      Enterprise Geocoding Module
      Universal Addressing Module

      SAPValidateAddressWithCandidates.UAM_EGM.df

      Enterprise Tax Module
      Universal Addressing Module

      SAPAssignGeoTAXInfo.df
      SAPBatchAssignGeoTAXInfo.df

      SAPValidateAddressAndAssignGeoTAXInfo.df
      SAPValidateAddressWithCandidates.UAM_ETM.df

      Enterprise Geocoding Module
      Enterprise Tax Module
      Universal Addressing Module

      SAPValidateAddressWithCandidates.UAM_ETM_EGM.df

      Universal Addressing Module without Loqate


      SAPValidateAddressWithCandidate_UAM.df

      Universal Addressing Module without Loqate
      Enterprise Tax Module

      SAPAssignGeoTAXInfo.df
      SAPBatchAssignGeoTAXInfo.df

      SAPValidateAddressAndAssignGeoTAXInfo.df
      SAPValidateAddressWithCandidates.UAM_ETM.df

      Universal Addressing Module with Loqate

      ValidateAddressWithCandidates_UAM_Loqate.df

      Universal Addressing Module with Loqate
      Enterprise Geocoding Module

      ValidateAddressWithCandidates_UAM_Loqate_EGM.df

      Universal Addressing Module with Loqate
      Enterprise Tax Module

      ValidateAddressWithCandidates_UAM_Loqate_ETM.df

      Universal Addressing Module with Loqate
      Enterprise Geocoding Module
      Enterprise Tax Module

      ValidateAddressWithCandidates_UAM_Loqate_EGM_ETM.df

      Universal Addressing Module, Loqate only

      ValidateAddressWithCandidates_Loqate.df

      Universal Addressing Module, Loqate only
      Enterprise Geocoding Module

      ValidateAddressWithCandidates_Loqate_EGM.df

      Enterprise Geocoding Module

      GeocodeUSAddressWithCandidates.df
      ValidateAddressWithCandidates_EGM.df

      Enterprise Tax Module

      ValidateAssignGeoTAXInfo.df
      ValidateAddressWithCandidates_ETM.df
      SAPBatchAssignGeoTAXInfo.df

      Note: If errors occur in Management Console or Enterprise Designer, delete the contents of <WindowsTemporaryDirectory>\g1Assemblies, where <WindowsTemporaryDirectory> is one of these: %TMP%, %TEMP%, %USERPROFILE%, or the Windows directory. Typically, C:\Documents and Settings\<USERNAME>\Local Settings\Temp\g1Assemblies. After deleting the contents of this folder, log in again.
  3. Import .SAR files.

    A .SAR file is a file that contains a third-party add-on package for SAP, such as the Spectrum™ Technology Platform SAP Module. The .SAR file is located on the Spectrum™ Technology Platform installer in the SAP Objects folder. For information about importing .SAR files into SAP applications, see your SAP Basis administrator.

  4. Activate BC sets for CRM installation where ICWC is required (IC Web Client) - You have already assigned CRM_UI_Profile parameter to the user with appropriate roles and authorization.
    1. Log-on to the client where the settings for the Spectrum™ Technology Platform SAP Module is to be configured.
    2. Enter the transaction code SCPR20. This activates BC sets and places the default entries on the Spectrum™ Technology Platform customizing tables.
    3. In the BC Set field, enter keyword *hsgrp1* and find all the BC Sets in this namespace.
    4. Activate it with the options Overwrite All Data and Default Mode.


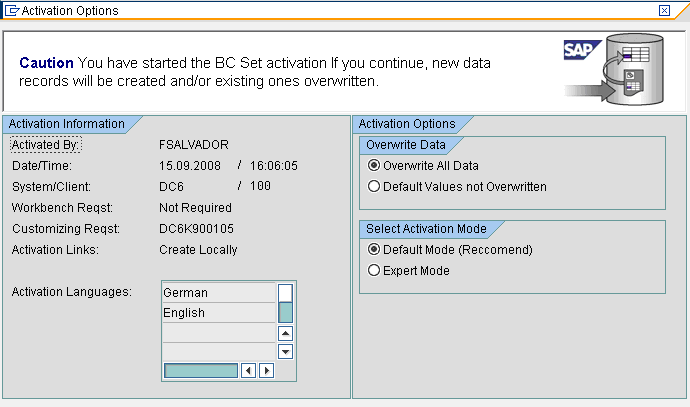
    5. Select and activate the BC sets with the activation options set to Overwrite All Data and Expert Mode
      Note: Activate these BC sets in the order listed.
      • /HSGRP1/BCSET_BC_BAS_DES
      • /HSGRP1/BCSET_BC_BAS_GTX
      • /HSGRP1/BCSET_BC_BAS_PV
      • /HSGRP1/FUZZY_SEARCH_INPUT_PARAM
      • /HSGRP1/ICWC_SETTINGS
      • /HSGRP1/MERGE_SETTINGS
      • /HSGRP1/ONP_PO_CRM
      • /HSGRP1/SPOD_CONFIG
      • /HSGRP1/SPOD_IN_TABLE
      • /HSGRP1/SPOD_OPT_TABLE
      • /HSGRP1/SPOD_OUT_TABLE
      • /HSGRP1/SPOD_PO_CRM
      • /HSGRP1/ICWC_SCRN_CFG
      Note: Ignore any activation error or warnings with BC Set: /HSGRP1/ICWC_SCRN_CFG
  5. Set up the RFC destination for Spectrum OnPremise
    1. Enter transaction code SM59.
    2. Click Create.
    3. In the RFC Destination field, enter a name of your choice.
    4. In the Connection Type field, enter G (HTTP connection to external server).
    5. In the Description 1 field, enter a meaningful description.
    6. Press the Enter key.
    7. Click the Technical Settings tab.
    8. In the Target Host field, enter the computer name or IP Address of the Spectrum™ Technology Platform server.
    9. In the Service No field enter 8080.
    10. Click the Special Options tab.
    11. Select No Timeout.
      Note: These steps are not valid for Spectrum OnDemand as it is not supported for ICWC.
  6. Use these steps to import the upload the ICWC configuration file (CQ7_All_Screen_Configurations.cfg). The file resides on the Spectrum™ Technology Platform installer at this location: SAP Objects\SAP CRM 7.0\data\inst_cs7.
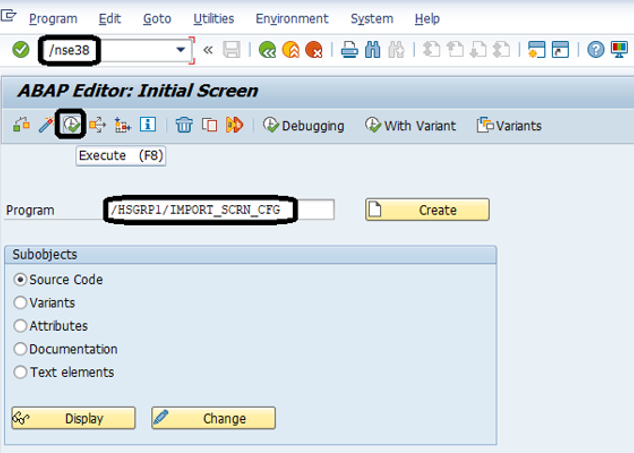
    1. On the initial screen, go to Tcode 'SE38' and enter '/HSGRP1/IMPORT_SCRN_CFG'
    2. Click Execute.

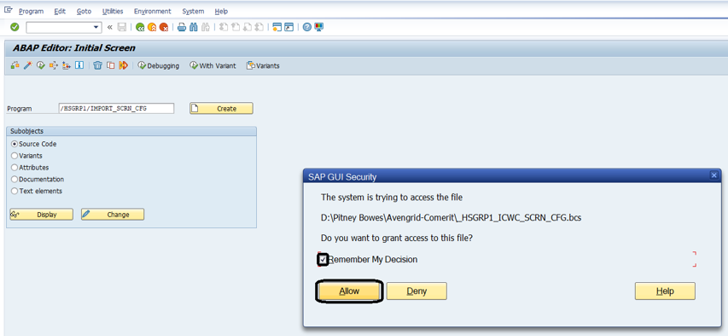
    3. Locate the CQ7_All_Screen_Configurations.cfg file and select it.
    4. Grant access as shown in the image below.
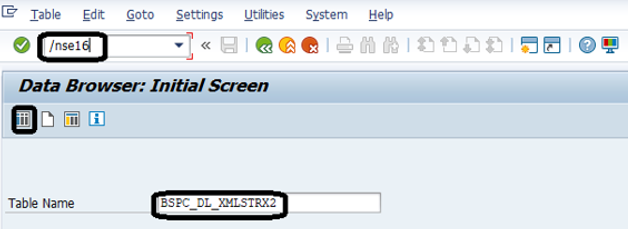
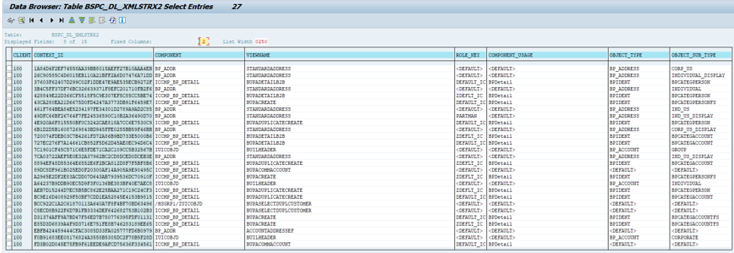
    5. Go to tcode SE16.
    6. Enter Table Name as BSPC_DL_XMLSTRX2.
    7. Click Table Content icon.

    8. Click the Execute icon.

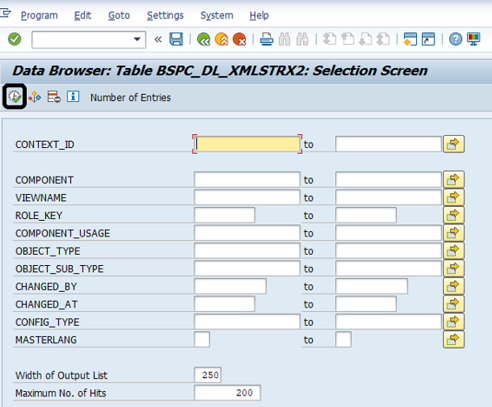
    9. Check these entries:

      Note: Ignore errors or warning messages related to missing users, as shown in the image below.

  7. Set up the Spectrum™ Technology Platform Logging Object
    1. Enter transaction code SLG0.
    2. Click New Entries.
    3. In the Object column, enter /HSGRP1/DQC.
    4. In the Object text column, enter DQC Logging.
    5. Save the change.
  8. Enable the Pitney Bowes IC WebClient Enhancement Set.
    1. Enter the transaction code SM30.
    2. In the Table/View field, enter BSPWDV_EHSET_ASG.
    3. Click Maintain.
    4. Click New Entries.
    5. In the Client field, enter the client number where the enhancement set will take effect.
    6. In the Enhancement Set field, enter /HSGRP1/ENHANCEMENT_SET.
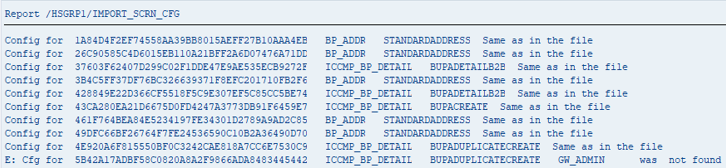
  9. Add the IC WebClient Configurations.
    1. Enter the transaction code BSP_WD_CMPWB.
    2. In the Component field, enter ICCMP_BP_DETAIL.
    3. Click the check icon.
    4. In the Enhancement Set field, enter /HSGRP1/ENHANCEMENT_SET.
    5. Click Display.
    6. Expand the Views folder and select /HSGRP1/BUPA_CMP_VIEW/BuPaDetailSelectDuplCustomer.


    7. Click the Configuration tab.
    8. On the edit screen select Full Name, Telephone, Street, City and Country context then click the right arrow button and arrange them in this order:
      • Full Name
      • Telephone
      • Street
      • City
      • Country
    9. Save the configuration.
  10. If you will be using French address validation, you must install the Data Normalization Module table cdq-TableLookup-SAP.tba on the Spectrum™ Technology Platform server. For more information, see the Spectrum™ Technology Platform Installation Guide.