Write to XML
The Write to XML stage writes the output of a job or subflow to an XML file.
Configuring the Write to XML Options
- Click the
 icon in the Data File field
and select the file to which you want the output written.Note: If the Spectrum Technology Platform server is running on Unix or Linux, remember that file names and paths on these platforms are case sensitive.
icon in the Data File field
and select the file to which you want the output written.Note: If the Spectrum Technology Platform server is running on Unix or Linux, remember that file names and paths on these platforms are case sensitive. - In the Schema section, perform these actions:
- Quick Add: Click this button, and from the fields
displayed in the pop-up window, select the fields that you want written
in the output file. Note: The fields displayed are from the input source connected to the Write to XML stage.The selected fields are displayed in a hierarchical structure. It shows the name of the element or attribute that will be written to the XML file. In parentheses following the element-attribute name is the name of the dataflow field followed by the data type, as in this example:
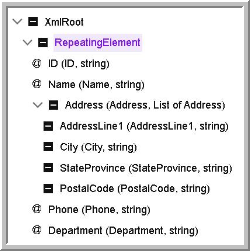 Note:
Note:The attribute is indicated by the "@" sign.
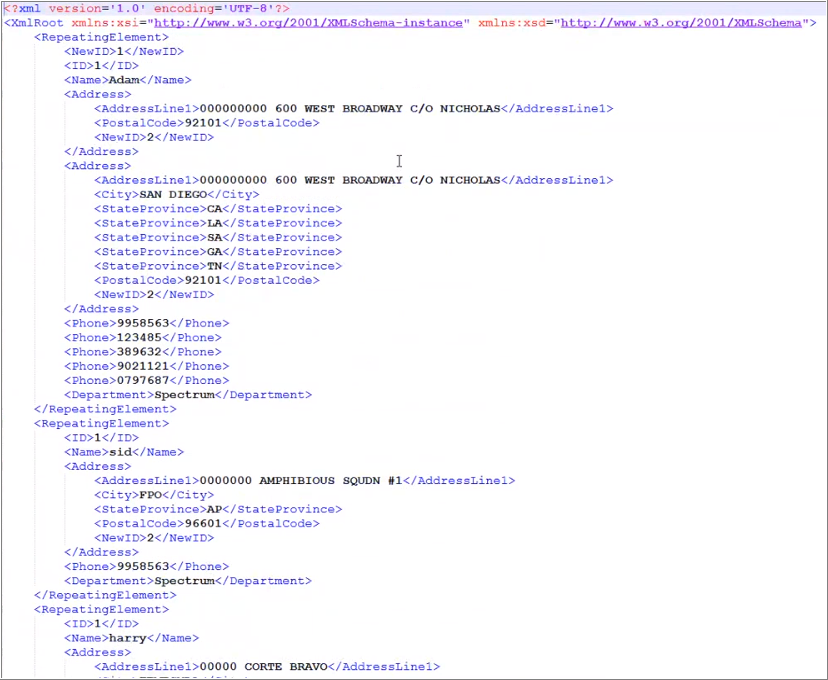
The attribute Name will contain the data from the field Name and it will be string data. Likewise, the element City will contain data from the City field and be string data. The XML file might look like this.
 Note: Every repeating element appears multiple times in the output.
- Quick Add: Click this button, and from the fields
displayed in the pop-up window, select the fields that you want written
in the output file.
- To modify fields, click it and make required changes using the Modify
Nodes tab.
- Modify Output type
- It specifies whether the dataflow field should be written to an XML
element or attribute.Note: This option is available if you are modifying a simple field.
- Element
- Select this to write the field's data to an XML element. Specify the element name you want to use in the Element name field.
- Attribute
- Writes the field's data to an attribute of the parent element. Specify the attribute name you want to use in the Attribute name field.
- Modify Element name/Attribute name
- Specifies the name of the element or attribute to be written to the
XML file. The default name is the dataflow field
name.Note: Dataflow field displays the field whose data will be written to the element or attribute. This is displayed so that if you change the element or attribute name to something different you can still see which field's data is contained in the element or attribute.
- Include empty fields
- Check this box to include XML elements that have a null value or no
data also in the output file. If you do not check this box, empty
elements will not be included in the output.
For example, if you define an element named
<City>but there is a record that does not have any data in the City field, the XML output will contain the following if you check Include empty fields:<City xs:nil="true"></City>If you do not check this box the
<City>element will not be written to the output file.
- Namespace
- If you want to specify an XML namespace to use for the element or attribute, select it here.
- Change all children to: It specifies the type of XML you
want the complex element to contain. Click on the element and select one of the
options:Note: This option is available if you are modifying a complex element.
- Element: All simple fields under the element are written as XML elements.
- Attributes: All simple fields under the element are written as XML attributes.
- To remove the selected field from the output,click the
Delete icon
 .
Note: If you remove a list field, all child fields are also removed. If you remove a child field, just the selected child field is removed from the list field.
.
Note: If you remove a list field, all child fields are also removed. If you remove a child field, just the selected child field is removed from the list field. - To reorder the selected fields, use the Move Up/Move Down
icon
 , as needed.Note: You cannot move simple elements into complex elements. If you want to modify the elements in a complex element, you must modify your dataflow's Aggregator stage to include the dataflow fields you want in the complex element. For more information, see Creating Complex XML from Flat Data.
 - To replace the currently defined fields with the fields coming to this stage
from upstream channel, use the Regenerate icon
 .
.