Integrating with SAP
To integrate Spectrum Technology Platform with SAP, you need to install supporting databases and dataflows on the Spectrum Technology Platform server, and then configure your SAP system to communicate with Spectrum Technology Platform. Once you do this, users of SAP will have access to address validation and geocoding functionality from within SAP.
-
Activate the business configuration (BC) sets. The
activation options and sequence differs for ECC and CRM installations.
-
Activate BC sets for ECC and S/4 HANA installations
- Log on to the client where the settings for the Spectrum Technology Platform SAP is to be configured.
- Enter the transaction code SCPR20. This activates BC sets and places the default entries on the Spectrum Technology Platform customizing tables.
- In the BC Set field, enter keyword *hsgrp1* and find all the BC Sets in this namespace.
- Activate it with the options Overwrite All
Data and Default Mode.
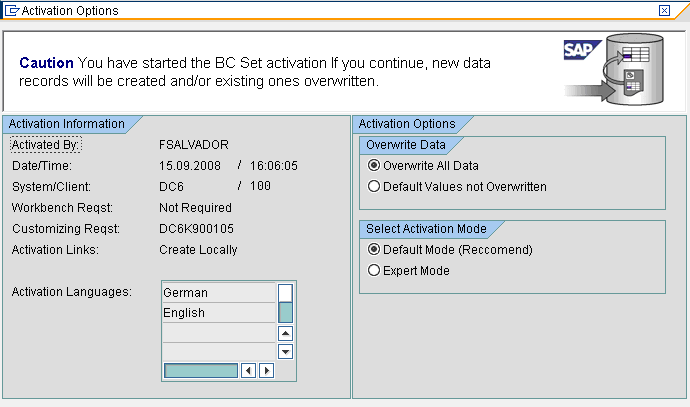
- Select and activate the BC sets with the activation options set
to Overwrite All Data and
Expert ModeNote: Activate these BC sets in the order listed.
- /HSGRP1/BCSET_BC_BAS_DES
- /HSGRP1/BCSET_BC_BAS_GTX
- /HSGRP1/BCSET_BC_BAS_PV
- /HSGRP1/BCSET_BUPA_CUSTOM
- /HSGRP1/BCSET_DQC_CUSTOM
- /HSGRP1/BCSET_VENDOR
- /HSGRP1/DD_TCODE
- /HSGRP1/FUZZY_SEARCH_INPUT_PARAM
- /HSGRP1/MERGE_SETTINGS
- /HSGRP1/ONP_PO
- /HSGRP1/SPOD_CON_TABLE
- /HSGRP1/SPOD_IN_TABLE
- /HSGRP1/SPOD_OPT_TABLE
- /HSGRP1/SPOD_OUT_TABLE
- /HSGRP1/SPOD_PO
-
Activate BC sets for CRM installations where ICWC isn’t required (IC
Web Client)
- Log on to the client where the settings for the Spectrum Technology Platform SAP is to be configured.
- Enter the transaction code SCPR20. This activates BC sets and places the default entries on the Spectrum Technology Platform customizing tables.
- In the BC Set field, enter keyword *hsgrp1* and find all the BC Sets in this namespace.
- Activate it with the options Overwrite All
Data and Default Mode.
- Select and activate the BC sets with the activation options set
to Overwrite All Data and
Expert ModeNote: Activate these BC sets in the order listed.
- /HSGRP1/BCSET_BC_BAS_DES
- /HSGRP1/BCSET_BC_BAS_GTX
- /HSGRP1/BCSET_BC_BAS_PV
- /HSGRP1/BCSET_BUPA_CUSTOM
- /HSGRP1/BCSET_DQC_CUSTOM
- /HSGRP1/BCSET_VENDOR
- /HSGRP1/DD_TCODE
- /HSGRP1/FUZZY_SEARCH_INPUT_PARAM
- /HSGRP1/HYBRID_CONFIG
- /HSGRP1/MERGE_SETTINGS
- /HSGRP1/ONP_PO
- /HSGRP1/SPOD_CON_TABLE
- /HSGRP1/SPOD_CON_ENTRY
- /HSGRP1/SPOD_IN_TABLE
- /HSGRP1/SPOD_OPT_TABLE
- /HSGRP1/SPOD_OUT_TABLE
- /HSGRP1/SPOD_PO
- /HSGRP1/SPOD_SSE_ENTRY
-
Activate BC sets for ECC and S/4 HANA installations