Configuring scorecard
- Adding data quality dimensions on the basis of which scoring is to be performed
- Adding and configuring rules for every DQ metric
- Defining the threshold percentages for categorizing the data as bad, acceptable, or good
-
On the Create Scorecard page, from the
Entities list, select the entity for which you want
to define the DQ dimensions and perform one of these steps, based on whether you
want to select a DQ metric from the list or define a new one.
- Click the Add DQ Metric
 icon, and select the required parameter
from Accuracy,
Consistency, and
Completeness.
icon, and select the required parameter
from Accuracy,
Consistency, and
Completeness. - To define a new DQ metric, click Add DQ Metric, write your parameter where the cursor is blinking, and press the Enter button on your system.
The selected DQ metric is displayed as a tab adjacent to the Add DQ Metric tab. - Click the Add DQ Metric
-
In the Rule Builder, build your rule by using the
Select Column and Select
Operator drop down lists.
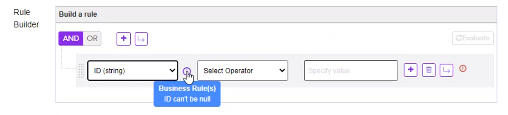
- The Select Column drop-down lists all the columns
in the selected data source along with the data type. For example,
PartyID (string).Note: For models built upon the Business Glossary entities, the properties of the entities are displayed here. For example, in case of a Party Business Glossary entity, the property can be Party ID (string).Note: If you have specified a business rule for the properties of the business glossary entities, it will be displayed here as suggestion. See the example of ID (string) property in the image below.
- The Select Operator drop-down lists the
operators. These are the operators that display based on the data type
of the column you selected: exists in,
equal, greater than or
equal, equal, less
than, is between, ends
with, contains, is not
null, not equal, less
than or equal, is null,
greater than, is not
empty, starts with,
matches, is null,
is empty, matches semantic
type, Does not contain,
Does not end with, and Does not
start with.
- To make use of the custom semantic types defined in the Glossary, use the matches semantic type opeator. When you select it, the custom semantic types defined for the selected data type are displayed in the adjoining drop-down list. For example, if you have defined BusinessParty and PassportNumber as two custom semantic types for the string data type, these two options will be shown to you when you select PartyID (string) as the column and matches semantic type as the operator.
- Use the Is between operator to fetch the values lying in between two primitive integer and primitive date type data.
- Use the text box after Select Operator to enter
values for the expression.Note: Avoid using anchor operators, such as ^ (beginning of line) and $ (end of line) in the regular expression, as these are not supported by Lucene’s regular expression engine.
- To build multiple conditions, click the Condition button, and use the AND OR slider to join the multiple conditions.
- To create another group of conditions, click the Group button.
- Drag the conditions set up and down and across the groups to build the needed expression.
The expression you built is displayed as Rule Expression. - The Select Column drop-down lists all the columns
in the selected data source along with the data type. For example,
PartyID (string).
-
To edit rule details, click the Edit rule
 icon in the Actions
column.
icon in the Actions
column.
-
To delete the rule, click the Delete rule
 icon in the Actions
column.
icon in the Actions
column.
-
Click the forward arrow
 on the top right of the page to move to
the next stage in creating scorecard.
Note: At any point, to go back and edit details in the previous stage, click the backward arrow
on the top right of the page to move to
the next stage in creating scorecard.
Note: At any point, to go back and edit details in the previous stage, click the backward arrow on the top right of the
page.
on the top right of the
page.