Applies to:
- Winshuttle Foundation
Configuring Winshuttle Workflow SV Service
SVService is a service that performs asynchronous processing, such as sending emails and processing email approvals. SVService drives all tasks that are completed within Winshuttle Workflow, and a scheduled task must be configured on the Workflow Front End (WFE) server in order to activate SVService processes.
When the task runs on the server, the SVService process connects to a queue in the Workflow database and processes items line by line. These items include things such as: emails, notifications, tasks, and plugins.
Note: If you have configured multiple front-end Web servers on your farm, SVService should only be run on 1 server, and preferably on the main SharePoint server of your farm.
The following section walks you through setting up SVService as a scheduled task for Windows Server 2008 SP2 (and later).
Note:
|
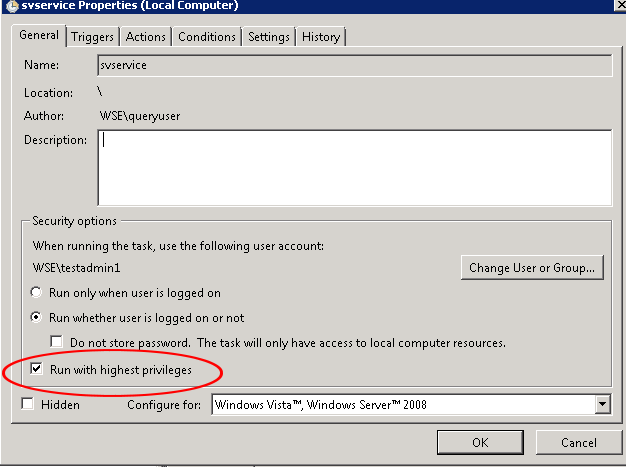
By default, your SVService scheduled task should be configured as shown below.
Configuring SVService as a scheduled task
- Click Start, click Administrative Tools, and then click Task Scheduler.
- In the Actions pane, click Create Task.
- For the name of the task, type WinshuttleWorkflow.
- Select the Run whether user is logged on or not option.
- Select the Run with Higher Privileges check box.
- Click Change User orGroup. In the Select User or Group pop up box, enter the Winshuttle Workflow Administrator account name and click OK.
- On the Triggers tab, click New.
- Under Settings, select Daily, and then set the task to repeat every 5 minutes for a duration of indefinitely. Click OK.
- On the Actions tab, click New.
- Click Browse and select the executable \Program Files\ShareVis\bin\svservice.exe
- In Add arguments, type –exit. Click OK.
The parameter
–exitis used so that after the SVService process has completed, the scheduled task on the server properly completes itself. - Click OK, re-enter your credentials if prompted and save the task.
NOTE: Make sure to run SVService in the context of Workflow Admin. In addition, open SVService Properties, and on the General Tab make sure Run with highest privileges is selected.

Additional information
If you have multiple Web Applications and want to create different Scheduled Tasks for each one, you can add a parameter that will point SVService to a specific Web Application:
Workflow 10.7 or earlier
Use –configpath or –c parameter to do this.
|
Example: |
Workflow version 10.8 or later
Use –configurl or –c to do this.
|
Example: |
The examples above describe the most likely scenarios for the SVService process. If you believe that you need to have more than one SVService process, or would like to discuss deeper optimization, please reach out to Winshuttle Support.
See SVService types for descriptions of other SVServices.
