Creating a Reference Field
- Open the print stream in which you want to create the field. For more information, refer to Opening a Print Stream.
- Click Field > Create Empty Field. (If the Fields list is empty, you cannot select Create Empty Field from the Field menu. Go to step 3.)
If you defined or edited a field that has not been saved or added to the Fields list, the Field Information Has Changed window is displayed. Click Yes to save the field or No if you do not want to save the changes to the field.
- Use the mouse to select the static text that will serve as the reference point for the field. For example, if you want to create a field to capture the sender, you would set the text "FROM:" as the reference point because the name of the sender will follow this text.
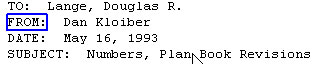 Note: If you click on any alphanumeric string that is delimited by a blank (or that is delimited by a hex value that is less than 20), such as a word or ZIP Code™, Visual Engineer Plus automatically selects and outlines the string.
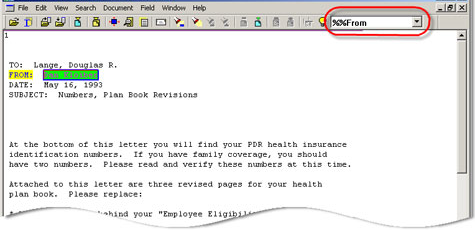
 - Click Field > Set Reference. The Field Reference dialog box is displayed.
- Fill in the fields and click OK. For more information, see Editing Field Reference Properties.
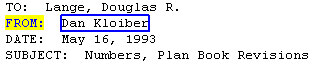
- The field reference is highlighted in yellow. Use the mouse to select the location of the data you want to capture in the field. Continuing the example above, if you want to create a field to capture the sender and you have defined "FROM:" as the reference point, you would select the actual name, as shown below.
- Click Field > Set Location. The Field Reference dialog box is displayed.
- If you are prompted with a Create Field window, select one of the following:
- Create field from reference: Select this option if the field's position is relative to some other printable element in the print stream. For example, if you want to create a field that contains an account number and the account number data always appears after the string
"Account Number: ", then you would use the string as a reference. - Create field from position in print stream: Select this option if the field's position is always the same in the Data view. This option is most often used with line data. It has limited use with AFPDS and Metacode because in these print streams text is always specified with coordinates.
- Create field from position on page: Select this option if the field's position is determined by an absolute position specified on the page. This option is available only if the text you selected is preceded in the underlying print stream by an absolute position. Consider the following example:
John Smith
123 Main St.
Anytown, IL 60532
If the string
"John Smith"is positioned by the print stream with an absolute X position of 600 pels and an absolute Y position of 400 pels, but the string"123 Main Street"is positioned using "relative X position of -300 pels" and "relative Y position of 100 pels", then you could choose the Create field from position on page option for the name "John Smith" and the field's position would be determined by the absolute positioning specified in the print stream data. The option Create field from position on page would not be available for the string"123 Main St."because the print stream uses relative positioning to place the text on the page.
- Create field from reference: Select this option if the field's position is relative to some other printable element in the print stream. For example, if you want to create a field that contains an account number and the account number data always appears after the string
- Complete the fields and click OK. For more information, see Editing Field Properties.
- If you do not have a control file open, select Field > Add Field To List to add the field to the Fields list. If you have a control file open the field is added automatically to the Fields list.
- Verify that the field was properly defined. To do this, generate a report of all values for the field. For more information, see Reporting Field Values.