
Setting Environment Preferences
The Environment window lets you change global settings related to the operating environment and appearance. To access this window, open a control file and then select Options > Environment.
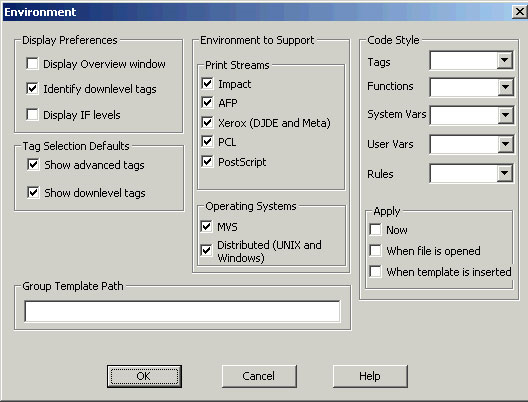
Display Preferences
- Display Overview window: Select this check box to automatically open the Application Overview window when you start the Visual Engineer. The Application Overview window provides a graphic outline of your control file. For more information, see Using the Application Overview.
- Identify downlevel tags: Select this check box to identify any downlevel tags you include in your control file with a wavy blue underline. Clear this check box to identify downlevel tags in the same manner as current tags.
- Display IF levels: Select this check box to display a bar connecting the IF level structures. Clear this check box to display the control file with marking the IF level structures.
Environments to Support
- Print Streams
- Impact: Select this check box to display tags that are valid for impact print streams. Clear this check box to hide tags that are valid for impact print streams.
- AFP: Select this check box to display tags that are valid for AFP print streams. Clear this check box to hide tags that are valid for AFP print streams.
- Xerox (DJDE and Meta): Select this check box to display tags that are valid for Xerox print streams. Clear this check box to hide tags that are valid for Xerox print streams.
- PCL: Select this check box to display tags that are valid for PCL print streams. Clear this check box to hide tags that are valid for PCL print streams.
- PostScript: Select this check box to display tags that are valid for PostScript print streams. Clear this check box to hide tags that are valid for PostScript print streams.
- Operating Systems
- MVS: Select this check box to display tags that are valid for use on a z/OS operating system. Clear this check box if you are not running EngageOne™ Enrichment on z/OS to hide tags that are valid on z/OS.
- Distributed (UNIX and Windows): Select this check box to display tags that are valid for use on UNIX or Windows. Clear this check box to hide tags that are valid for use on UNIX or Windows.
Code Style
- Tags: Select one of the following to determine the case of the tags in your control file:
- As Is to leave the case of the tags as they exist.
- Lower to change the case of the tags to all lowercase letters.
- Upper to change the case of the tags to all uppercase letters.
- InitCap to change the case of the tags to initial capitalization.
- Functions: Select one of the following to determine the case of the functions in your control file:
- As Is to leave the case of the functions as they exist.
- Lower to change the case of the functions to all lowercase letters.
- Upper to change the case of the functions to all uppercase letters.
- InitCap to change the case of the functions to initial capitalization.
- System Vars: Select one of the following to determine the case of the system variables in your control file:
- As Is to leave the case of the system variables as they exist.
- Lower to change the case of the system variables to all lowercase letters.
- Upper to change the case of the system variables to all uppercase letters.
- InitCap to change the case of the system variables to initial capitalization.
- User Vars: Select one of the following to determine the case of the user variables in your control file:
- As Is to leave the case of the user variables as they exist.
- Lower to change the case of the user variables to all lowercase letters.
- Upper to change the case of the user variables to all uppercase letters.
- InitCap to change the case of the user variables to initial capitalization.
- Rules: Select one of the following to determine the case of the rules in your control file:
- As Is to leave the case of the rules as they exist.
- Lower to change the case of the rules to all lowercase letters.
- Upper to change the case of the rules to all uppercase letters.
- InitCap to change the case of the rules to initial capitalization.
- Apply: Select one of the following to choose when to apply the environment settings.
- Now: Select this check box to apply the environment settings to the current code now. Clear this check box if you do not want to apply the environment settings to the current code now.
- When file is opened: Select this check box to apply the environment settings to a file when you open it. Clear this check box if you do not want to apply the environment settings to a file when you open it.
- When template is inserted: Select this check box to apply the environment settings to the template when you insert it. Clear this check box if you do not want to apply the environment settings to the template when you insert it.
Tag Selection Defaults
- Show advanced tags: Select this check box to display the advanced tags along with the basic tags. Clear this check box to display only the basic tags.
- Show downlevel tags: Select this check box to automatically show the downlevel tags in the selection list on the Insert a Tag dialog box. Clear this check box to display only the current tags in the selection list on the Insert a Tag dialog box.
Group Template Path
If you customized the tag group templates, type the path of the new templates. If you do not type the path of the new templates, the Visual Engineer will insert the default templates. For information about using customized tag group templates, refer to Using Tag Group Templates.
Refreshing the Print Stream View
When you modify a control file and have the print stream open in the graphic viewer or data viewer, the changes you make are not reflected in the print stream viewer unless you select View > Refresh. Note that this will not refresh the print stream with changes you make to the rules section of the control file.