Translating Data Model Entities
EnterWorks data model objects have translatable multi-language fields, such as their name and description. For translating entire data model objects and their attributes, use the Export and Import multi-languages functions described in this section.
Exporting Data Model Entities for Translation
Exporting data model entities for translation is performed in the Enable Classic UI.
To access the Multi-Language function:
- Log into the Enable Classic UI.
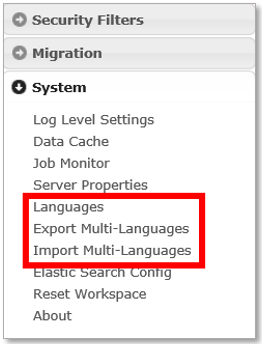
- From the Feature Bar, open the System
tab, and select Export Multi-Languages.
Open Multi-Language Export
- The Multi-Language Export window will open.
|
Multi-Language Export Window |
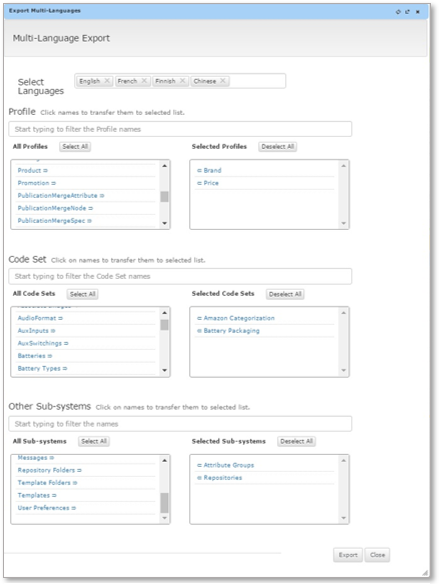
The Export Multi-Languages window has four sections
- Select Languages: This section allows you select which language(s) are available for translation. Only active languages are available for translation.
- Profile: Selecting profiles exports a profile’s name, description fields as well as every profile’s attribute name and description fields.
- Code Set: Selecting code set exports a code set’s name and description field along with each code sets codes description field
- Selecting Other Sub-Systems:
Other Sub-systems cover the rest of the data models that can be
translated, which include:
- Attribute Groups
- Attribute Tabs
- Code Set Folders
- Data Sources
- File Definitions
- Groups
- Import Template Folders
- Languages
- Repositories
- Repository folders
- Templates
- User Preferences
The sub-systems Messages contain all EPIM interface labels and messages; steps for this translation are in Translating EnterWorks Labels and Messages.
Once you have finished selecting language(s) and data model(s), simply click the Export button at the bottom right of the page, this will generate a link that downloads a csv file for the data model(s) selected.
The generated link can come in either one of two background colors.
A successful export will generate a link similar to the picture below with a green background.

An unsuccessful export will generate a link similar to the picture below with a yellow background, information is added to describe what failed to export.

Clicking the link will download a csv zip file. The steps below cover how to add translations to these files.
- Extract file(s) to your computer
- Open a new Excel file.
- Select the Data tab.
- In the Get External Data section of the data tab, select From Text.
- In the file explorer that appears navigate to the extracted data model file(s).
-
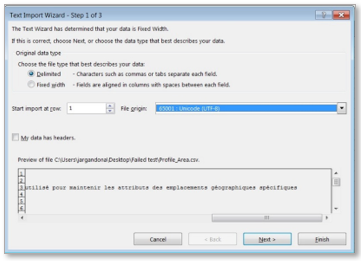
In the Text Import Wizard that appears select the Delimited radio button. In the file origin dropdown list
select Unicode (UTF-8). An example is shown below:
-
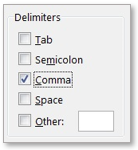
Click Next and in the following window, in the Delimiter section verify that only the Comma checkbox is selected. An example is shown below:
-
Click Finish. Place the data in the upper left corner
cell (A:1) and click Ok.
The image below is the general format for each exported data model object.
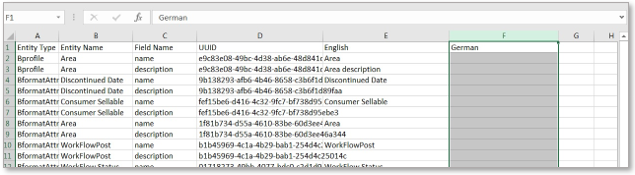
- From this point, translate the default language column values into the
language column(s) selected for translation. Pictured above is an example
of German translations for a profile named Area and its attributes.
NOTE: The default language will always display with its own column and values.
-
For Chinese, Korean, Japanese and languages that are made primarily of
special characters, follow these extra steps, otherwise simply save as a
csv file.
- Save file as Unicode text.
- Close Excel.
- Open Unicode file with Notepad++.
- Select all text and crtl-F.
- Select the Replace tab.
- In the search mode section, select the Extended radio button.
- In the section Find what, enter “\t” and inReplace with section, enter “,”. Click Replace All
- Save with .csv extension.
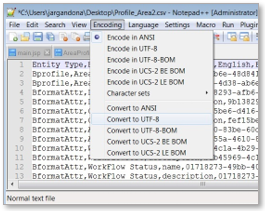
NOTE: The file must be saved in UTF-8 format. To verify open the file in notepad++ and check the encoding. Convert file to UTF-8 if it is not already and save the file again. An example is shown below.
Import Data Model Translations into EPIM via Enable Classic UI
Translated data model object csv files can be integrated through the Import Multi-Language function located in the System feature bar. A data model object csv file can be imported from your local machine by selecting the From Local tab, or from the application server by selecting the From Server tab.
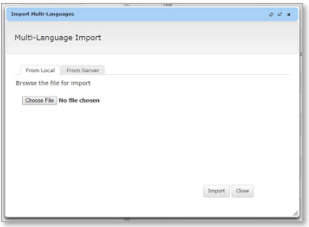
- To import translated data model csv files simply click Choose File, select the csv file, then click Import.
-
A new job is created from the import. Navigate to the job monitor and
open the log file for the import job. An example of a successful import log
file is shown below.

- If the import job was successful simply clear the data cache, log out and log back in with the language selected for translation and navigate to the data model object modified to view the results of your translation.
- For complete integration, change the Browser specified language. Steps to do so are outlined in the Browser Specific Language Setting section of this manual.
NOTE : Log file import failures may occur, due to incorrect formatting of csv file, repeat formatting steps if such an error appears in the log file.

Copyright 2007, 2023 Precisely