Import Records
Tip: To quickly import modifications or additions to a repository, export the repository to a spreadsheet, modify or add records to the spreadsheet, then import the spreadsheet.
Import Current View
To import data to a repository:
-
Open the desired repository in a Repository View, (see
Open a Repository in a Repository View).
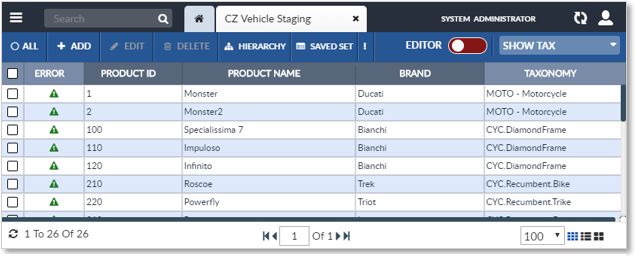
Repository View: Grid View
-
Open the More Actions dropdown by clicking the
 on the Repository View’s Activity Bar.
- Select the Import option.

Open the More Dropdown and Select Import
- The Import Configuration Step 1 window will appear.
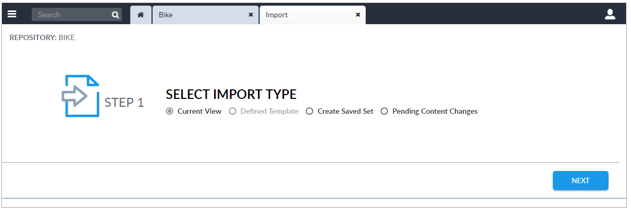
Import Records: Step 1
Step 1: Import Configuration
Select Current View as the type of Import to be performed.
- Current View: The record attribute values are imported simply from a delimited file or spreadsheet.
- Defined Template: Allows the user to specify an Import Template to be used. Import Templates are typically created by the system administrator.
- Create Saved Set: (Optional) Stores the imported records in a Saved Set.
- Pending Content Changes: (Optional) Select to enter changes that take effect in the future (see Events).
Click Next to continue to Import Configuration Step 3, Back to
return to Import Configuration Step 1, or click the Close icon ![]() on the Import tab to exit the Import procedure.
on the Import tab to exit the Import procedure.
Step 2: Import Configuration
|
Import Records: Step 2 |
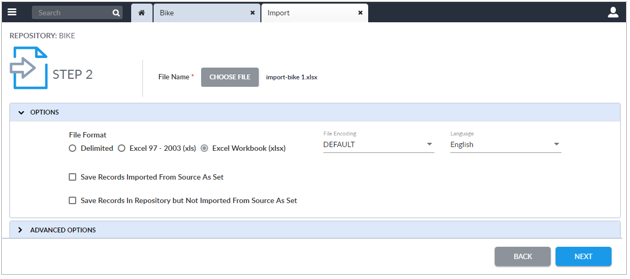
Edit the Option values in the Import Configuration Step 2 window:
- File Name: The name of the file to import.
- File Format: This option will be selected automatically based on the type of file selected above.
- File Encoding – Select the file encoding method. Optionally, leave as Default unless the data does not import correctly, then see the system administrator for the correct option.
- Language – Select the language for the export (for multi-language attributes).
- Save Records Imported from Source as Set – This option will create a Saved Set consisting of all records that have been imported.
- Send above Saved Set to Workflow – (This field only appears if the Import Type is Create Saved Set.) Set this checkbox if the records are to be sent into the workflow. It is just like editing each record and clicking the Save & Send button.
- Save Records in Repository but not Imported from Source as Set – This option will create a Saved Set of all records that were not affected by the import within the repository. This is used when updating all records within a repository, in order to identify any records that were not updated.
- Optionally, expand the Advanced Options and edit as
desired. Scroll through the Advanced Options as necessary
to access options.
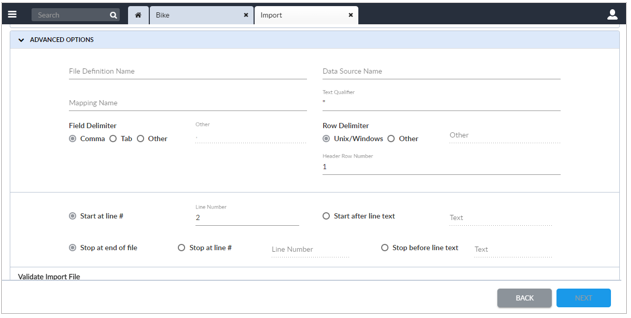
Import Records: Step 2 Advanced Options
The Advanced Options are described in the following table.
Note: To execute a predefined import without a template, save the temporarily created mappings using the File Definition Name, Data Source Name, Mapping Name, Save Mapping options.
|
Import Options |
Description |
|
File Definition Name |
It names the file definition object that will contain the columns found in the file. Most import jobs auto-generate this object then remove it after the import has completed. |
|
Data Source Name |
It names the data source object file that identifies the source. Most import jobs auto-generate this object then remove it after the import has completed. |
|
Mapping Name |
The name of the mapping object that will be created. Most import jobs auto-generate this object then remove it after the import has completed. |
|
Text Qualifier |
Enter the character(s) that indicate the start and end of a text string value. |
|
Field Delimiter |
Enter the character(s) that delimit field values in the import file. |
|
Row Delimiter |
Enter the character(s) that delimit rows in the import file. |
|
Header row number |
Defaults to 1. |
|
Start at line # |
Defaults to 2. |
|
Start after line text |
Enter the text that identifies the line before the start of the import records. |
|
Stop at end of file |
The default option. |
|
Stop at line # |
Instead of stopping at the end of the file, stop at the specified line number. |
|
Stop before line text |
Instead of stopping at the end of the file or at a line number, stop before reaching the entered line of text. |
|
Validate Import File Options: |
|
|
Non-Primary Key Data |
Use a non-primary key attribute as the primary key. |
|
Column Count |
If set, this option will flag any row having a different number of columns than the header row. |
|
Required Attributes |
This option will prevent a record that is missing required attributes from being imported. |
|
Unique Business Key (If defined in configuration) |
If a business key is defined in the profile, use it as the primary key. |
|
Column Data Type |
This option will prevent a record with incorrect data types from being imported. |
|
Sync In Options: |
|
|
Keep repository values if Import values are empty/null |
If the import file’s attribute value is empty, keep the existing attribute value instead of clearing the value. |
|
Update Only |
Only update records that already exist in repository; do not create new records. |
|
Disallow Null Primary Keys |
Ignore import record if any of its primary keys are blank. |
|
Create Only |
Only add new records, do not update any records that already exist in the repository. |
|
Use alternative primary keys |
Designate a combination of attributes as the primary key. |
|
File Contains Taxonomy Node |
Deprecated. |
|
Ignore white space |
Ignore any extra spaces before or after the data in the import file. This option defaults to checked. |
|
Extended Data in One Row Format |
Deprecated. |
|
If an error occurs, discard saved objects |
If an error occurs in the import process, the underlying import objects will be deleted |
|
Sync In |
Starts import job. Uncheck to save objects without starting import. |
|
Validate Afterwards |
|
|
Save Mapping |
Save underlying objects as mappings which can be rerun again: related to the use ofFile Definition Name,Data Source Name, and Mapping Name. |
|
Allow External Trigger |
Allow triggers to be executed. |
|
Force job to execute as a 1st-time data load |
Runs the job as if it were a first-time data load. This increases performance and decreases load time, however it may create duplicate records that will not have accurate record histories. |
|
Sync Format Date for PLT |
The format for dates found during the import process. It allows the user to ensure that all dates are consistently formatted. For information regarding this field, contact EnterWorks. |
|
Sync Scan XML for PLT |
For information regarding this field, contact EnterWorks. |
|
Sync Scan HTML for PLT |
For information regarding this field, contact EnterWorks. |
- Click Next to continue to Import Configuration Step 3, Back to return to Import Configuration Step 1 or click the Close icon
 on the Import tab to exit the Import procedure.
Step 3: Import Configuration
|
Import Records: Step 3: Verify Mappings |
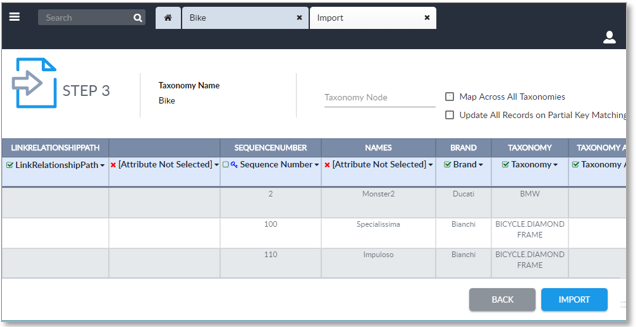
-
Verify the input records’ attribute field mappings.
If a file previously exported from a repository with the same profile is used and the column names were not changed, all the fields should map automatically.
A Primary Key indicator (blue key) will appear next to the name of the attribute that has been determined to be the primary key.
A Confidence Indicator is displayed next to each attribute name:
- Green box with green checkmark: Confidence is high that this attribute has been properly mapped.
- Green box: Request for confirmation that this attribute was properly mapped. To confirm, click the green checkbox.
- Red X: This attribute has not been mapped.

Import Records: Attribute Mapping Indicators
- If any column is not properly mapped, click its column header and select the correct attribute name.
-
Edit the rest of the configuration options.
- Taxonomy Node dropdown list - If all Category Attributes in the input file are associated with one Taxonomy node, the Taxonomy node can be selected and only those Category Attributes will be shown for selection mapping. This is particularly useful for implementations with large numbers of Category Attributes.
- Map Across All Taxonomies checkbox - If a field in the input file is a Category Attribute, use this checkbox to have the Category Attributes map automatically and/or show in the dropdown list for manual mapping. Category Attributes don’t show in the mapping list automatically because it could make the selection list very large.
- Update all records on partial key matching – This checkbox is used to update multiple records based on a partial key. This option should be used with care because one record in the input file could update multiple records in the database. It is recommended that the system administrator be contacted before using this option.
- Click the Import button to import the data file, click the Back button to return to the previous Import Configuration page, or click the Close button on the Import tab to quit without importing the data file.
Step 4: Import Configuration
An Import job is created and placed in the Job Queue. To view the job’s progress, open the Job Monitor from the Features Sidebar’s System tab or open a Job Monitor Widget in the Dashboard.
The Imported record files are prepared and made available for download and transmission. Upon completion, an Import Job Completed message will appear in the Import Configuration’s Step 4 window.
|
Import Job Completed: Step 4 |

The user can download any Job Status Files created by the Import procedure by clicking the buttons below the Job Completion Status message:
- Log File: Download the Job Log file. It contains status about the contents of the Import Job, the date and time the Import Job was run, completion status, and the number of records processed and imported.
- Output File: Not used during imports.
- Error File: May or may not be created.
The user can also download the resulting Job Status Files from a Job Monitor Widget.
|
Download/Transmit Job Monitor Files |
If a Saved Set was created, to view it:
- Click the Refresh icon
 on the bottom left of the Repository View and click the Saved Set
button on the Repository View’s Activity Tab.
on the bottom left of the Repository View and click the Saved Set
button on the Repository View’s Activity Tab.
- The Saved Set Sidebar will appear. Click on the Saved Set that was created to see the added or modified records

Copyright 2007, 2023 Precisely