Scheduled Cleanup
EnterWorks has a built-in Scheduled Cleanup feature that deletes log files, temporary files, and relic system files and records. If the files need to be archived before they are deleted, ensure that customized scripts are run frequently enough to archive the necessary files, (see Manually Archiving and Removing Files).
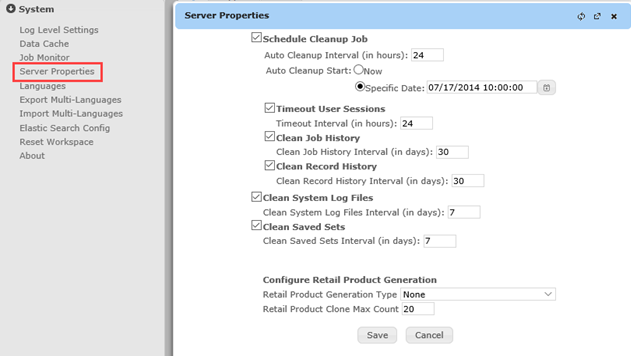
The Scheduled Cleanup function is managed in the Server Properties window, using the Classic UI. To access the Server Properties window, open the Feature Bar, open the System tab, and select Server Properties.

The configuration options for EnterWorks’ Scheduled Cleanup function are as follows.
-
Schedule Cleanup Job: The Scheduled Cleanup function deletes files and records according to settings for the cleanup jobs listed in this window. It also removes expired code set item histories.
The Scheduled Cleanup function is run according to the Auto Cleanup Interval and Auto Cleanup Start Date. It can also be run on demand by selecting the Now radio button.
-
Timeout User Sessions: The amount of time before idle users are logged out. This setting is discussed in the Change Notification Guide at .
-
Clean Job History: This feature removes job log files that are older than the threshold indicated. The recommended threshold is 24 hours.
-
Clean Record History: This feature removes record change history entries older than the specified threshold, on a per-record basis. The entry regarding a record’s creation is never deleted; only entries regarding changes to a record are deleted.
-
Clean System Log Files: This feature removes system log files (see System Log Files) and Shared Files that are older than the number of days specified. The recommended setting is 7-24 days.
-
Clean Saved Sets: The number of days to store saved sets that are automatically created by the system for tasks such as processing jobs and promoting records. The recommendation for clean-up is one day.
-
The Configure Retail Product Generation configuration options at the bottom of the System Properties window are deprecated.
Before exiting the window, make sure to click the Save button on the bottom of the window to save any changes you have made in the schedule.
