Installing a Cluster

Installing a cluster involves setting up one Spectrum™ Technology Platform server at a time. Each time you add a server you need to point it to an existing server which will act as a seed node. A seed node is a server that has a copy of the Spectrum configuration data that it can copy to a new node so that the new node's configuration is synchronized with the other nodes in the cluster. The following diagrams illustrate this process.

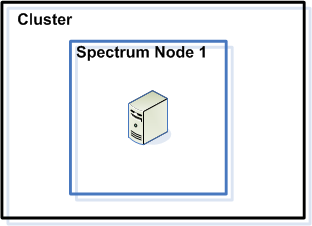
After installing the first node you will in effect have a cluster with only one node:


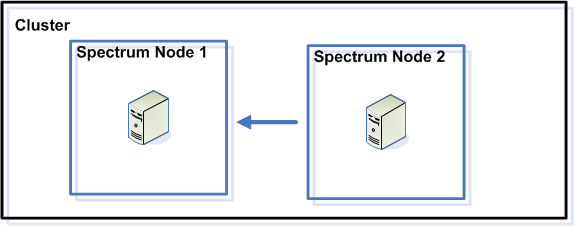
When you install the second node it must point to the first node as a seed node. This will enable the second node to receive a copy of the first node's configuration database, resulting in a cluster with two nodes with synchronized configuration information.


As you add additional nodes, the new nodes can point to any of the existing nodes as a seed node. You must also configure the first node to point to at least one other node in the cluster so that if it is ever brought down it can rejoin the cluster.


Before you begin, Install an appropriate load balancer. Follow the procedures described in the load balancer's documentation when installing.

Note: The load balancer must be configured to allow encoded forward slashes. If the load balancer does not allow encoded forward slashes you may get HTTP 404 errors while using the cluster. For example, if you are using an Apache load balancer, you can configure it to allow encoded forward slashes by opening the httpd.conf file and specifying this property: AllowEncodedSlashes On. For other types of load balancers, refer to the load balancer's documentation.

Once you have your load balancer installed, follow these steps to install nodes in the cluster.

  1. Install Spectrum™ Technology Platform on a server where you want to host a node. For instructions, see Installing a New Server.
    Important: Do not start the server when the installation completes. You must complete the following steps before starting the server.
  2. Configure the properties files.
    1. Edit the properties in file server/app/conf/spectrum-container.properties, as described in Cluster Properties.
    2. Save and close the spectrum-container.properties file.
    3. Some modules have module-specific settings that you must configure to enable the module to work in a cluster.
      Module Cluster Configuration Settings
      Advanced Matching Module These settings configure clustering for full-text search indexes. If you do not use full-text search indexes you do not need to configure these settings.

      Open this file in a text editor:

      SpectrumFolder\server\modules\searchindex\ es-container.properties

      Configure these properties:

      es.index.default_number_of_replicas
      Enter the number of additional copies you want created for each search index. This number should be the number of nodes in your cluster minus 1. For example, if your cluster has five nodes, you would enter "4" in this property.
      es.index.default_number_of_shards
      Enter the number of shards you want your index to have in the distributed environment. The more nodes that are in your cluster, the higher this number should be.
      Save and close es-container.properties when you are done editing these properties.
      Note: Search indexes created prior Spectrum™ Technology Platform 10.0 do not support clustering. To enable clustering for indexes created prior to the 10.0 release, you must recreate the search index using the 10.0 API after modifying the es-container.properties file.
      Data Hub Module Open this file in a text editor:

      SpectrumFolder\server\modules\hub\hub.properties

      Configure these properties:
      hub.models.path.base
      Specifies the folder where models are stored. By default, each model is placed in a subdirectory under the SpectrumFolder\server\modules \hub\db folder. If you want to store models in a different location, uncomment this property and specify the folder where you want to store models.
      hub.neo4j.database.type
      Change the value of this property to ha. The default value embedded is for non-clustered installations.
      hub.servers.per.cluster
      Uncomment this line. Set the value of this property to the number of Spectrum™ Technology Platform servers in the cluster.

      Save and close hub.properties when you are done editing these properties.

      The SpectrumFolder\server\modules\hub\ db\neo4j.properties controls how the graph databases are configured, using Neo4j Enterprise. This file is used as a template for each model. If needed, each model can be configured separately by placing a copy of this property file into the store directory for that model.

  3. Start the server. To start the server, change the working directory to the Spectrum™ Technology Platform server's bin directory, source the setup file, then type the following command: ./server.start .
  4. Repeat this procedure to install additional nodes in the cluster.
  5. After installing all the nodes, go back to the first node and add the other nodes as seed nodes.
    1. On the first node you installed, open the properties file server/app/conf/spectrum-container.properties.
    2. In the property spectrum.cluster.seeds, add the host name or IP address of the other nodes in the cluster, separating each with a comma: ipaddress1, ipaddress2,…,ipaddressn
    3. Save and close the spectrum-container.properties file. You do not need to restart the server.