Merging Entities
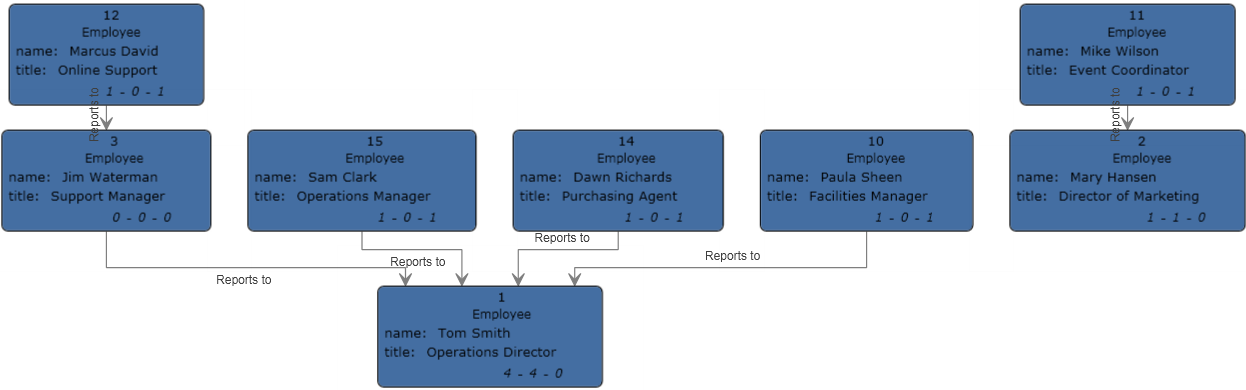
This feature enables you to merge two entities into one. If your model contains two entities that represent the same subject, you can merge them and their respective data together into one entity. Using the end result from Splitting Entities, you might want to merge together the entities for Jim Waterman, who has two entities in that model: one as a manager to Marcus David, and one as an employee of Tom Smith.
- With an existing model open, select two entities you want to merge. You can do this by clicking and dragging over the two entities, or you can click one entity and Ctrl-click the second entity.
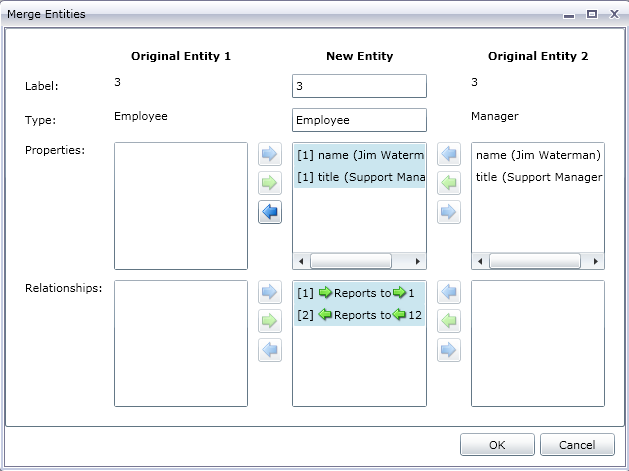
- Click the Merge button on the Editing ribbon or right-click and select Merge entities. The Merge Entities dialog box will appear, with Original Entity 1 in on the left, Original Entity 2 on the right, and New Entity in the middle.
- If you want to change the label for the new entity, enter a new name in the Label field. In our example, we will keep the label as "3" because using the employee ID is consistent with the rest of the entities in the model.
- If you want to change the type of the new entity, use the Type field. In our example, we will keep the type as "Employee."
- Determine which properties you want tied to the new entity by clicking a property and then
using the blue arrows in between the entities in the
Properties field. Our example will keep the
"name" and "title" properties for the new entity because this this is
consistent with the rest of the entities in the model. We can pull the data
for those properties from either of the two entities because the data is the
same ("Jim Waterman" and "Support Manager," respectively). Note that as you
add properties to the new entity, they are prefaced with a [1] or [2],
indicating the original entity that property came from.
Each property must have a unique name. Therefore, if you want to merge two properties with the same name but different data, you would need to modify the name of the property for one of the entities by clicking a property, clicking the green arrow to open the Advanced Property Mapping dialog box, and either accepting the default new name (which appends a number to the end of the property name, such as "name2") or entering a new name.
For example, if our organization chart model included start dates for each entity, Original Entity 1 (the employee role) might have a start date of 04/20/2000 and Original Entity 2 (the management role) might have a start date of 08/15/2004. If you wanted to include both start dates in the merged entity, you could click "start date" for Original Entity 1, click the green arrow, and either accept "start date2" or enter "original start date" in the New Name field.
- Determine which relationships you want tied to each entity by clicking a relationship and
then using the blue arrows in between the entities in the
Relationships field. In our example, we will keep
both "Reports To" relationships because they represent the relationships for
Jim as an employee and as a manager. Note that as you add relationships to
the new entity, they are prefaced with "[1]" or "[2]", indicating the
original entity that relationship came from.
Unlike properties, each relationship does not need to have a unique name. Two relationships can be merged into one new relationship by clicking the relationship, then clicking the green arrow to open the Advanced Relationship Mapping dialog box, doing nothing with the Label and Unique ID fields, and pressing OK. If you do merge two relationships into one, you will see it prefaced with "[1,2]"to represent that the relationship came from both original entities.
If you want to retain two relationships that have the same name, you would need to modify the name of the relationship for one of the entities by clicking the relationship, clicking the green arrow to open the Advanced Relationship Mapping dialog box, and entering something in the Unique ID field. After that, if the relationship has properties associated with it, you would also need to determine which properties should be carried over from the left and right relationships to the new relationship.For example, let's say that our organization chart model used titles instead of names and employee numbers, and that one of the employees worked for two people with the title of "Director." To merge those two relationships that say "Reports to Director" but keep them unique within the model, you would need to click one of the relationships, click the green arrow, and enter a unique identifier of some sort in the Unique ID field. In our case, that would probably be the name of the director, and you would repeat this action for the other director so both relationships for the entity include the respective director's name.
The model for our example has been updated with just one entity for Jim Waterman. You can see that the Marcus David entity (Jim's employee) is coming into the Jim Waterman entity, and the Tom Smith entity (Jim's boss) is going out of the Jim Waterman entity.