
Installing a Cluster with a Separated Configuration Database
This procedure creates two clusters: one for the server nodes and one for configuration database nodes. The nodes in the server cluster point to the servers in the configuration database cluster for their configuration data. The nodes in the configuration database cluster replicate their data between each other.
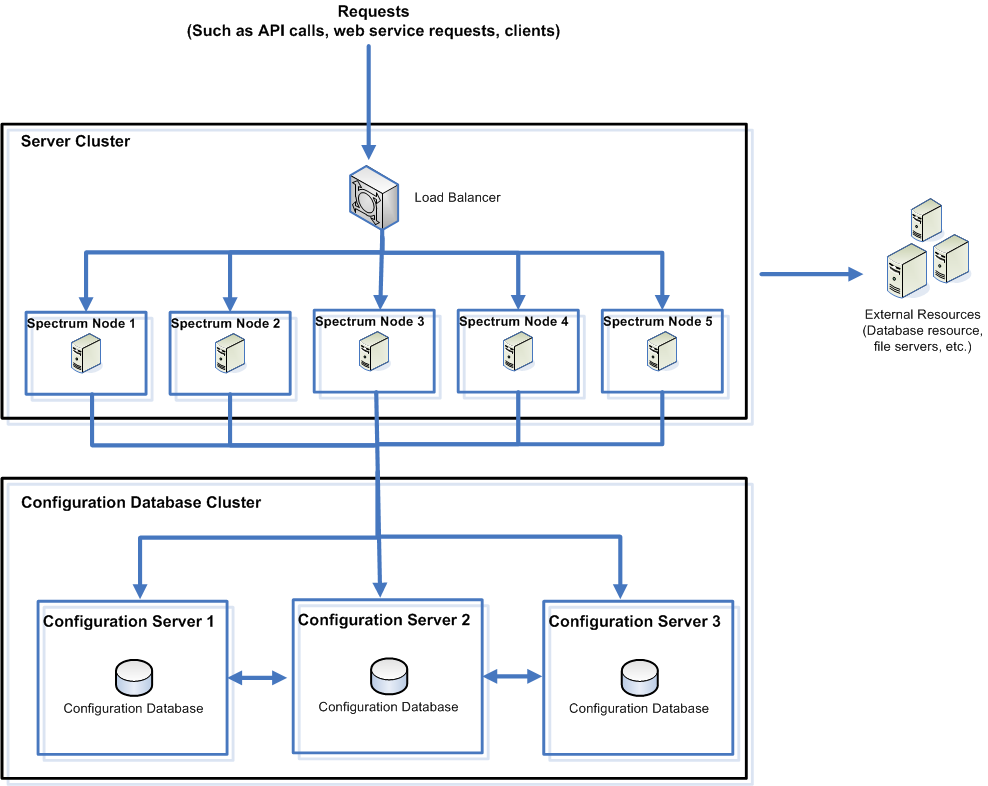
The following diagram illustrates this installation scenario:
To install a separate configuration database, you first install the configuration database on servers in a cluster, then install the server on nodes in a separate cluster. At least one configuration database must be running before you can install the server.
Note: In the case of a separated database configuration cluster setup, as shown here, you can apply load balancing only to the Spectrum server cluster. You cannot apply load balancing to the separated database cluster.
-
Place the Spectrum Technology Platform installer on the server where you want to install the configuration database.
Note: We recommend a minimum of three nodes per cluster.
- Double-click installdb.exe.
-
Install the configuration database on each node in the cluster.
Important: When prompted with the option to start Spectrum Technology Platform after the installation, you must disable this option so that the database does not start automatically when the installation completes.
-
Configure property settings on each node in the cluster.
-
Start each configuration database node in the cluster consecutively.
Right-click the Spectrum Technology Platform icon in the Windows system tray and select Start Spectrum.Note: Verify that the configuration database is fully started before continuing by opening the log file DatabaseDirectory\repository\logs\debug.log.
-
Install Spectrum Technology Platform on each node in the cluster.
Important:
- The installer will provide the option to auto start the Spectrum Technology Platform server. By default this option is not selected. Do not enable this option if installing a clustered environment.
- When installing each server select the Server only option in the installer and provide the host and port of one or more of the configuration database servers. You can find the port in the file SpectrumDirectory\Database\repository\spectrum-container.properties. The port is specified in the
spectrum.repository.server.connector.bolt.portproperty.
-
On each node, configure settings in the
SpectrumDirectory\server\conf\spectrum-container.properties
file.
-
On each node, configure settings for Search index.
-
Confirm the following setting on each node in the cluster.
- SpectrumDirectory\server\conf\spectrum-container.properties
spectrum.repository.cluster.mode=CAUSALNote: Thespectrum.repository.cluster.modesetting shown here is for the Spectrum Technology Platform server running in a cluster.
- SpectrumDirectory\server\conf\spectrum-container.properties
-
Start each server in the cluster.
Right click the Spectrum Technology Platform icon in the system tray and then select Start Spectrum.For more information, see Starting a Cluster.
-
On each node, open the SpectrumDirectory\index\elasticsearch.template file, insert the hash character
#to comment out the following line:# cluster.initial_master_nodes: node-1,node-2,node-3,...Important: This setting must be commented out after you start the cluster for the first time. It should remain commented out for all subsequent restarts of the cluster, as Elasticsearch handles adding and removing nodes after the cluster is started initially.