Preference Views
The Preference View capability allows users to define a view of repository record data by selecting which attribute values to display, the attribute display order, and which (of any) linked relationships to show. A Preference View establishes how record data will be displayed in the Repository View, Detail Editor Sidebar, and the Detail Editor Tab.
Preference Views are named and saved so they can be used again later. A Preference View can only be used with the repository it was created for.
Users can create their own Preference Views, share their Preference Views, select which (if any) Preference View to use, edit Preference Views, delete Preference Views, save Preference Views, select a Preference View to be their Default Preference View, and select a Favorite Detail Editor Tab Preference View.
If no Preference View has been designated as the Default Preference View or the Favorite Detail Editor Tab Preference View, when a repository or record is opened, all record attributes will be displayed.
Preference View in Repository View
To use a Preference View while viewing a repository:
-
Open the desired repository in a Repository View, (see
Open a Repository in a Repository View).
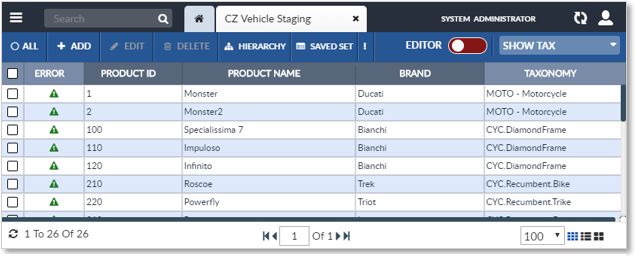
Repository View
- When a repository is opened, it will be displayed as defined in the Default Preference View. If no Default Preference View has been selected, all record attributes will be shown.
-
Expand the Preference View Dropdown in the Activity Bar.

Select a Preference View
- Select the desired Preference View. The repository will be displayed according to the format defined in the selected Preference View.
- To stop using a Preference View, expand thePreference View Dropdown in the Activity Bar and select No Preference.
Add/Edit a Preference View
To add or Edit a Preference View:
- Open the desired repository in a Repository View, (see Open a Repository in a Repository View).
|
Repository View |
- When a repository is opened, it will be displayed as defined in the Default Preference View. If no Default Preference View has been selected, all record attributes will be shown.
- Expand the Preference View Dropdown in the Activity Bar.
- To create a Preference View, select Add Preference.
- To edit a Preference View, select Edit Preference.
Select Add Preference

- The Add/Edit Preference window will appear.

Add Preference View: Details Tab
The Add/Edit Preference window has for tabs: the Details tab, the Attributes tab, the Sort tab and the Link Relation tab. See the following sections for details on each tab.
Details Tab
The Details tab contains basic configuration options.
|
Add/Edit Preference View: Details Tab |
Select the Details tab and set the values as desired. The configuration options are:
- Name: (Required) The name of the Preference View.
- Description: (Optional) A description of the Preference View.
- Listing View: (Required) Sets the default Listing View. It defaults to Tabular Grid. (For details regarding the Listing View, see Open a Repository in a Repository View .)
- At the bottom right of a Repository View, the Records Per Page drop-down list lets the user select how
many records are displayed on a page.
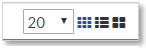
Records Per Page
- Define the Records Per Page drop-down list by setting the List Of Records Per Page and the Number of Records Per Page values.
- List Of Records Per Page: (required) The list of the available choices in the Records Per Page drop-down list. The field accepts a list of numbers separated by commas. It defaults to “20, 50, 100, 250”.
- Number Of Records Per Page: (optional) A drop-down list that sets the default number of records to display on a page. The list of values in the Number Of Records Per Page drop-down list is the list of values specified in List Of Records Per Page.
Note : The Name and Description fields can support multi-language translations. See the Multi-Language section of this document for additional information.
- Set As Default: (optional) If selected, the Preference View will be set as the Default Preference View. It will be active when the repository is first opened. If no Favorite Detail Editor Tab Preference View is active when a repository is opened, the Default Preference View will be active in the Detail Editor Tab and Detail Editor Sidebar as well.
- Set As Global: (optional). If selected, the Preference View will be available to all users.
- Set as Favorite for Detail Editor Tab: (optional) If selected, the Preference View will be used as the Favorite Detail Editor Tab Preference View. The Favorite Detail Editor Tab Preference View determines the format of record data in theDetail Editor Tab and Detail Editor Sidebar. If no Favorite Detail Editor Tab Preference View is active when a repository is opened, the Default Preference View will be active in the Detail Editor Tab and Detail Editor Sidebar as well.
- Display Image: (optional) Specifies if the Cover Flow capability is activated in Repository View. If selected, the following settings will appear:
- Image Context
: (optional) Allows the user to select the context of the displayed images,
such as: Lg (large), Med (medium), Original, Sm (small), or Thumbnail.
NOTE: Be careful what image size is selected as it could slow the load time of the records being displayed.
- Image/Row Height: (optional) Allows the user to override the default size of the Thumbnail and specify the images’ height in pixels. This also controls the size of the images displayed in Card View and Gallery View.
- Add Category Attributes of Selected Taxonomy node: If selected, Category Attributes will be displayed. For information regarding this field, contact EnterWorks.
- Select Next to switch to the Attributes tab or select Cancel to exit without saving the Preference View.
Note that only the creator of a global Preference View or a system administrator can modify or delete it.
Attributes Tab
The Attributes tab is used to select which record attributes will be displayed in the Preference View.
|
Add Preference View Attributes Tab |

On the Attributes tab, set the values as desired. The configuration options are:
- Repository dropdown list: (required) Lists the names of the repositories the Preference View can access to retrieve attributes to display. The value of the Repository field defaults to the name of the active repository (the repository the Preference View is being created for). The Repository dropdown list will only show linked repositories that are parents of the active repository.
- Select a repository from the Repository dropdown list.
- Attribute Filter: (optional) Filters the Available Attributes list so that it only displays attributes whose names contain the text specified in the Attribute Filter.
- Beneath the Attribute Filter field is the Available Attributes list. It displays the attributes of the repository selected in the Repository dropdown list, arranged in their Attribute Tabs. Click the > next to an Attribute to expand it. Click the < to collapse an Attribute Tab.
- Current Columns: (required) The list of attributes that will be displayed as columns in the Preference View. The display order of the columns is determined by the positions of the attributes in the Current Column list. The first attribute will be the first column, the second attribute will be the second column, etc.
-
To add an attribute in the Available Attributes list
to the Current Columns list, select the attribute and
click the Right Arrow icon
 . The attribute will be added
to Current Columns.
. The attribute will be added
to Current Columns.
- To remove an attribute from Current Columns, select
the attribute from Current Columns and click theLeft Arrow icon
 . The attribute will be removed from Current Columns.
- To change an attribute’s display order, select the attribute in Current Columns and use the Up-Arrow icon
 to move the attribute earlier in the display order or use the Down Arrow icon
  to move the attribute later in the display
order.
to move the attribute later in the display
order.
- Note that attributes may be provided in multiple languages. When adding a multi-language attribute to Current Columns, select the desired language version of the attribute. For more information, see the Multi-Language section in this document.
- Select Next to switch to the Link Relation tab or select Cancel to exit without saving the Preference View.
Note that the attributes listed in the Available Attributes list include an attribute group titled (STATE). The (State) attribute group contains system attributes that describe the state of the record. The Preference View treats these attributes like any other. They may be added to Current Columns field.
Attributes can be selected individually or as a group (shift-select the desired attributes). Attribute Groups and Tabs can also be selected and added; all their component attributes will be added to the Current Columns field.
Sort Tab
The Sort tab is used to select which attribute columns will be sortable.
|
The Sort Tab |
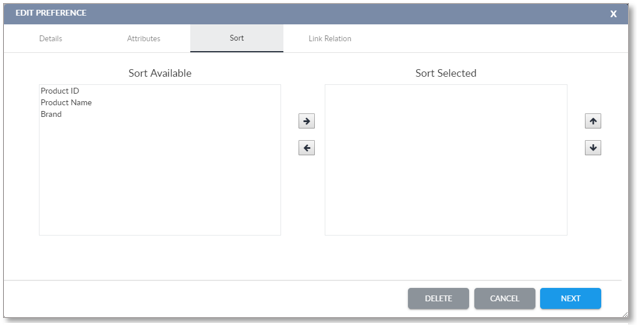
- The Sort Available list contains all the attribute
columns that are available to be sorted. The Sort Selected
list contains all the attribute columns that will be sortable. Use the
 button and the
  button to move attributes from one list to the other.
- Click Next to move to the Link Relation tab.
Link Relation Tab
The Link Relation tab is used to select which Linked Repositories will be displayed when a record is being edited.
|
Add Preference View Link Relation Tab |

Edit the Link Relation tab’s configuration options as desired.
- Preview Link Table: If desired, select a table to be displayed in the Record Preview. For more information about the Record Preview, contact EnterWorks.
- The Available Linked Groups list contains the Linked Relationship Groups in the repository (linked repositories) that are available to be displayed in the Preference View.
- If a Linked Table is to be displayed in the Record Preview, select the desired Linked Table from the Preview Linked Table dropdown. When the repository is viewed in a Repository View using Gallery View, this table will show up in the Record Preview. For more information on Record Preview, contact EnterWorks.
-
To add a Linked Group to Selected Linked Groups,
select the desired Linked Group from the Available Linked Groups list and click the Right Arrow icon . The Linked Group is added to Selected Linked Groups.
- To remove a Linked Group from SelectedLinked Groups, select the Linked Group from SelectedLinked Groups and click the Left Arrow icon . The attribute is removed from Selected Linked Groups.
- Select Apply to save and create the Preference View or select Cancel to exit without adding the Preference View.
The Selected Linked Groupslist contains theLinked Relationship Groups in the repository (linked repositories) that will be displayed in the Preference View.
Linked Groups can be selected individually or as a group (shift-select the desired Linked Groups).
Save a Preference View
If the user activates a Preference View, then changes the display options for the Repository View (such as the sort order, List View, or column width), the user can save the changed display options to the active Preference View.
- Open the desired repository in a Repository View, (see
Open a Repository in a Repository View).
Repository View
- Expand the Preference View Dropdown in the Repository View’sActivity Bar and select Save Preference.

Save the Preference View
The changes made to the active Preference View will be saved and applied in future uses of the selected Preference View.
Delete a Preference View
To delete a Preference View for a repository or record:
- Open the desired repository in a Repository View, (see Open a Repository in a Repository View).
- Expand the Preference View Dropdown in the Activity Bar. Select the desired Preference View.
Repository View
- Expand the Preference View Dropdown in the Repository View’s Activity Bar and select Delete Preference.

Select Delete Preference
- A Confirm window will appear that asks if you want to delete the preference. Select Yes. The Preference View will be deleted and the view will revert to the Default Preference View.
An alternative method of deleting a Preference View is through the Edit Preference window:
-
Open the desired repository in a Repository View, (see
Open a Repository in a Repository View).
Repository View
- Expand the Preference View Dropdown in the Activity Bar.

Select Edit Preference
-
The Edit Preference window will appear.

The Delete Button in the Edit Preference Dialog
- Select the Delete buttons on any tab. A Confirm window will appear that asks if you want to delete the selected preference. Select Yes and the active Preference View will be deleted. The view will revert to the Default Preference View.
Set Default Preference View
A repository’s Default Preference View is the view used when the repository is first opened in a Repository View. If no Favorite Detail Editor Tab Preference View is active when a repository is opened, the Default Preference View will be active in the Detail Editor Tab and Detail Editor Sidebar as well.
To establish a Preference View as the Default Preference View for a repository:
- Select a Preference View and open it in the Add/Edit Preference View dialog, (see Add/Edit a Preference View).
- On the Details tab, select Set As Default.

Set a Preference View as the Default
- Move to the Link Relation tab and select Apply to save your changes to the Preference View, select Cancel to exit without saving your changes to the Preference View, or select Delete to delete the Preference View.
Preference View in Detail Editor Tab
The Favorite Detail Editor Tab Preference View defines how record data will be displayed in the Detail Editor Tab and the Detail Editor Sidebar. When a record is opened in the Detail Editor Tab, it is displayed according to the Favorite Detail Editor Tab Preference View. If no Preference View has been designated as the Favorite Detail Editor Tab Preference View, the record will be displayed as defined in the repository’s Default Preference View. If no Default Preference View has been selected, all record attributes will be shown.
While in the Detail Editor Tab, the user can use Preference Views but not manage them. Preference Views can be chosen or disabled, but not edited, added, deleted, saved or resized.
Set Favorite Detail Editor Tab Preference View
To establish a Preference View as the Favorite Detail Editor Tab Preference View:
- Select a Preference View and open it in the Add/Edit Preference View dialog, (see Add/Edit a Preference View).
- On the Details tab, select Set As Favorite for Detailed Editor.

Select Set as Favorite for Detailed Editor
- Move to the Link Relation tab and selectApply to save your changes to the Preference View, select Cancel to exit without saving your changes to the Preference View, or select Delete to delete the Preference View.
Preference View in Detail Editor Sidebar
The Favorite Detail Editor Tab Preference View defines how record data will be displayed in the Detail Editor Sidebar and the Detail Editor Tab. When a record is opened in the Detail Editor Sidebar, it is displayed according to the Favorite Detail Editor Tab Preference View. If no Preference View has been designated as the Favorite Detail Editor Tab Preference View, the record will be displayed as defined in the Default Preference View. If no Default Preference View has been selected, all record attributes will be shown.
While in the Detail Editor Sidebar, the user has full Preference View use and management capabilities. Preference Views can be chosen, disabled, edited, added, deleted, saved and resized.

Copyright 2007, 2023 Precisely