Workflow
This section will cover how to use a workflow and how to track a work item’s progress through a workflow. For more information on workflows, see EnterWorks 10 Basics. For details on how to define and configure a workflow, see the EnterWorks 10 PIM Administration Guide.
Send Records to Workflow
To send one or more records from a repository to a workflow, first open the repository. Open the Feature Sidebar, select the desired folder, and select the desired repository. For more detailed information on repositories, see the Repositories section in this document.
|
Repository View: Grid View |
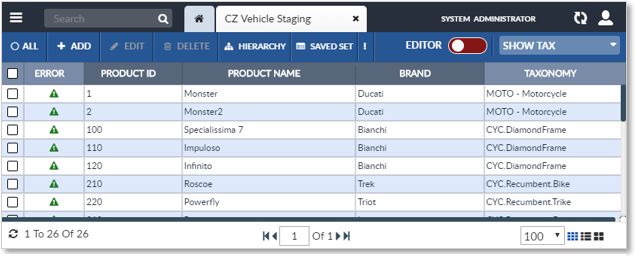
Select the desired record, records or records in a Saved Set in the Repository View. Note that additional records cannot be added to a multi-record work item once it has been created.
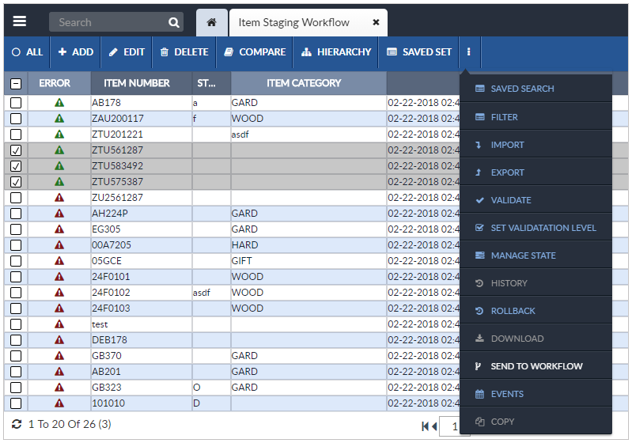
Open the More Actions dropdown by clicking the ![]() on the Repository View’s Activity Bar. Select the Send to Workflow option.
on the Repository View’s Activity Bar. Select the Send to Workflow option.
|
More Actions: Send to Workflow |
A Workflow Submission window will appear. It lists one or more workflows the record(s) may enter.
|
Workflow Submission |
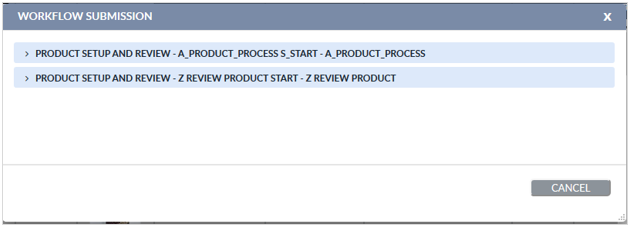
Select a workflow to expand it. The workflow may request the user enter required or optional data.
|
Workflow Submission Form |
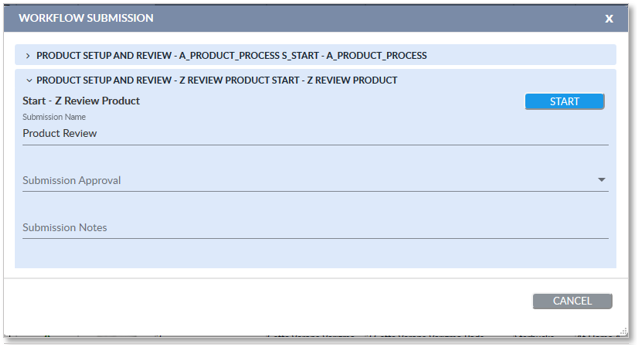
Edit the contents of the Workflow Submission window as desired. Select Start to create a work item(s) and send it to the workflow(s). To exit the Workflow Submission window without creating a work item and sending it to workflow, click Cancel or close the Workflow Submission window.
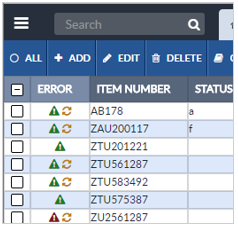
The Workflow Submission window will close. Refresh the Repository View to show that the record(s) are being
processed in a workflow. The Locked In Workflow indicator
![]() will appear next to the Status indicator of records that
are in workflow.
will appear next to the Status indicator of records that
are in workflow.
|
Records in Workflow |
Work item tasks can be viewed or acted upon in the Workflow Task Manager and while editing a record in the work item in the Detail Editor Tab (see View or Advance Work Items From Detail Editor Tab).
NOTE: If a record is already active in a workflow (as denoted by the Locked in Workflow icon), a new work item cannot be launched for the record – only the existing work item(s) can be advanced (providing the user is a designated participant).
View or Advance Work Item in Detail Editor Tab
Work item tasks can be viewed or advanced from theWorkflow Task Manager and from the Detail Editor Tab. For information regarding the Workflow Task Manager, see Workflow Task Manager .
To view or advance a work item from the Detail Editor Tab, first open a record associated with the work item in the Detail Editor Tab. To do so, open the record’s repository, open the Feature Sidebar, select the desired folder, and select the desired repository. The repository will be opened in a Repository View. For more detailed information on repositories, see the Repositories section in this document.
|
Repository View: Grid View |
The In Workflow indicator will appear next to the Status indicator of records that are in workflow.
|
Records in Workflow |
Select the desired record and click the Edit button in the Repository View’s Activity Bar. The record will be opened in the Detail Editor Tab. An In Workflow indicator will appear next to the record’s summary information.
To see the record’s work item information, select the Workflow Details button on the Detail Editor Tab’s Activity Bar.
|
Workflow Details Button |
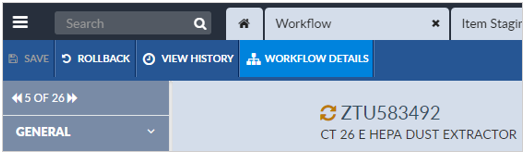
A Work Item Details window will appear. The Work Item Details window will display all the user’s work items that are associated with the record. Expand a work item to see its details.
|
Work Item Details |
To advance a work item, select the work item to expand it. Edit the work item as necessary, entering any required or optional data as desired. When the work item is complete, click the Send button. The work item will be submitted back to the workflow and will be removed from the record’s Work Item Details window.
Workflow Task Manager
The Workflow Task Manager allows a user to manage work items assigned to them. Depending on their permissions, a user may view work items, advance work items, view records associated with work items, clear work item errors, and purge workflows.
The Workflow Task Manager is available in the Administration Tab of the Features Sidebar and also as the Workflow Task Manager Widget.
|
Workflow Task Manager |

|
Workflow Task Manager Map (Left Side) |
|
Workflow Task Manager Map (Right Side) |
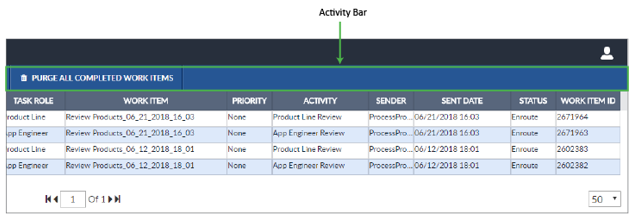
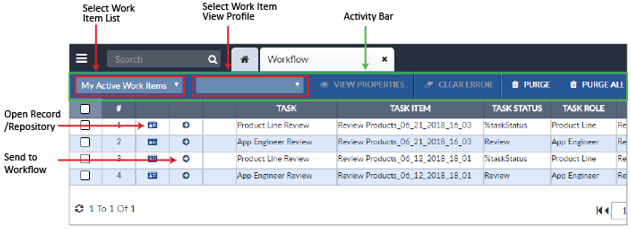
The purpose of the columns of the Workflow Task Manager are as follows:
- Selection box: Click to select the work item.
- #: An index for displaying work items.
- [Unlabeled #1]:
-
 : Select the icon to open the work item’s record or repository.
-
 : Select the icon to view the Properties and System Attributes of the
work item. For details on the Properties and System Attributes of work
items, see
Workflow Task Manager.
: Select the icon to view the Properties and System Attributes of the
work item. For details on the Properties and System Attributes of work
items, see
Workflow Task Manager.
-
- [Unlabeled #2]:
If the system is configured to allow advancing work items through the Workflow Task Manager, a Submit Work Item icon
 will appear. Click it to send
the work item to the next activity in the workflow. If a Submit Work Item icon is not displayed, to advance the
work item the user must click the Open Record/Repository icon to open the record or
repository and advance the work item from there. For more information,
see
View or Advance Work Item in Detail Editor Tab.
will appear. Click it to send
the work item to the next activity in the workflow. If a Submit Work Item icon is not displayed, to advance the
work item the user must click the Open Record/Repository icon to open the record or
repository and advance the work item from there. For more information,
see
View or Advance Work Item in Detail Editor Tab.
- [Unlabeled #3]: For details regarding this column, contact EnterWorks.
- Task: The name of the task as defined in the workflow.
- Task Item: The name of the work item for the workflow. Usually the name is the same for all work items in a workflow, but in some workflows each work item is uniquely named (such as including the date and time it was created).
- Task Status: Indicates whether the work item is Completed (i.e., reached an end activity), En Route (in the middle of a workflow) or In Error (stuck at an automatic activity with a processing error). Work items with a status of Completed only appear if All Completed Work Items has been selected in the Work Item List. Work items with a status of En Route or Error only appear if My Active Work Items or All Active Work Items have been selected in the Work Item List.
- Task Role: Optional role that can be set in the workflow. This typically identifies either an individual or the role of the person who needs to act on the task. This is not necessarily an EnterWorks group or workflow role.
- Work Item: Same as the Task Item.
- Priority: An optional field in work items to allow higher priority work items to be displayed first in the list of work items. Most work flows do not use this feature
- Activity: The name of the workflow activity in which the work item is currently sitting.
- Sender: The name of the workflow activity from which the work item was sent.
- Sent Date: The date and time the work item was sent to the current activity
- Status: Same as Task Status.
At the far left of the Workflow Task Manager’s Activity Bar is the Select Work Item List dropdown.
|
Select Work Item List |
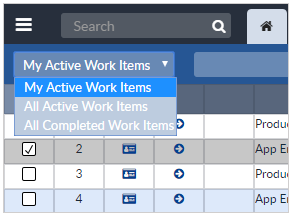
Select the desired list of work items to view:
- My Active Work Items: A list of the user’s work items the user can perform.
- All Active Work Items: Permitted users will see all the active work items in the system
- All Completed Work Items: Permitted users will see all the completed work items in the system.
To view a work item’s properties, select the work item and select the View Properties button on the Workflow Task Manager’s Activity Bar. A View Properties window will appear, showing all of the properties and their values in the work item.
|
Workflow View Properties and System Attributes |

The View Properties window has two tabs. The Properties tab displays work item specific properties. The System Attributes tab displays values that are common to all workflows.
Open Workflow Task Manager
To open the Workflow Task Manager in a tab:
- Open the Features Sidebar, select the Administration tab, and select Workflow Task Manager.
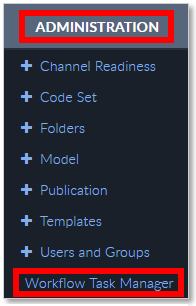
Open Workflow Task Manager
-
The Workflow Task Manager will open.
Workflow Task Manager Detail
Advance a Work Item via Workflow Task Manager
Depending on system configuration, the user may be able to advance a work
item through the Workflow Task Manager. If the system is
configured to allow it, for eligible work items the Workflow Task Manager will display a Submit Work Item button ![]() in the 2nd unlabeled
column. Otherwise, to advance the work item the user must click the Open Record/Repository icon
in the 2nd unlabeled
column. Otherwise, to advance the work item the user must click the Open Record/Repository icon ![]() to open the record or
repository and advance the work item from there. For more information, see
View or Advance Work Item in Detail Editor Tab.
to open the record or
repository and advance the work item from there. For more information, see
View or Advance Work Item in Detail Editor Tab.
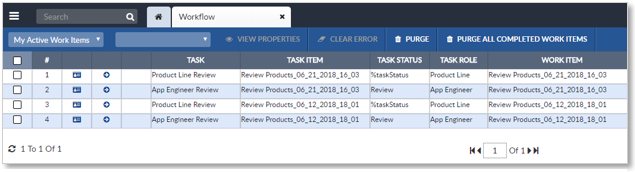
To advance a work item via Workflow Task Manager, first
open the Workflow Task Manager. This can be done either by
opening a Workflow Task Manager Widget (see
Configuring Workflow Task Manager Widget
) or by opening the Workflow Task Manager in a new tab. To
open it in a tab, open the Features Sidebar by selecting
the Features Sidebar icon ![]() on the Tab Bar,
select the Administration tab, then select Workflow Tasks. The Workflow Task Manager tab will appear.
on the Tab Bar,
select the Administration tab, then select Workflow Tasks. The Workflow Task Manager tab will appear.
|
Workflow Task Manager Detail |
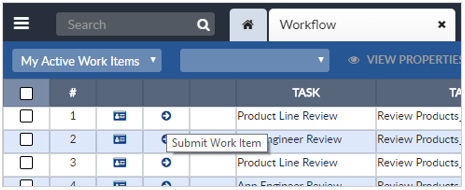
Select the work item to advance by clicking the record’s Submit Work Item button ![]() .
.
|
Submit Work Item |
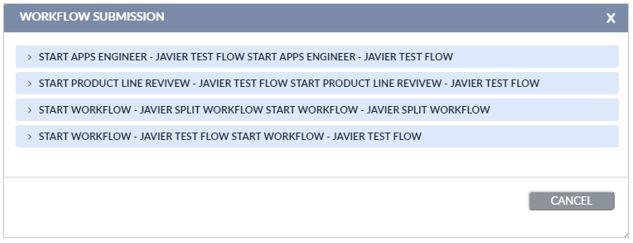
A Workflow Submission window will appear. It lists one or more options for advancing the work item. Select an option to expand it.
|
Workflow Submission Window |
Edit the contents of the Workflow Submission window as desired. Select Send to save the changes to the work item and advance the work item (send it back to the workflow). To exit the Workflow Submission window without advancing the work item, select Cancel.
Open Work Item Records Repository
The repository record(s) associated with a work item can be accessed through the Workflow Task Manager.
To access the record(s), first open the Workflow Task Manager. This can be done either by opening
a Workflow Task Manager Widget (see
Configuring Workflow Task Manager Widget) or by opening the Workflow Task Manager in a new tab. To
open it in a tab, open the Features Sidebar by selecting
the Features Sidebar icon ![]() on the Tab Bar,
select the Administration tab, then select Workflow Task Manager. The Workflow Task Manager tab will appear.
on the Tab Bar,
select the Administration tab, then select Workflow Task Manager. The Workflow Task Manager tab will appear.
|
Workflow Task Manager Detail |
The user’s active work items will be listed in the Workflow Task Manager. Select the Open Repository icon for the desired work item.
|
Workflow Task Manager: Open a Repository |

If the work item is associated with more than one record, the repository holding those records will be opened in a Repository View. It will show only the associated records.
If the work item is associated with only one record, depending on system configuration, either the record’s repository will be opened in a Repository View and it will only list the associated record, or the record will be opened in the Detail Editor Tab.
Clear Work Item Error
If an automatic process returns an error when triggered by a work item, the work item is halted in the workflow. The work item error can be cleared and the automated process triggered to attempt to advance the work item again.
To clear a work item error, first open the Workflow Task Manager. This can be done either by opening
a Workflow Task Manager Widget (see
Configuring Workflow Task Manager Widget
) or by opening the Workflow Task Manager in a new tab. To
open it in a tab, open the Features Sidebar by selecting
the Features Sidebar icon ![]() on the Tab Bar,
select the Administration tab, then select Workflow Task Manager. The Workflow Task Manager tab will appear.
on the Tab Bar,
select the Administration tab, then select Workflow Task Manager. The Workflow Task Manager tab will appear.
|
Workflow Task Manager Detail |
The user’s active work items will be listed in the Workflow Task Manager. Select the work item with an error that is to be cleared. Click the Clear Error button on the Workflow Task Manager’s Activity Bar.
The work item’s error will be cleared and the work item will be resubmitted to the workflow process it had previously failed. If the failure was due to environmental conditions that have been resolved, it will successfully process the activity and continue on in the workflow. If the error conditions are still present, the work item will again be flagged as being In Error.
Purge a Workflow – DO NOT USE
WARNING: Purging a workflow will delete all work items (active and completed) from the workflow, even those not visible to the user. DO NOT USE THIS FUNCTION.
For more information on purging work items, see the EnterWorks 10 Administration Guide.
Work Item View Profile
The Work Item View Profile capability allows users to select work item list formats that have been defined by system administrators. Depending on system configuration, specific Work Item View Profiles may not be available.
To select a Work Item View Profile, first open the Workflow Task Manager. This can be done either by opening
a Workflow Task Manager Widget (see
Configuring Workflow Task Manager Widget
) or by opening the Workflow Task Manager in a new tab. To
open it in a tab, open the Features Sidebar by selecting
the Features Sidebar icon ![]() on the Tab Bar,
select the Administration tab, then select Workflow Tasks. The Workflow Task Manager
tab will appear.
on the Tab Bar,
select the Administration tab, then select Workflow Tasks. The Workflow Task Manager
tab will appear.
|
Workflow Task Manager Detail |
Select a Work Item View Profile from the Select Work Item View Profile dropdown list on the left side of the Workflow Task Manager’s Activity Bar. The workflow task list will be displayed according to the selected profile.
|
Workflow Task Manager: Select Profile Dropdown List |

Copyright 2007, 2023 Precisely