Write to XML
The Write to XML stage writes the output of a job or subflow to an XML file.
File Properties Tab
|
Field Name |
Description |
|---|---|
|
Data file |
Specifies the path to the output XML file. Click the ellipses button (...) to locate the file you want. Note: If the Spectrum Technology Platform server is running on
Linux, remember that file names and paths on these
platforms are case sensitive.
|
|
Actual File |
Displays the structure specified in the Fields tab. If you click an element and the file specified in the Data file field contains the element, a preview of the data will be displayed. Note that only data from simple elements can be displayed in the preview. |
|
Export Schema |
Click this button to save an XSD file that represents the schema shown in the Actual File view. The schema file is immediately saved to the location you specify. |
Fields Tab
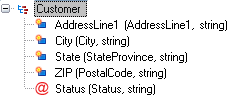
The Fields tab defines the fields you want to include in the output XML file. When you add fields, they are displayed in a tree structure. The tree displays the name of the element or attribute that will be written to the XML file. In parentheses following the element-attribute name is the name of the dataflow field followed by the data type, as in this example:

This indicates that four elements and one attribute will be written to the XML file. The attribute is indicated by the red "@" sign.
Note that the element State will contain the data from the field StateProvince and be string data. Likewise, the element ZIP will contain data from the PostalCode field and be string data. The XML file might look like this:
<XmlRoot>
    <Customer Status="0">
        <AddressLine1>7713 Mullen Dr</AddressLine1>
        <City>Austin</City>
        <State>TX</State>
        <ZIP>78757-1346</ZIP>
    </Customer>
    <Customer Status="0">
        <AddressLine1>1825B Kramer Ln</AddressLine1>
        <City>Austin</City>
        <State>TX</State>
        <ZIP>78758-4260</ZIP>
    </Customer>
</XmlRoot><XmlRoot>) is specified on the
File Properties tab.The following table describes the options on the Fields tab.
|
Option Name |
Description |
|---|---|
|
Add |
Adds a field to the output. |
|
Modify |
Modifies how the field is written to XML. You can specify one of the Modify option settings. Note: Dataflow field displays the field whose
data will be written to the element or attribute. This is displayed
so that if you change the element or attribute name to something
different you can still see which field's data is contained in the
element or attribute.
|
|
Remove |
Removes the selected field from the output. If you remove a list field all child fields are also removed. If you remove a child field, just the selected child field is removed from the list field. |
|
Remove All |
Removes all the fields from the output. |
|
Move Up/Move Down |
Reorders the selected field. Note that you cannot move simple elements into complex elements. If you want to modify the elements in a complex element, you must modify your dataflow's Aggregator stage to include the dataflow fields you want in the complex element. For more information, see Creating Complex XML from Flat Data. |
|
Regenerate |
Replaces the fields currently defined with the fields coming into Write to XML from the upstream channel. |
Runtime Tab
| Option Name | Description |
|---|---|
| Generate multiple files | Select this option to write records to different
files instead of writing all records to one file. The file to which
each record is written is specified in the record itself. Each
record must contain a field that specifies either a file name or the
full file path of the file to which you want the record written. For
example, if you want to send the stock prices of different companies
(of various groups) to all the clients separately, this feature
writes the stock prices of different companies into separate files
that may be sent to each of the clients, if you so wish. If you
enable the Generate multiple file option you
must specify an output file on either the Spectrum Technology Platform server or on an
FTP server. If you want to write data to a file on an FTP server you
must define a connection to the file server using Spectrum Management
Console. Note: The records in the column you select in the
File path field must be in sorted
order. Use this feature when record contains either a file
name or the full file path of the file.
|
| File path field | Selects the field that contains the path (either a file name or the full file path) of the file to which you want to write the record. Note that only the simple type elements mapped directly to a root will be listed in the File path field. This field is only enabled if you select the Generate multiple files. |
| Generate schema at runtime | Select this option to generate an XSD at runtime and insert a
noNamespaceSchemaLocation reference to schema in
the XML file. The value of attribute
noNamespaceSchemaLocation is XSD file name in the
XML file. If you export the schema while editing a dataflow, there will
be no reference to the XSD in the output XML file and the user would
need to manually add in the reference to the XSD. |
| Schema path | Specifies the path to save the XSD file that contains the schema of the output XML file. Click the ellipses button (...) to browse to the file you want. The schema file is saved to the location you specify when you run the dataflow. |
