Web Help
|
|
 Home
Home Back
Back Forward
 Contents
 Index
Index Product Help
 Support
 Print
Print Feedback
|
Back to |
Customizing templates
Central permissions, policies, and roles
To author templates in Journal Entry, you must have the Transaction Developer role in Central.
Default templates
Winshuttle Journal Entry provides several default templates, organized under headings of General Ledger, Accounts Payable, Accounts Receivable, or Accrual/Deferral. Depending on the type of template that you selected, you can further customize the templates for Simple post, Multiple Company post, or COPA post and, depending on the template, by t-code.
In Journal Entry for Winshuttle Central, you must store the template in Central. For more information on configuring Central, see the Winshuttle Central Admin Guide.
Journal Entry adds efficiency by allowing multiple templates or data sheets to be added to one workbook. The entire workbook is submitted to Central, which triggers one workflow for all templates.
Create a template
- Open a new workbook in Excel or select an existing workbook to upload. Click the Journal Entry tab.
- Click Logon to Central and enter your credentials.
- Select the Developer role.
- Click Create New Template, and then select one of the default templates under the headings General Entry, Accounts Payable, Accounts Receivable, or Accrual/Deferral.
- Depending on the type of template selected, select Simple Post, Multiple Company Post, or COPA Post.
- Select the desired t-code from those available for the selected template.
- Select to write to the default sheet or select a specific sheet write to.
- Under Mapping, choose Cell Based or Column Based.
Note: Column mapping is not supported for BAPIs.
- Click Load Default Template.
- If you want to, add headers and data to the template.
- Name and save the template.
- You can add different templates to the same book, but each must be written to a different sheet.
- To add multiple templates, select the template.
- Specify the sheet.
- Validate and simulate each sheet before you submit the workbook to Winshuttle Central for approval.
- Click Submit to Central.
- When prompted, add supporting documents, if desired.
You are notified that your template and any supporting documents have been submitted to the Central site.
Customizing templates
Whether you are creating a sheet from a template or creating an original template, the Journal Entry customization capabilities give you control over the mapping and naming of cells (similar to the functionality in Transaction) and over the layout of objects in the workbook.
Customize a template: overview
- Click Logon to Central and enter your credentials.
- Click Create New Template, and then click Customize.
- Select the business process, the post mode, and the t-code. Specify which sheet the template should be saved to.
- Under Mapping, choose Cell Based or Column Based.
- Click Customize New Template.
- On each page of the Customize pane, specify fields to include, header and cell mapping, lists of values, or document splits, as described in the Selecting fields and Mapping cells sections that follow this procedure.
For debit and credit indicators, use the default "S" and "H" or click the List of Values button and type in the labels you want.
Note: You can add tax information on the Basic tab or the Tax tab. However, fields on the tax tab cannot be included in a loop.
- To set a custom limit on line items for each document, in the Document Length box, enter a value between 0 and 998.
- Save the document. Click Publish.
- Enter some test data in the finished document. Validate and simulate to ensure that the template behaves correctly.
- Submit the document to Central.
Customize the fields
Select and map the fields for the header and the log fields, add any lists of values that you want people to use. If you want to use the same value for a field every time, change it to Fixed. See the sections below for more details.
Then click Next, and select and map the fields for the line items, add LOVs and set any values that need to be fixed.
Selecting fields
After you select the mode, t-code, sheet, and mapping and click Customize New Template, check the Selection box for each field that you want people to use.
If a field must contain data, check both Selection box and the Required Field box.
Mapping fields manually or automatically
To map fields, you need to assign a column or cell to the headers on the first page of the Customization pane and the line-item fields on the second page of the Customization pane.
Tip: Take note of the row or column where your header and log fields end so that you can avoid overlapping when you map the line items.
Map fields manually
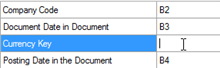
To manually map headers, enter a cell name or column name in the Mapping column.
Map fields automatically
To automatically map headers (if you have many cells to map), check the Auto map settings box, choose the settings that you want, and then click the AutoMap button ![]() .
.
Auto map settings:
- Arrange header items vertically or horizontally (this option is available for cell-based mapping only).

- Set the Excel start column and row for the header and log items.
- Select to write headers for header items.
- If blank lines of cells are needed, select the line above where you want the blank line and click the Add Blank Cell button
 .
. - If you want, assign a list of values to a field. Click the List of Values button
 .
.
Creating a list of values
You can assign a list of values (LOV) to a cell by selecting to display entire SAP windows, include a text file, include an Excel file, or to include select SAP fields from an F4 lookup. Where a list of values appears, the value selected by the user during data entry is validated when the sheet is validated.
Add a list of SAP values
- In the header or item mapper, click the LOV button next to a field .
- Click SAP.
- Enter your SAP credentials in the SAP logon dialog box. Click OK.
- In the List of Values dialog box, click OK.
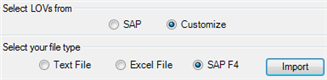
Create a custom LOV from a text or Excel file
- In the header or item mapper, click the LOV button next to a field .
- Click Customize.
- Do one of the following:
- Click Text file. Browse to a local file.
- Set the delimiter for separating text. Click OK.
-or-
- Click Excel file.
- Browse to a local file.
- Specify the sheet to write to and the Excel cell range. Click OK.
Create a custom LOV from an SAP F4 lookup
- In the header or item mapper, click the LOV button next to a field .
- Click Customize.
- Click SAP F4, and then click Import.
- If you are not already logged on, enter your SAP credentials.
- In the SAP list, select the items you want to add to your list. Click the green check mark.
Although SAP descriptions are not loaded, you can customize your own descriptions. In addition, you can limit the values available. Click Delete to remove a value from the list.
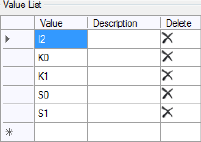
- When finished, click OK.
Creating run-time and fixed values
For all header and line item fields, you can create a run-time value.
Create a run-time value for a header or line item field
- In the Customize pane, locate the header item or line item that people need to enter data for at run time.
- In the Selection Type list for that item, click Runtime.
Note: If Journal Entry prompts you that line items will overlap with existing log and out cells, do one of the following: increase the Start Row, uncheck the Write headers for Journal Entry Header Items box, or change the mapping for header items or logs.
If you choose Runtime for a field, you can either give LOV values for that field or you can leave as it is. However, if you give the LOV values for that field, the runner will have to choose a value from the LOVs that you specified unless and until you select the Allow user to override Custom List of Values check box, which allows the runner to override the LOVs and enter a value that is not in the existing LOVs.
- You can create a custom list of values for any of the line items listed. Click the List of Values icon next to the desired line item, select Customize, and enter the desired values in the Value List.
- You can allow a user to override the Custom List of Values. Click the List of Values icon next to the desired line item, select Customize, select the Allow user to override Custom List of Values check box, and enter the desired values in the Value List.
Create a fixed value for a header or line item field
For all header and line item fields, you can create a fixed value—that is, a permanent value that cannot be changed. The runner will not be able to edit this value during execution.
Note: When you finish creating fixed values for headers or line item fields, the Data Review pane will show only the fields that are marked as Runtime. Fixed items will not appear in this list.
- In the Customize pane, locate the header item to which you want to assign a fixed value.
- In the Selection Type list for the item, click Fixed.
The Fixed value for dialog box appears.
- In the Fixed value for dialog box, enter the value.
Tip: If you need to find the value you want to use, click SAP F4, log on to SAP if necessary, click the value that you want to use, and then click the green check mark.
- Click OK.
You will notice that the row containing the field name and description is now blue and that the cell in the Mapping column is now gray. This is because fixed values are not mapped to a particular cell in Excel.
Note: To change a current fixed value, click the red pin in the List of Values column, enter the new value, and click OK.
Add loop information
After you map the line-item fields, click Next.
Note: If Journal Entry prompts you that line items will overlap with existing log and out cells, do one of the following: increase the Start Row, uncheck the Write headers for Journal Entry Header Items box, or change the mapping for header items or logs.
Enter the loop information:
- If you are using cell-based mapping, type the Start Row and End Row of the line-item fields.
- If you are using column-based mapping, you also specify an ID column and Header and Line identifiers (for example, H and D) that you will use to indicate whether a row is header data or line-item data.
Defining a custom document length
Template authors can define a custom length of between 0 and 998 line items for a document. If a runner tries to post a document that exceeds the maximum item length, a message prompts the runner to split the document. Document chunks from a split cannot be longer than the maximum length for that template.
Uploading large documents: Split document
For large uploads, instead of using multiple workbooks, you can split your document.
Important: Journal Entry cannot split a column-based document that contains multiple loops at the same level.
You need to know the name or number of an SAP reconciliation or offset account so that all the documents that result from a split can be balanced.
Defining a custom document length
Template authors can define a custom length of between 0 and 998 line items for a document. If a runner tries to post a document that exceeds the maximum item length, a message prompts the runner to split the document. Document chunks from a split cannot be longer than the maximum length for that template.
Splitting documents
Important: Journal Entry cannot split a column-based document that contains multiple loops at the same level.
Document splitting settings
When you finish creating fixed values for headers or line item fields, you will see a data review pane which includes all fields that were marked as "Runtime." Fixed items will not appear in this list.
- Select the Split Document check box.
- In the No. of rows box, specify how many rows should be processed before a document is split (maximum is 997 lines). If you're not sure how many rows you'd like to enter, you can adjust the split settings later.
- Click Publish.
- When ready, click the Winshuttle for Journal Entry tab and then click Post.
Uploading large documents: Split document
For large uploads, instead of using multiple workbooks, you can split your document. You need to know the name or number of an SAP reconciliation or offset account so that all the documents that result from a split can be balanced.
- Create and name an offset account. Ensure that you add a user-friendly description so that users of the template understand why extra lines appear.
- In the No. of rows box, specify how many rows should be processed before a document is split. A common length for a document is 999 lines.
- Click Publish.
- When data is entered and validated, click Split document. Blank rows will appear at the specified interval. When you post, the entries will be split into multiple SAP documents where the blank rows appear.
|
Also in this section |
 Trademarks


