Schedule a Query run
When you use the Scheduler to schedule a run in advance, Query automatically connects to SAP, runs the Query on the schedule you set up, and then closes the connection with SAP. Studio can send an email notification confirming that the scheduled job was performed.
Notes:
If the script is mapped to SQL Server or to a SharePoint List, Schedule is the only option, and the script will run from the server or site. Data file attachment is not available for these data types.
The account that you use to write to SQL Server must have db_owner or db_ddladmin membership on the database that contains the target table.
To run a scheduled script on a virtual machine (VM) with Windows 7 or later or Windows Server 2008 or later, you must remain logged on to the VM.
For information about running Winshuttle with Citrix, see Citrix installation with Winshuttle products.
Use Studio to schedule a script
Schedule to run from your computer
- Click the File tab, click Query Script Library, and open the script that you want.
- Click the Run tab, and click Schedule or click the arrow and click Schedule Local.
- Save the data file to a location on your computer.
- Confirm the criteria that are displayed in the Run Time Variable Wizard by clicking OK.
- In the Winshuttle Scheduler box, in the Title box, select the SAP system.
- Type the title you want Studio to show in the list of scheduled tasks.
- In the Send Email Notifications To box, type the email address where you want to receive scheduling notifications.
Use commas to separate multiple email addresses.
Note: If you are using an Exchange server to send email notifications, you can include the results file with the email message by checking the Attach data file box. To set this up, provide the Exchange server details in the Studio options.
- In the Reason box, you can change the reason for the run.
- Click Next.
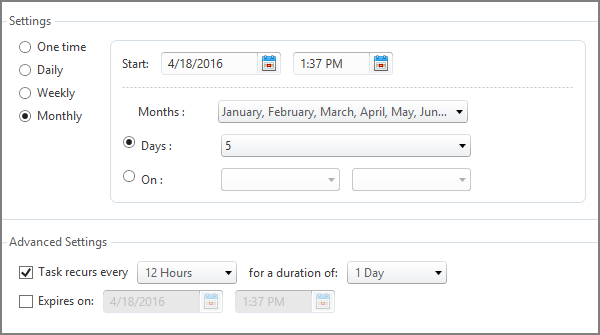
- Click One Time, Daily, Weekly, or Monthly.
- Choose the recurrence options you want. These options change depending on what you clicked in step 10.
- To stop running the scheduled script, check the Expires on box and then enter a date and time.

- Click Finish.
Schedule on Server
- Click the File tab, click Query Script Library, and open the script that you want.
- Click the Run tab, click the Schedule arrow, and click Schedule Server.
- Save the data file to a location on your computer
- Confirm the criteria that are displayed in the Run Time Variable Wizard by clicking OK.
- Select the SAP system.
- Click Next.
- To set the schedule, click One Time, Daily, Weekly, Monthly, or Yearly.
- Choose the recurrence options you want. These options change depending on what you clicked in step 7.
- Click Finish.
Use the Excel Add-in to schedule a run
Schedule to run from your computer
- Start Excel and open a new blank workbook.
- Click the Winshuttle Run tab and log on to Foundation.
- Click the Winshuttle Foundation tab, click Open, click Open Query Data File, and open the data file.
- Click the Winshuttle Run tab, click the Schedule arrow and click Schedule Local.
If you are not logged on, the SAP Logon box will open so that you can log on to the SAP system.
- In the Winshuttle Scheduler box, in the Title box, type the title you want to Studio to show in the list of scheduled tasks.
- In the Send Email Notifications To box, type the email address where you want to receive scheduling notifications.
Use commas to separate multiple email addresses.
Note: If you are using an Exchange server to send email notifications, you can include the results file with the email message by checking the Attach data file box. To set this up, provide the Exchange server details in the Studio options.
- In the Reason box, you can change the reason for the run.
- Click Next.
- To set the schedule, click One Time, Daily, Weekly, or Monthly.
- Choose the recurrence options you want. These options change depending on what you clicked in step 9.
- Under Advanced Settings, you can choose to run the script multiple times. For example, if you want to run the script monthly on the fifth day, and you want to run the script at the beginning and the end of the day, check the Repeat task every box, click 12 Hours, and click 1 Day.
- To stop running the scheduled script, check the Expires on box and then enter a date and time.
- Click Finish.
Schedule on Server
- Start Excel and open a new blank workbook.
- Click the Winshuttle Run tab and log on to Foundation.
- Click the Winshuttle Foundation tab, click Open, click Open Query Template, and open the data file.
- Click the Winshuttle Run tab, click the arrow under Schedule, and click Schedule Server.
If you are not logged on, the SAP Logon box will open so that you can log on to the SAP system.
- Save the data file to your computer.
- Save the data file to Foundation.
- Select the SAP system.
- To set the schedule, click One Time, Daily, Weekly, Monthly, or Yearly.
- Choose the recurrence options you want. These options change depending on what you clicked in step 9.
- Click Finish.
Change the schedule or stop scheduling a run
- Click the File tab.
- Click Scheduled Tasks.
- Click Delete, or click Edit to make changes in the Winshuttle Scheduler box.