
Install on IBM i
Installing and using Data Integration on an IBM i system differs from installing and using Data Integration on another type of system because you must install a Change Selector.
To run Data Integration on IBM i, you must install the following:
-
Director on each Windows host where modeling will be done - Director is the GUI modeling tool that runs on a Windows host and is used to create and maintain an Enterprise Data Movement Model (EDMM).
-
DB2 Change Selector on the IBM i platform whose database server is a source of data movement - A DB2 Change Selector captures changed data on a DB2 database server. The Change Selector must be installed before you install the Java components see How to Install the Change Selector Process.
-
Java data movement components and Listener, on each host, whether a source, target or intermediate host, that participates in data movement. These components collect and replicate data. Listener runs on each host, initializes and communicates with the other data movement components on the host and with client components.
-
Java client components on each host that will monitor and control data movement.
Java client components monitor and control data movement. MonCon is a GUI application and may be installed on Windows and UNIX.
-
Delete journal receiver exit program on each IBM i source host that has an installation library.
-
Install one exit program on each IBM i source host that has an installation library, if you want Data Integration to automatically delete journal receivers once it is finished processing them.
Issue a green screen command to activate the exit program. Once the exit, which is a standard executable IBM i program (ORDLTRCV *PGM), is copied into the Omni install library, a user with *SECOFR privileges enables or activates it by issuing the ADDEXITPGM at the green screen.
Run the exit as OMNIENT. By default, the exit runs with QUSER authority, instead use an optional program data parameter in the ADDEXITPGM command which enables the exit to run under the privileges of the user name specified in the program data.
How to Install the Change Selector Process
The Change Selector is a process, that is, an executable component, used for replication on DB2 servers only. The Change Selector captures SQL row operation changes, specifically INSERT, UPDATE, and DELETE in the context of an SQL transaction.
The Change Selector is installed before the Java components. Install a Change Selector on all IBM i machines in your Enterprise Data Movement Model (EDMM) that host DB2/400 source servers. You may need the cooperation of a systems programmer, security administrator, DB2 administrator, and a network administrator. The installation process includes unpacking the compressed installation library. Trace information about the entire installation job is stored in a spool file (QPJOBLOG) in your user output queue.
-
Sign on.
Use the QSECOFR user profile or a user profile that has security officer authority.
The end of the installation process automatically generates a job log. By signing on just before starting the installation, you limit the job log to only the installation process.
-
Load the CD or Copy the STM file from the CD.
-
If you are installing from a CD, load the CD into the device and make the device ready. Using the name of the device from which you are installing for device-name, enter the following command:
LODRUN DEV(device-name)
-
If you are copying the STM file, locate the STM file in the iseries folder on the CD. The file name is:
<version number>.SYSTEMI.MXSHARE
Copy this file to the following location:
/ConnectCDCV58/<version number>.SYSTEMI.MXSHARE.STM -
-
Install INSPRD, if not already installed.
Precisely provides the Install (INSPRD) tool in version 8 License and Availability Manager for users that are installing from a streamfile (STMF). The INSPRD tool simplifies the install process.
If either of the following conditions apply, you must obtain the tool manually during the installation:
-
You are using the STMF format for a new install, where License and Availability Manager is not installed.
-
You are using the STMF format to upgrade to version 8 for the first time and License and Availability Manager is not at version 7.
The INSPRD STMF and manual are on the CD in:
iseries/INSPRD
-
-
Enter the INSPRD command to start the install.
Issue the following command on the IBM i:
LAKEVIEW/INSPRD STMF('/ConnectCDCV58/<version number>.SYSTEMI.MXSHARE.STM’) INSTLIB(*SELECT) -
Install License Manager, if not already installed.
If you do not have a License Manager installed, you are prompted to install it when you attempt to install the Change Selector. License Manager must be installed before you install the Change Selector.
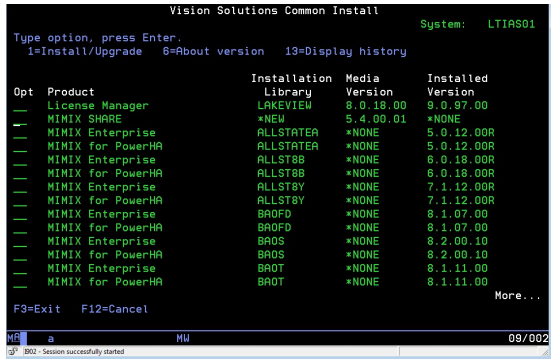
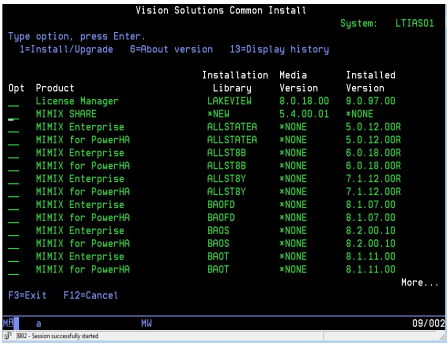
Note: The License Manager can only be automatically upgraded from the prior version, version 7. The License Manager must be installed at version 8.0.15.00 or higher prior to installing the Change Selector. - Select 1 Install/Upgrade.
On the Lakeview Technology Common Install screen, input 1 Install/Upgrade in the Opt column next to Data Integration and press Enter.
For online help, press F1 when the cursor is at the top of the display or, for a specific option or item, press F1 when the cursor is on that option or item.
 The Install Lakeview Product (INSLKVPRD) display appears.
-
Accept or select new lnstallation Library name.
In the Installation Library field, you see either a default library name (OMNIENT), the name of your existing product library (if you are reinstalling) or the value *NEW. You can accept the library name or change it to a new name.
If the value *NEW appears, the default library already exists on the system and you must provide the name of a library that does not already contain a copy of the files you are installing.
- Press Enter to start the installation process. Messages at the
bottom of the page describe the active installation task. When the
installation of all the products completes, the Lakeview Technology
Common Lakeview Technology Install display appears. A completion
message appears at the bottom of the display.
If you are installing multiple products, repeat step 1 and step 2 for each product.
-
Press F12 to return to the command line.
-
How to install Java Installer
This section gives information on using the Java Installer to install Data Integration on IBM i platforms only. Installation must be done locally in batch mode or remotely in GUI or batch mode, that is, with the installer running on a Windows or UNIX originating host and installing onto an IBM i host. See the Installation Guide for all other platforms besides IBM i, including how to set up the originating host.
The installation procedure accomplishes the following steps:
-
Gathers input describing where to install and information about the host environment.
-
Verifies information gathered in Step 1.
Before copying any Data Integration files, the Installer verifies the following:
-
The version of the Java Run-time Environment must be at a level acceptable for the Data Integration executable processes.
-
The Java compiler is available wherever Data Integration is installed.
You receive a warning if the javac file is not available or is not in the path. Installation can continue without javac, but expressions and join tables will not function.
-
The TCP/IP port number chosen for use by the Listener must be available and not used or reserved by any other service. On a reconfiguration, Listener must be shut down prior to the reconfiguration.
All the drivers chosen for use at a host must be accessible and supported for use by Connect CDC.
-
-
Configures shell scripts using input gathered in Step 1.
-
Installs the files. This involves copying components from the install directory to the specified directory on the host and creating the MXSHARE subsystem.
-
Starts the Listener.
-
Saves the installation configuration.
This step creates the following files:
-
<host>verifier.properties in the installation directory
-
<host>verifier.results
-
<host>.ini
This file contains the parameters values chosen for this host installation and usually resides in the /tmp directory on the host on which you are installing.
-
install.log
Along with the log file created during the installation, this file serves as a record of the installation. Subsequent runs of the Installer attempt to locate this file.
Modes of Installation
You must choose whether the installation performs a full install or reconfigures an existing installation and whether it is done in batch or interactive mode.
Full Installation or Reconfiguration - Full installation is a complete installation of all files. Once Data Integration has been installed, Reconfiguration can be used to change parameters except the installation directory and the host where it is installed.
GUI or Batch Installer - Data Integration may be installed interactively using a GUI Installer or a Batch Installer. From a UNIX host or a Windows host, use either the GUI Installer or the Batch Installer to install remotely. From another IBM i host, use the Batch Installer to install remotely. No GUI Installer is available for installing locally on IBM i.
Install Files
Installing Data Integration on a remote IBM i host entails issuing IBM i commands from the Installer connected to the host as a client. The procedure involves doing a binary transfer of a number of files to a target installation directory on the mainframe.
When the Installer is run remotely in this manner it runs on the host in the queue QUSRWRK under the user QUSER with a job name of QZRCSRVS.
The installation files, listed below, are packaged together in one file, named install.zip. To list the contents of install.zip without unpacking, enter the following command:
jar tvf install.zip|
File |
Description |
|---|---|
| omni.zip |
Connect CDC packaged into a.zip file |
| binstaller.cmd |
Command file that runs the Batch Installer on Windows |
| binstaller.sh |
Shell script that runs the Batch Installer on UNIX |
| ginstaller.cmd |
Command file that runs the GUI Installer on Windows |
| ginstaller.sh |
Shell script that runs the GUI Installer on UNIX |
| inetfactory.jar |
Library, provided by jScape, required for installation networking tasks and for installing the Connect CDC Listener start and kill scripts in the boot area |
| installer.jar |
Java Installer program for both the GUI and Batch Installer programs |
| jt400.jar |
Library from IBM required for FTP installation tasks and running Connect CDC after it is installed |
| log4j-1.2.8. jar |
Library used for writing messages to an install log |
|
JT400offbox.properties |
Properties file used if you use the remote hosting feature described in the Getting Started Guide where you model a remote IBM i server on a Windows or UNIX host. |
| JTopen400.properties |
Properties file used to enable FOR BIT DATA (IBM i only translation to treat binary data values as character values. |
| udbcs.zip |
Files containing the UDB Change Selector. |
The installation steps are:
-
Copy install.zip from the CD to a writeable directory on the originating host where the Installer is to be run. When FTPing install.zip across a network, do a BINARY transfer of the file.
-
Unpack the installation files (listed above) on the installing host. The command to unpack depends on the platform of the originating host.
-
On a UNIX platform, issue the command:
jar xvf install.zip
-
On a Windows platform, use WinZip or another similar program, or
jar xvf install.zip.
-
-
Execute the Batch or GUI Installer.
How to install using the GUI Installer
The GUI Installer may be used to perform the installation on a remote machine running IBM i where the local machine runs UNIX or Windows.
The GUI Installer may be used to perform an initial full install of Data Integration or a reconfiguration of an existing installation. If the installer finds an existing <host>.ini file created during a previous installation, a subsequent installation automatically runs reconfiguration. If you do not want to run reconfiguration, delete the <host>.ini file.
Described below are the GUI windows and the information requested for installing Data Integration. The appearance of the window varies slightly depending on the platform.
The installation steps are as follows:
-
Start the GUI installer.
-
When the originating host is UNIX, execute the GUI installer with the command:
sh ginstaller.sh-
When the originating host is Windows, execute the command:
ginstaller.cmdThe installation wizard displays in which you set constants for the operating system.
The following table describes the Welcome Window fields.
Field
Description
Host
Defaults to the local machine. For remote install, enter the name or IP address of the remote host.
Operating System
Defaults to the operating system on the local machine. Select the operating system type that matches the installing host machine.
User ID
(Remote installs only) Enter the userid for logging on to the remote host.
User Password
(Remote installs only) Enter the password for logging on to the remote hosts.
-
- Read and accept the license agreement.
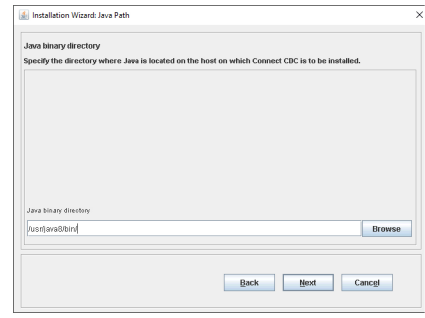
The Java binary directory window displays.
-
Enter the path where the Java program is located, for example:
/usr/java8/bin/Note: For the Java installer, use the forward slash for all paths specified during install. - Click Next.
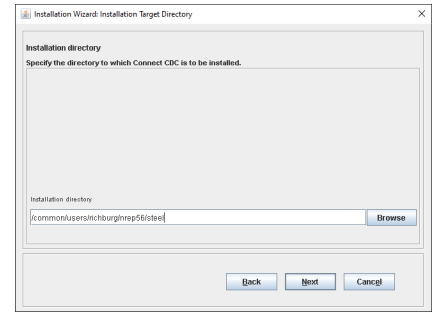
The Installation Target Directory window displays.
-
Identify the directory where Data Integration is to be installed. If installing remotely, the directory must be accessible to the remote host.
Note the following:
-
The Browse button does not appear for remote installs or for reconfigurations.
-
For reconfigurations, The destination folder contains with information that was set during the previous installation or reconfiguration. It cannot be changed
-
-
Click Next.
The OS400 Installation Parameters window displays.
-
Enter the name of the Install library where commands to start Listener and Console may be installed. The install creates and attempts to start the Listener in a subsystem called MXSHARE from the Install library specified. If the Install library does not exist, the installer creates it. The recommended Install library is OMNIENT where the Change Selector is installed.
Keep in mind the following:
-
You must install one exit program for each installation library on each IBM i source host where you want the journal receiver to be controlled by the Delete Journal Receiver exit program.
-
You should not install the Delete Journal Receiver exit program on an i5 system used as a target.
-
If you intend to have the system delete receivers you can use the Delete Journal Receiver exit program.
Note: You are not required to have the system delete receivers. You could delete the receivers manually or rely on another program to delete the receivers.Installation may fail to activate the Delete Journal Receiver exit program if the user is not using a user profile that allows execution of this command on the IBM i host to which you are connecting. However, if activation fails due to privileges, the install will still continue and you can issue the ADDEXITPGM command later to activate the exit program:
-
After the exit program has been installed, check whether it was installed and activated properly. You can issue the WRKREGINF command:
WRKREGINF EXITPNT(QIBM_QJO_DLT_JRNRCV)Alternately, you can inspect the install.log.
-
Then, if the exit was not enabled by the installer, issue the ADDEXITPGM. This command uses the optional program data parameter so that you run the exit as OMNIENT.
By default, the exit runs with QUSER authority, but instead run the exit program under the privileges of the user name specified in the program data:
ADDEXITPGM EXITPNT(QIBM_QJO_DLT_JRNRCV) FORMAT(DRCV0100)PGMNBR(*LOW) PGM(OMNIENT/ORDLTRCV) PGMDTA(65535 10 OMNIENT)TEXT('Omni Delete Receiver exit')For reconfiguration, the command library fills in with whatever was set during the previous installation or reconfiguration.
-
- Click Next.
The Installation Components window displays.
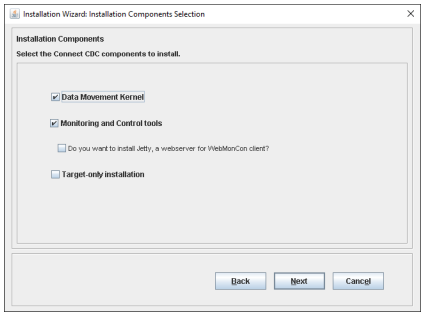
- Select the components to be installed, then click Next.
The Database Selection window displays.
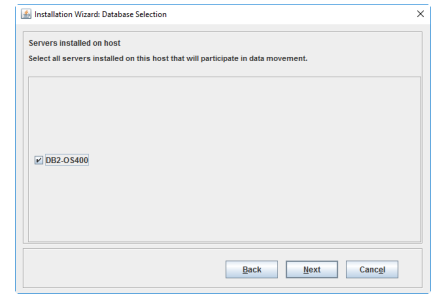
-
Select the database types that will participate in data movement on this recipient host.
For reconfiguration, the database type selected is set according to what was chosen in the previous install.
Normally, you would set the path for the JDBC driver. However, the JDBC driver for IBM i is automatically installed and does not require a driver path.
For reconfiguration, the driver path contains the value provided in the previous install or reconfiguration.
- Click Next.
The Listener Port window displays.
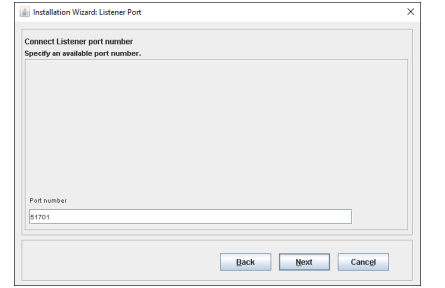
-
Specify an available TCP/IP port number for use by Listener. The installer assumes the port is free if the port is not active.
For reconfiguration, The port number contains the value specified in the previous installation or reconfiguration.
When reconfiguring an installation, Listener must be shut down prior to installing or the Installer assumes the port is in use by another service
- Click Next.
The JVM Memory Specifications window displays.
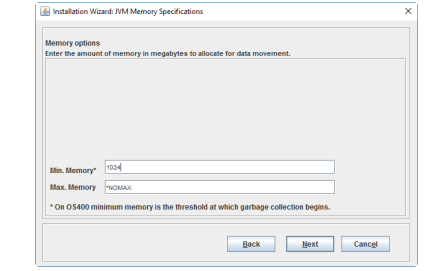
-
Specify the amount of memory in megabytes to use for data movement. The minimum memory is the threshold at which the Java Virtual Machine begins collecting allocated memory no longer referenced and setting the memory as free and available. In the Max. Memory field, if you enter any other value than *NOMAX, it is interpreted as a maximum memory setting.
For reconfigurations, the memory minimum and maximum parameters contain the values specified in fill in the previous installation or reconfiguration.
- Click Next. The Secure Sockets Options window displays.
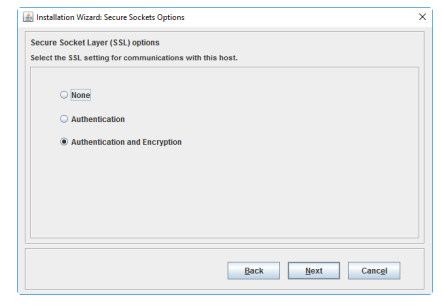
-
Select the Secure Socket Layer options to use in all network communications with the recipient host.
For reconfigurations, the SSL option selected is the one chosen in the previous installation or reconfiguration.
- Click Next.
The summary window displays your selections.
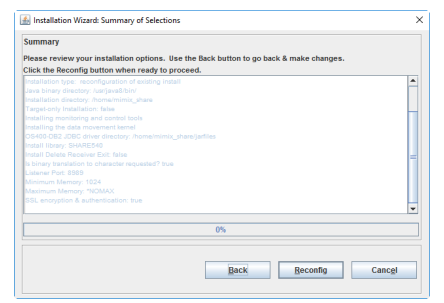
-
Do one of the following:
-
If the selections are correct, click Install.
-
If the selections are incorrect, click Back and make changes.
-
For reconfigurations, click Reconfig to continue.
If the install is successful, you will receive an installation successful message.
-
-
Click OK to close.
The final window shows the installation results.
-
Click Finish to end the installation process.
How to install using the Batch Installer
The Batch Installer may perform the installation on a local host running IBM i. The Batch Installer may perform the installation on a remote machine running IBM i where the local machine is UNIX or Windows. The Batch Installer may be used to perform an initial full install of Data Integration or a reconfiguration of an existing installation. In this section two batch install examples are provided.
To run the batch installer, perform the following steps. Two batch install examples are provided. The procedures are the same for both examples, whereas the content of each file may vary.
Example 1: Batch Install for two hosts
Create the host.list File
Create the host.list file containing entries for installing to one or more hosts.
This host.list file identifies two hosts (vector and mountain) on which to install Connect CDC. The file must be located in the current directory where the Installer is running. Below is a sample host.list file:
remote=Nreconfigure=Nvector=UNIXremote=Yreconfigure=Ymountain=OS400This example instructs the Batch Installer to install Data Integration on two hosts:
-
A local, initial full install onto the UNIX host named vector.
-
A remote, reconfigure install onto the IBM i host named mountain.
Keywords and input parameters may be in mixed case. The order of the input parameters is important. Comments are denoted by a # in the first column of a line. Comments are not allowed on the right side of a key=value property specification.
Create the <host_name>.properties File
Define a separate .properties file for each host listed in the host.list file where <host_name> is the name of the host machine to install Data Integration. Each .properties file must be located in the current directory where the installer is running.
Below is a sample .properties file named mountain.properties for the host named mountain:
# Sample OS400 install parameters file# HOST_NAME is the name of the OS400 host to installHOST_NAME=mountainHOST_USER=rpuserHOST_PASS=rpuserJAVA_PATH=/usr/java/binINSTALL_CD=/common/users/rpuser/V58/INSTALL_DIRECTORY=/common/users/rpuser/v58/ConnectCDCLISTENER_PORT=1780INITIAL_MEMORY=256SSL_AUTH=NSSL_ENCR=NNUM_DRIVERS=0COMMAND_LIBRARY=OMNICOMMTARGET_ONLY=NTRANSLATE_BINARY=NINSTALL_JETTY=NINSTALL_LIBRARY=OMNIENTExample 2: Batch Install for a single host
Create the host.list File
Create the host.list file containing entries for installing to one hosts.
This host.list file identifies one host (LTIAS03), on which to install Data Integration. The file must be located in the current directory where the Installer is running. Below is a sample host.list file:
##### B A T C H   I N S T A L L  (local i5 on this host)
   				#
   				########## LTIAS03
   				#
   				remote=N
   				reconfigure=N
   				install_LTIAS03=OS400
This example instructs the Batch Installer to install Data Integration on one host, a remote, install onto the IBM i host named LTIAS03.
Keywords and input parameters may be in mixed case. The order of the input parameters is important. Comments are denoted by a # in the first column of a line. Comments are not allowed on the right side of a key=value property specification. For keyword definitions, refer to Keywords or Input Parameters for the host.list file.
Create the <host_name>.properties File
Define a separate .properties file for the host listed in the host.list file where <host_name> is the name of the host machine to install Data Integration. Each .properties file must be located in the current directory where the installer is running. Below is a sample .properties file named install_LTIAS03.properties for the host named LTIAS03.
# Omni Installation Properties
                        PRODUCT_VERSION=5.8.00
                        HOST_USER=TEST
                        HOST_PASS=******   (comment: provide actual password)
                        HOST_NAME=LTIAS03
                        JAVA_PATH=/usr/bin/
                        INSTALL_CD=/home/test/V580/install
                        INSTALL_DIRECTORY=/home/test/V580
                        LISTENER_PORT=1780
                        INITIAL_MEMORY=32
                        MAXIMUM_MEMORY=*NOMAX
                        SSL_AUTH=N
                        SSL_ENCR=N
                        NUM_DRIVERS=0
                        COMMAND_LIBRARY=DVTIMV580
                        INSTALL_LIBRARY=SHAREV580
                        TARGET_ONLY=N
                        TRANSLATE_BINARY=N
                        INSTALL_JETTY=N
                        INSTALL_CLIENT=Y
Note: In the example shown above, The System i5 driver is installed automatically, as designated by NUM_DRIVERS=0. However, you can make an explicit specification for the driver, specified in place of NUM_DRIVERS=0, as shown below:
NUM_DRIVERS=1
                                DRIVER_ID_1=JTOpen400>
DRIVER_CLASSPATH_1=../jarfiles (my comment: since installer installs driver file this is a relative pointer to its location)|
Keyword or Input Parameter |
Description |
|---|---|
|
Remote |
One of the following:
This remote keyword affects all installing hosts defined later in the host.list file until another remote keyword is specified. |
|
Reconfigure |
One of the following:
This reconfigure keyword affects all hosts defined later in the host.list file until another reconfigure keyword is specified. |
|
host_filename = HOST_TYPE |
Defines host (recipient host) on which to install Data Integration.
In the example above, there would be two property files names named vector.properties and mountain.properties.
|
|
Keyword |
Description |
|---|---|
|
HOST_NAME |
Network name or IP address of the host to install on. |
|
HOST_USER |
Required only for remote installs. Name of the remote user on the host that “owns” the installation. This user does the remote connect and should either own the directory where Data Integration is being installed or have permission to write to this directory. |
|
HOST_PASS |
Required only for remote installs. Password associated with HOST_USER. Leave blank or enter <PROMPT> if you prefer to be prompted rather than save your password in a file. |
|
JAVA_PATH |
Directory where the Java executables are located on the recipient host. JAVA_PATH is required when installing to a remote host . |
|
INSTALL_CD |
Directory location of the omni.zip installation file. The Installer requires the current working directory to be writable. |
|
INSTALL_DIRECTORY |
Directory on the installing host where Data Integration will be installed. |
|
LISTENER_PORT |
TCP/IP port number to be reserved for Listener. Enter NONE if the installer is to skip the installation of the data movement kernel and Listener. |
|
INITIAL_MEMORY |
Initial memory setting of the Java heap memory (default, 32). On IBM i, the number specifies the threshold at which the Java Virtual Machine begins collecting allocated memory no longer referenced and setting the memory as free and available. |
|
MAXIMUM_MEMORY |
If you enter any other value than *NOMAX, it is interpreted as a maximum memory setting. |
|
SSL_AUTH |
Flag of either “Y” or “N” that indicates whether SSL authentication is to be used. A “Y” value means that –Dssla will be passed to Connect CDC Listener. |
|
SSL_ENCR |
Flag of either “Y” or “N” that indicates whether SSL encryption is to be used. A “Y” value means that –Dssle will be passed to Connect CDC Listener. |
|
INSTALL_CLIENT |
Flag of either Y for yes or N for No, indicating whether to install the Console and Consoletools. |
|
NUM_DRIVERS |
On IBM i,specify 0 for NUM_DRIVERS. Data Integration automatically installs the driver. |
|
DRIVER_ID_n |
On IBM i, do not specify a DRIVER_ID for the JTOpen400 JDBC driver. Data Integration automatically installs the driver. |
|
DRIVER_CLASSPATH_n |
On IBM i, do not specify a DRIVER_CLASSPATH for the JTOpen400 JDBC driver. Data Integration automatically installs the driver. |
|
COMMAND_LIBRARY |
Name of an IBM i Command library. This library is used by the installer to contain two (2) command language programs, OMNIL and OMNIC. The former is a program that can be called to start the Listener, and the latter is a program that can be called to run the Console. The installer creates this library if it does not already exist, and then creates a file called COMMANDS, if it does not already exist. The installer copies into COMMANDS the files that contain the command language source for the two programs and then generates the two programs. |
|
TARGET_ONLY |
Enter Y or N, depending on whether this is a target-only installation. |
|
TRANSLATE_BINARY |
Enter Y, unless you have been specifically advised by your support/services engineer. |
|
INSTALL_JETTY |
On IBM i, specify N. |
|
INSTALL_LIBRARY |
Library where the Delete Journal Receiver exit program is to be installed. This library MUST be the same as the Change Selector install library (for example, OMNIENT). The Change Selector install library is specified on the server Properties window. |
Execute the Batch Installer
Once the input files, the host.list file and <host_name>.properties file, are created, the next step is to run the batch installer. The Installer always writes an “install.log” file in the current working directory of the Installer. This detailed log documents the installation.
-
If the originating host is Windows, execute the command:
binstaller.cmd-
If the originating host is UNIX, execute the Batch Installer with the command:
sh binstaller.shSample output for Batch Install for a single host:
> binstaller.sh
   			   Installation succeeded!
   			   Please review the install.log for more information
   			   --- Summary . . .
   			   Number of hosts processed    = 1
   			   Number of hosts installed    = 1
   			   Number of hosts reconfigured = 0
   			  $