Install Winshuttle add-on v11 on ECC6 710, 711, 71x
1. Prerequisites for installation
This document is only for the installation of the Winshuttle Function Module (WFM) add-on v11.
This document is for new customers who are installing v11 function module server-side functionality for both Transaction and Query products.
- Ensure that you import the current SPAM/SAINT update (version 2.0 or later for SAP NetWeaver 2004s).
To confirm the version, compare the short text of the last imported SPAM/SAINT update (SAPKD*) with the short text of the SPAM/SAINT update in the SAP Service Marketplace. If the SAP Service Marketplace contains a more current version, import the new SPAM/SAINT update. For more information, see Note 19466.
- Use the current R3trans and tp for the installation:
- R3trans version 20060327or later on SAP NetWeaver 2004s
- tp version 340.16.31 (release 640) or later
Ensure that your system has 5 MB available in the transport directory.
2. Prepare the installation
To load the package with the add-on installation tool from the application server
- Log on as user:
<SID>adm to UNIX
<SID>OFR to AS/400 (IBM eServer iSeries)
<SID>adm to Windows NT
- Change to the transport directory of your SAP System. The transport directory also appears under the name Transaction AL11 under DIR_TRANS.
- Change to the EPS directory, and then change to the "in" directory.
- Use the latest version of the SAPCAR tool to extract WNSC40CI.SAR, which becomes the .PAT file. Copy the .PAT file to the "in" directory.
To load the package directly from the front end
Ensure that you have the latest version of the SAPCAR tool available on the SAP server:
sapcar release 640_REL build 785764 compiled on Oct 18 2005, 21:01:57 or later
3. Execute the installation
- Log on to your SAP system in client 000 as a user with SAP_ALL authorization.
Do NOT use user SAP* or DDIC.
- Call the add-on installation tool by using the transaction code SAINT.
- In SAINT, click Installation Package > Load Packages > Front End.

- Upload the file WNSC10LI.SAR and decompress it to a .PAT file.
- After upload and decompression, click Start.
- Select the add-on and click Continue.
- Click Continue.
- Click Continue.
- If the Add Modification Adjustment Transports to the Queue window appears, this component has an independent and unique namespace that is assigned by SAP. Click No.

- Click Start options.
- Select Start in background immediately and click the green check mark to continue.
- On the next screen, click the green check mark to import the package.
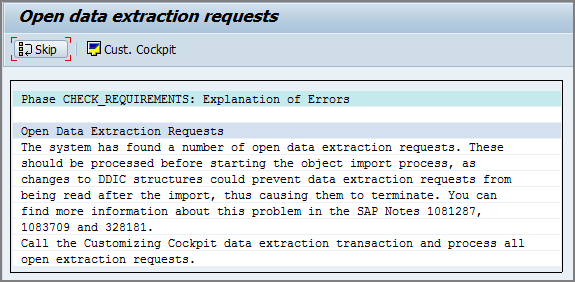
- If the Open data extraction requests window appears, the add-on has an independent unique namespace. Click Skip.

- Click Yes to continue the import process.
- Click Refresh or press Ctrl+F6 to refresh the screen.
- When the installation finishes, click Logs to view the import logs and confirm that the installation was completed successfully.
- After you view the logs, return to the Status/Remarks screen and click Finish.
