
Setting and Verifying Page Breaks
Before you create any fields, you must set the page breaks in the print stream. Then, you should verify that Enrichment Visual Engineer Plus has correctly identified page breaks.
To set page breaks
- Select Document > Set Page Top or click the Set Page Top button. The Set Page Top dialog box is displayed.
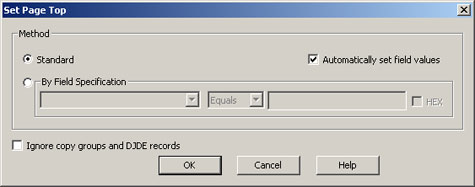
- Fill in the fields in the dialog box and click OK. The fields are listed described below.
- Standard: Select this option if you want Visual Engineer Plus to automatically determine the page breaks based on standard techniques such as carriage controls, copy groups, Begin Page (BPG) structured fields, and DJDE headers.
- By Field Specification: Select this option to define page breaks by the location of a certain field. Then, select the field that you want to use to identify the top of a page. In center box, you can select one of the following:
- Equals: Select this option if you want a new page to start whenever the value in the field matches the specific entered to the right.
If you select Equals, the HEX check box becomes available. Check this box if you want to specify a hexadecimal value for the field.
- Changes: Select this option if you want a new page to start whenever the value in the field changes.
- Exists: Select this option if you want a new page to start whenever the field appears, no matter what the value in the field happens to be. Note: When you use the By Field Specification option to set the page breaks, Visual Engineer ignores the settings on Field Information dialog box and searches for all occurrences of the field.
- Equals: Select this option if you want a new page to start whenever the value in the field matches the specific entered to the right.
- Automatically set field values: Select this check box to automatically set the field specifications based on the field you selected prior to opening this dialog box.
- Ignore copy groups and DJDE records: Select this check box to ignore copy groups or Xerox DJDE records that would ordinarily indicate a page. Clear this check box to include copy groups or Xerox DJDE records when determining page breaks.
- Click OK. Visual Engineer Plus finds all pages.
- Verify that the number of pages is correct.
To verify page breaks
Scroll through the print stream using the Next Page  and Previous Page
  buttons to verify that the page breaks are in the correct place. Page breaks are indicated by a magenta line.
You can also use the Find Pages and Documents command from the Document menu to help you verify that the print stream contains the correct number of pages. The Find Pages and Docs dialog box displays the number of pages and documents Visual Engineer Plus found. If the correct number of pages was not found, you need to change the page break options.