Manage Hierarchy Nodes
The Hierarchy Manager can be used to manage Hierarchies that have been configured with at least one node. If the Hierarchy has not been configured, see the EnterWorks 10 Administration Guide for instructions on configuring a Hierarchy.
Open a Hierarchy in Hierarchy Manager
To open a Hierarchy in the Hierarchy Manager:
- Open the Hierarchy in the Hierarchy/Taxonomy Sidebar, (see Open a Hierarchy or Taxonomy in the Hierarchy/Taxonomy Sidebar).
- Select the Manage icon
 on the left of the Hierarchy/Taxonomy Sidebar’s Activity Bar. The Hierarchy
will be opened in the Hierarchy Manager.
on the left of the Hierarchy/Taxonomy Sidebar’s Activity Bar. The Hierarchy
will be opened in the Hierarchy Manager.
|
Hierarchy Manager |
Hierarchy Manager
The Hierarchy Manager allows a user to add nodes, delete nodes, copy nodes, and assign/reassign records to nodes.
(For a detailed labeled reference guide image, see Hierarchy Manager Reference Guide.)
The Hierarchy Manager’s interface is composed of four sections:
Current Hierarchy Node Tree
The left pane of the Hierarchy Manager displays the Hierarchy’s current node tree.
|
Current Hierarchy Tree and its Activity Bar Menu |

|
Current Hierarchy Tree Activity Bar |

The Current Hierarchy Node Tree is used to add, edit, and delete nodes; manage the Hierarchy’s security (for more details, seethe EnterWorks 10 Admin Guide); and manage record assignment.
- Use the to expand and collapse buttons to view a node’s children nodes.
Detailed description of Hierarchy management functions are found in subsequent sections of this document. Briefly, the actions on the Hierarchy Manager’s Activity Bar are:
- Add: to add a node to the Current Hierarchy Node Tree.
- Edit: to edit the node selected in the Current Hierarchy Node Tree.
- Delete: to delete a node from the Current Hierarchy Node Tree.
- Product
toggle: If enabled (it will be green):
- If the Source Hierarchy Tab is showing, records assigned to nodes in the Current Hierarchy Node Tree will be displayed.
- If the Saved Set Sidebar is showing, Saved Sets can be used to filter all the repository’s records in order to facilitate assigning selected records to a nodes.
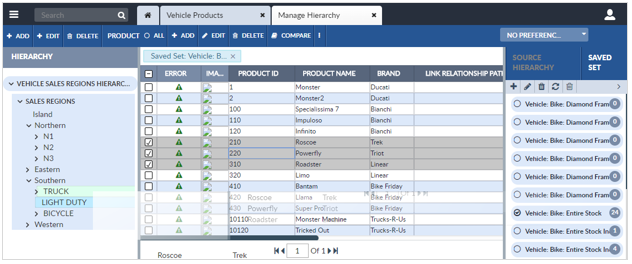
Hierarchy Manager Center Pane
The central display section of the Hierarchy Manager is called the Center Pane.
|
Hierarchy Manager Center Pane |

- If the Saved Set Tab (on the right of the display) is selected, the Center Pane acts as a Repository View and has a Repository View’s functionality. Selecting a Saved Set in the Source Pane will cause its records to be displayed in the Repository View. (See Saved Set Sidebar.)
NOTE: Selecting records from the Center Pane and clicking the Delete button on the Hierarchy Manager’s Activity Bar will delete your records.
- If the Source Hierarchy Tab is selected, the Center Pane acts as a Detail Editor Sidebar. For more information on the Detail Editor Sidebar, see Detail Editor Sidebar.
Clicking a record assigned to a node in the Current Hierarchy’s Node Tree will cause the record to be displayed in the Center Pane. Note that records only appear in the Current Hierarchy’s Node Tree if the Product toggle on the Hierarchy Manager’s Activity Bar is set to ON (it is green).
Source Hierarchy Tab
The Source Hierarchy tab is on the right of the screen and it toggles back and forth with the Saved Set tab.
The Source Hierarchy tab allows the user to easily copy nodes from a Hierarchy or Taxonomy and add them to the Current Hierarchy Node Tree.
The Source Hierarchy dropdown allows user to choose a Hierarchy or Taxonomy to use as a source for new nodes. When a node is selected, its node tree is displayed. Node names preceded by a > have children nodes; to display them click the >.
To add one or more nodes to the Current Hierarchy, select the node or group of nodes from the Source Hierarchy and drag and drop them where desired in the Current Hierarchy Node Tree. (For detailed instructions, see Add Hierarchy Node.)
|
Source Hierarchy Tab |

Saved Set Sidebar
The Saved SetSidebar can be accessed from the Hierarchy Manager. It appears on the right of the screen and it toggles back and forth with the Source Hierarchy tab. The Saved Set Sidebar is fully functional and allows management of Saved Sets. (For more information on the Saved Set Sidebar and how it functions, see Saved Sets.)
|
Saved Set Sidebar |

When the Saved Set Sidebar is initially opened, all the records in the repository will be displayed in the Center Pane in a Repository View. The Repository View is fully functional, for more information, see Repository View).
Selecting a Saved Set will cause only its records to be displayed.
Records can be assigned to a node in the Current Hierarchy Node Tree by dragging and dropping them (singly or as a group) from the Center Pane to the node, or by dragging and dropping an entire Saved Set from the Saved Set Sidebar to the node. (When dragging and dropping records, wait for the node name to be highlighted in green before dropping the records. For more information, see Assign Records via Hierarchy Manager.)
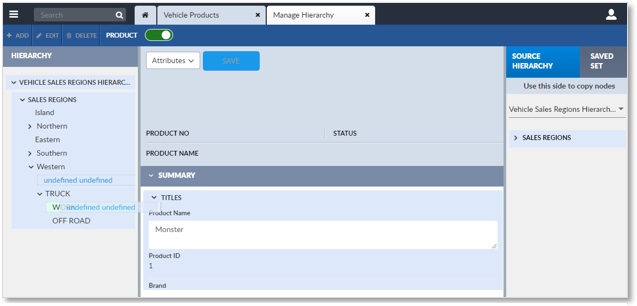
Add Hierarchy Node
To add a node to a Hierarchy (that has been configured and already has one or more nodes):
- Open the Hierarchy in the Hierarchy Manager, (see
Open a Hierarchy in Hierarchy Manager).

Hierarchy Manager
- When a new node is added, it is added as a child of an existing node. Select the parent node.
- Click the
 Add Node button on the
Hierarchy Manager’s Activity Bar. The Node Editor will appear in the Center Pane of the window. An empty node will appear in
the Current Hierarchy Tree in the Current Hierarchy pane on the left side of the display.
Add Node button on the
Hierarchy Manager’s Activity Bar. The Node Editor will appear in the Center Pane of the window. An empty node will appear in
the Current Hierarchy Tree in the Current Hierarchy pane on the left side of the display.

Hierarchy Manager: Add a Node to a Hierarchy
- Edit the fields using the Node Editor in the Central Pane as desired:
- Name: The name of the new node.
- Description: Enter a description if desired.
- Active Indicator: The node’s status:Active, Inactive, or Pending.
- Allow Assignment to Node: If Yes is selected, the user will be able to assign records to this node.
- To save the new node and exit the Node Editor, select the Save button. To exit without saving the changes to the node, click the Cancel button.
- When you are finished modifying the Hierarchy’s node tree, clear the cache, (see Clear Data Cache), and refresh displays to ensure changes to the Hierarchy have been propagated throughout the system and displays are accurately reflecting system status.
Copy Hierarchy Node(s) from Source Hierarchy
To copy one or more nodes from the Source Hierarchy Node Tree to the Current Hierarchy Node Tree:
- Open the Hierarchy in the Hierarchy Manager, (see
Open a Hierarchy in Hierarchy Manager).
Hierarchy Manager
- Select the Source Hierarchy tab in the Source Pane (on the far right).
- From the Source Hierarchy dropdown list, select the Hierarchy or Taxonomy to copy nodes from. The selected Hierarchy will be displayed as the Source Hierarchy Node Tree. Note that the Source Hierarchy Node Tree may be the same Hierarchy that is loaded as the Current Hierarchy Node Tree. This allows the user to replicate node structures in a Hierarchy.
- Expand the Source Hierarchy Node Tree as necessary to find the desired node
- Expand the Current Hierarchy Node Tree as necessary to find the desired parent node.
- Drag and drop the selected node(s) from the Source Hierarchy Node Tree to the node in the Current Hierarchy Node Tree that will be the parent node.
The node and any descendants will be copied and made a child of the parent
node; any records assigned to the node and its descendants will be assigned
to the new nodes as well.

Drag and Drop Node(s) from Source Node Tree to the Current Node Tree
- After the node is copied, the parent node may need to be expanded to make the new node visible.
- When you are finished modifying the Hierarchy’s node tree, clear the cache, (see Clear Data Cache), and refresh displays to ensure changes to the Hierarchy have been propagated throughout the system and displays are accurately reflecting system status.
Move/Reorder a Node
Hierarchy nodes can be moved from one parent node to another. Reordering a parent node’s list of descendants can be accomplished by dragging and dropping nodes to the desired position.
To move Hierarchy nodes:
- Open the Hierarchy in the Hierarchy Manager, (see
Open a Hierarchy in Hierarchy Manager).
Hierarchy Manager
- Select one or more nodes in the Current Hierarchy Node Tree and drag and drop them to their new parent node or to a new position in the parent node’s list of nodes.
- 3. When you are finished modifying the Hierarchy’s node tree, clear the cache, (see Clear Data Cache), and refresh displays to ensure changes to the Hierarchy have been propagated throughout the system and displays are accurately reflecting system status.
Delete Hierarchy Node
When a node is deleted from a Hierarchy, any children nodes are also deleted.
To delete a node from a Hierarchy:
-
Open the Hierarchy in the Hierarchy Manager, (see
Open a Hierarchy in Hierarchy Manager).
Hierarchy Manager
- Select the node to be deleted.
-
Click the Delete Node button
 on the Hierarchy Manager’s Activity Bar.
- A Confirm window will appear. Select Yes to delete the node. Select No to exit the Confirm window without deleting the node.
- When you are finished modifying the Hierarchy’s node tree, clear the cache, (see Clear Data Cache), and refresh displays to ensure changes to the Hierarchy have been propagated throughout the system and displays are accurately reflecting system status.
Assign Records via Hierarchy Manager
Note: this functionality may not yet be implemented. If it is not yet implemented, assign records to nodes via the Assign Records using Hierarchy/Taxonomy Sidebar.
To assign records to a Hierarchy node via the Hierarchy Manager:
- Open the Hierarchy in the Hierarchy Manager, (see
Open a Hierarchy in Hierarchy Manager).
Hierarchy Manager
- Expand the Current Hierarchy Node Tree as necessary to find the desired node.
- Toggle the Product toggle to On (it will be green). The Current Hierarchy Node Tree will display the records assigned to a selected node.
- Select the Source Hierarchy tab in the Source Pane (on the far right), then select the desired Hierarchy or the Taxonomy from the Hierarchy dropdown list. The selected Hierarchy will be displayed as the Source Hierarchy Node Tree. Note that the Source Hierarchy Node Tree may be the same Hierarchy that is loaded as the Current Hierarchy Node Tree. This allows the user to replicate node structures in a Hierarchy.
- Expand the Source Hierarchy Node Tree as necessary to find the desired node and its assigned records.
- Expand the Current Hierarchy Node Tree as necessary to find the node the records will be assigned to.
- Drag and drop selected records from the Source Hierarchy Node Tree to the node in the Current Hierarchy Node Tree. When dragging and dropping records, drag them over the desired node and wait for the node name to be highlighted with a green box before releasing the records. It might take a second or two.
- When the records have been successfully assigned, a green status pop-up window will briefly appear at the bottom of the screen indicating that the records have been successfully added.
- Select records from the Center Pane, then drag and drop
them to the node in the Current Hierarchy Node Tree to
which they will be assigned.
Hierarchy Manager: Assign Records from Saved Set to a Hierarchy Node
- The records will now be assigned to the node in the Current Hierarchy Node Tree.
- To unassign records from a Hierarchy node, see the system administrator.
- When you are finished modifying the Hierarchy’s node tree, clear the cache, (see Clear Data Cache), and refresh displays to ensure changes to the Hierarchy have been propagated throughout the system and displays are accurately reflecting system status.
Alternatively, select the Saved Set tab in the Source Pane (on the far right). All the records in the repository will be displayed in the Center Pane in a Repository View and the Saved Set Sidebar will be opened on the right. Selecting a Saved Set will cause its records to be displayed in the Center Pane. A Filter Term box will appear in the Center Pane’s Activity Bar, indicating the records displayed are from the selected Saved Set.
Move/Reassign Records via Hierarchy Manager
To move or reassign records from one Hierarchy node to another via the Hierarchy Manager:
- Open the Hierarchy in the Hierarchy Manager, (see
Open a Hierarchy in Hierarchy Manager).
Hierarchy Manager
- Expand the Current Hierarchy Node Tree as necessary to find the desired source node.
- Toggle the Product toggle to On (it will be green). The Current Hierarchy Node Tree will display the records
assigned to nodes.
Move/Reassign Records via Hierarchy Manager
- Drag and drop the desired record from the source node to the destination node. The record is now associated with the destination node.
- When you are finished modifying the Hierarchy’s node tree, clear the cache, (see Clear Data Cache), and refresh displays to ensure changes to the Hierarchy have been propagated throughout the system and displays are accurately reflecting system status.
Assign Records using Hierarchy/Taxonomy Sidebar
To assign records to a Hierarchy node:
- Open the Hierarchy in the Hierarchy/Taxonomy Sidebar,
(see Open a Hierarchy or Taxonomy in the Hierarchy/Taxonomy Sidebar).

Hierarchy/Taxonomy Sidebar
- Selecting a Hierarchy node will cause the Repository View to display only the records assigned to that node. If the selected node has no records assigned to it, no records will be displayed.
-
A filter box will be added to the Repository View’s Filter Bar
 that indicates which node’s
records are currently being displayed. Hovering over the filter term shows
the node’s Hierarchy.
that indicates which node’s
records are currently being displayed. Hovering over the filter term shows
the node’s Hierarchy.
- The records shown in the Repository View can also be filtered through using the Filter button on the Repository View’s Activity Bar’s More dropdown list. For more information about Filters, see Filters.
- The Hierarchy/Taxonomy Sidebar’s Display Option dropdown list allows the user to choose if only the records attached to the node are displayed, or if the records attached to the children or parent nodes are also displayed.
- Select one or more records, then drag and drop them onto the desired Hierarchy node. The records will be assigned to that node.
- Select the node to cause the Repository View to only display the records
assigned to the node.
Hierarchy/Taxonomy Sidebar: View Node Record Assignment
- To
return to viewing all the records in the repository, close the Filter Term box by clicking its Close icon
 .
.
- When you are finished modifying the Hierarchy’s node tree, clear the cache, (see Clear Data Cache), and refresh displays to ensure the change to the Hierarchy has been propagated throughout the system and displays are accurately reflecting system status.
Unassign Records From a Hierarchy Node
Currently, records cannot be unassigned from a Hierarchy node in the Hierarchy/Taxonomy Sidebar. See the system administrator to unassign records from Hierarchy nodes.

Copyright 2007, 2023 Precisely