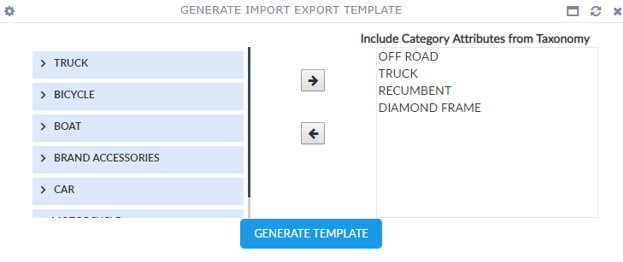
Generate Import/Export Template Widget Administration
The Generate Import Export Template widget allows the user to generate an empty file to be used to import data into an EnterWorks repository.
The administrator configures the file by selecting an Import Template to define the columns in the file, and decides which category attributes will be included along with the global attributes specified by the Import Template. The administrator can also configure the widget to allow the user to choose which category attributes to include.

Configuring Generate/Import Export Template Widget
To configure a Generate Import Export Template widget:
-
Configure a new blank widget. For more information about adding and configuring new widgets, see Add a Widget.
-
Select the Settings icon
 in the upper right of the new widget’s Activity Bar. Note that a widget’s
Activity Bar will not be displayed unless the cursor is hovering over the top of the
widget. A Configuration window will appear.
 - Select Generate Import Export Template from the Type dropdown list on the far right of the widget Configuration window. The Generate Import Export Template widget configuration options will appear.
- The Generate Import Export Template configuration options are:
-
Title: The title of the widget. It is helpful if the title of a widget reflects the source of the data as well as the widget’s type, for instance "Generate Import Export Template".
-
Repository: The repository the template will be generated for.
-
Preference: The Preference to use when generating the template. If a Preference is specified, the only category attributes that will be presented for inclusion are those that are in the Preference.
Note: If a Preference is specified, the selected Preference acts as a filter. Only category attributes that are in both the selected import template and the selected Preference will be presented for inclusion in the generated template. -
Output Format: The format of the template:
-
CSV (Comma Separated Values)
-
Excel Workbook (xlsx)
- Excel Workbook (xlsx) with Format:
-
The columns of required attributes are highlighted.
-
A worksheet named Lists displays any code sets.
-
Attributes of type code set will display dropdown menus for user to select a value from the code set.
-
-
Excel 97 - 2003 (xls)
-
-
Template: The import template that will be used to define the global attributes that will be included in the generated template, and the set of category attributes that are available to be included.
-
File Split By Category: If selected, if category attributes are to be included in the generated template, instead of generating one template that lists all the category attributes from all the selected taxonomy nodes, a separate file is generated for each taxonomy node. Each file would include all specified global attributes and only those category attributes that are assigned to the taxonomy node.
For example, if you have four different nodes that each have ten category attributes (with no overlap), not setting this option would produce a file with all the selected global attributes and 40 category attributes. If the File Split by Category option is set, four files would be produced, one for each node, that contain all the specified global attributes and the ten category attributes associated with that node.
-
Show Taxonomy in Widget: If selected, the Include Category Attributes from Taxonomy selection panel will appear on the widget and the user will be able to select which category attributes to include in the generated template. If it is not checked, the user will not be able to change the list of category attributes to be included in the template.
-
Download Button Label: The label to be used in the widget’s button that triggers the generation of the template.
-
Include Category Attributes from Taxonomy selection panel: This is used to define the initial list of category attributes the user will be able to select for inclusion in the template if the Include Category Attributes from Taxonomy box is selected.
-
-
Click Apply to save the changes to the widget and close the Configuration window. Click Cancel to close the Configuration window without saving the changes.
-
If you want your Dashboard configuration to remain after you switch tabs or log out, click the Save Layout button on the Dashboard's Activity Bar, otherwise your Dashboard will revert to its last saved configuration.
