Configure IIS Application Pools
To configure the IIS Application Pools:
- If IIS Manger is not already opened, open it: From the Start Menu select Administrative Tools, then select Internet Information Services (IIS) Manager.
-
Add the
Enableapplication pool to the server:- In the IIS Manager's left navigation tree, expand the folder for your server.
- In the left navigation tree, right-click the Application Pools node and select Add Application Pool….
- The Add Application Pool window will appear. Edit the
configuration options as shown below:
-
Name:
Enable - .NET CLR version: .Net Version v4.0.30319
- Managed pipeline mode: Integrated
- Start application pool immediately: Check the box.
- When you are finished editing the options, click the
OK button. The
Enablepool will now appear in the Application Pools page.
-
Name:
- Set the
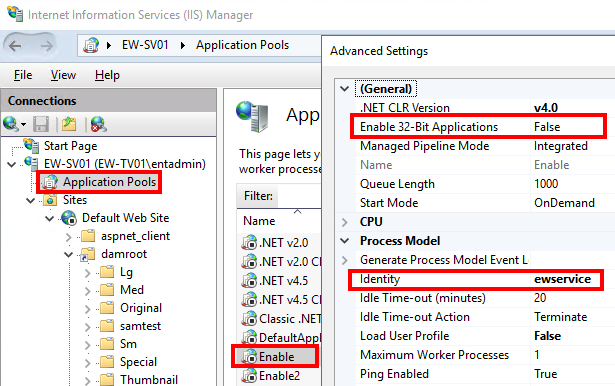
Enableapplication pool's advanced settings:- In the Application Pools page, select the Enable application pool, then in the Actions menu on the right, click Advanced Settings…. The Advanced Settings window will appear.
- Set the option as shown below: (General):
-
Enable 32-Bit Applications: False
-
- Set the application pool to run as the
ewserviceuser account.- Select the setting: Process Model
-
Identity:

-
- The Application Pool Identity window will appear. Select Custom account and click the Set button.
- Enter the credentials for the
ewserviceaccount. - Click the OK button to exit the Application Pool Identity window.
- Select the setting: Process Model
- Click the OK button to exit the
Enableapplication pool's advanced settings.
-
Add the
Enable2application pool to the server:- In the left navigation tree, right-click the Application Pools node and select Add Application Pool….
- The Add Application Pool window will appear. Edit the
configuration options as shown below:
-
Name:
Enable2 - .NET CLR version: .Net Version v4.0.30319
- When you are finished editing the options, click the
OK button. The
Enable2pool will now appear in the Application Pools page.
-
Name:
- Set the
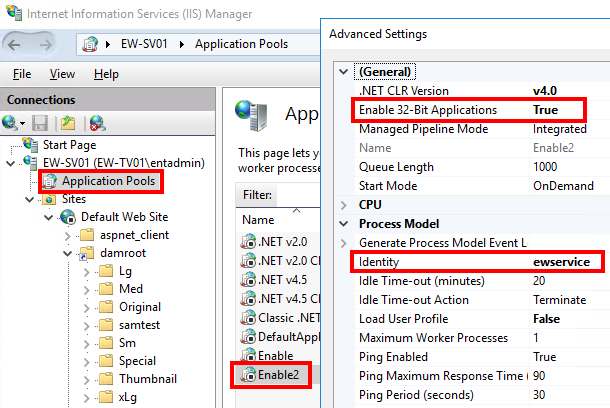
Enable2application pool's advanced settings:- In the Application Pools page, select the Enable2 application pool, then in the Actions menu on the right, click Advanced Settings…. The Advanced Settings window will appear.
- Set the following setting: (General):
-
Enable 32-Bit Applications: True
Note: The Enable 32-Bit Applications setting is set to:-
Enableapplication pool = False. -
Enable2application pool = True.
-
- Set the application pool to run as the
ewserviceuser account.- Select the setting:
-
Identity:

-
- The Application Pool Identity window will appear. Select Custom account and click the Set button.
- Enter the credentials for
the
ewserviceaccount. - Click the OK button to exit the Application Pool Identity window.
- Select the setting:
- Click the OK button to exit the
Enable2application pool's advanced settings.
-
Configure the default web site:
- In the left navigation tree, expand the Sites folder and select Default Web Site.
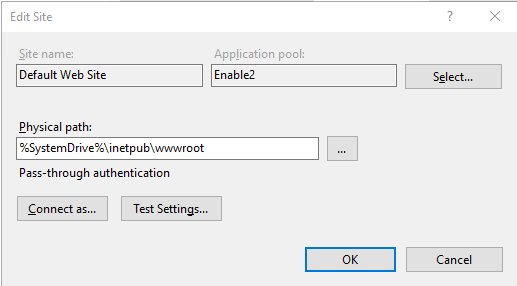
- In the Actions menu on the right, select Basic Settings. The Edit Site window will open.
- Click the Select button to the right of the field for
the Application pool. The Select Application Pool
window will appear. Use the dropdown list to select
Enable2 as the application pool, then click
OK to exit the window.

- If Application user (pass-through authentication) does not appear above the Connect as button, click the Connect as button. The Connect As window will appear. Select Application user (pass-through authentication), then click OK to exit the window.
- Click the Test Settings button to verify the connection. The Test Connection window will open and report that the application pool identity is valid. Click Close to close the window and return to the Edit Site window.
- If Publication Manager is configured on the same server that
hosts
enable-web-server-service, then IIS must be configured to use a port 81 rather than port 80.Note: If you are configuring SSO, you will have to configure a second Tomcat, namedEnableServerTomcatPubMgr, and configure it to use port 8190. For instructions on configuring a second Tomcat, contact EnterWorks support.- To configure IIS to use port 81 if you are not using
SSL:
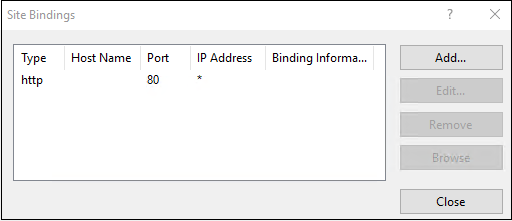
- Right-click Default Web Site and click
Edit Bindings... The Site Bindings
window will open. If the port hasn't already
been changed, it will be set to 80.

- Select the port binding and click
Edit. The Edit Site Binding window will
open. Edit the configuration settings as
follows:
-
Type: This will be set to http and you cannot change it.
-
IP address: Leave this set to All Unassigned.
-
Port: 81
-
Host Name: This can be left empty.
-
- Click OK to save your changes and exit to the Site Bindings window.
- Right-click Default Web Site and click
Edit Bindings... The Site Bindings
window will open. If the port hasn't already
been changed, it will be set to 80.
- To configure IIS to use port 81 if you are
configuring SSL:
- The customer must provide you with:
-
SSL certificate file in .PFX format
-
The certificate's password.
-
- Copy the SSL certificate file to:
<drive>:\Enterworks\certs\ssl for iis - Import the certificate to IIS:
- In the IIS Manager, select the <server-name> section of the left navigation tree.
- Double-click the Server Certificates icon in the center of the screen, to open the Server Certificates window.
- In the Actions menu on the right of the window, click Import.
- The Import Certificate window will open.
Edit the configuration settings as follows:
-
Certificate file (.pfx): Click the ... icon to the right of the entry field and select the SSL certificate file in the folder:
<drive>:\Enterworks\certs\ssl for iis -
Password: Enter the password the customer provided you.
-
Select Certificate Store: Open the dropdown and select Web Hosting.
-
Allow this certificate to be exported: Leave this setting as you found it. Checked is acceptable.
-
- When you are finished editing the configuration settings, click OK to return to the Server Certificates window. The certificate should appear in the window.
- Right-click Default Web Site and click
Edit Bindings... The Site Bindings
window will open. If the port hasn't already
been changed, it will be set to 80.

- You cannot change the type of the binding to https, so you must create a new binding for https, then delete the http binding.
- Click the Add... button to the right
of the window. The Add Site Binding window
will open. Edit the configuration settings as
follows:
-
Type: https
-
IP address: Leave this set to All Unassigned.
-
Port: 81
-
Host name: Enter the customer's domain name, for example:
enable.<customer-name>.com -
SSL certificate: Click Select ... to select open the Select Certificate window. Select the certificate and click OK.
-
- Click OK to save your changes and exit to the Site Bindings window.
- Select the http binding you are replacing, then click Remove. A confirmation window will ask if you are sure you wish to delete the binding. Click Yes.
- The customer must provide you with:
- To configure IIS to use port 81 if you are not using
SSL:
- You are finished configuring the application pools.
