Configure IIS
To configure IIS:
-
IIS must be configured to use a local user account or a network user account.
The best practice is for this user account to be named
ewservice. These instructions will refer to the account asewservice, but that does not have to be the name of the account.If you need to create theewserviceaccount:-
If you wish to create
ewserviceas a network account, do so. You may need to specify the network domain. -
Or, if you wish to create
ewserviceas a local account, you can do so in the following manner:- Open the server's Start Menu, search for User Accounts, and open it.
- The User Accounts page will open. Click Manage Another Account.
- The Manage Accounts page will open. Click Add a user account. It appears at the bottom of the list of users.
- If the following user does not exist, create it.
-
user account:
ewservice -
password:
<ewservice-password>
-
-
-
Ensure that the
ewserviceuser has the necessary permissions:- Ensure that the
ewserviceuser has the necessary permissions for the<drive>:\Enterworksfolder:- Right-click the
<drive>:\Enterworksfolder and select Properties. - Open the Security tab.
- If ewservice does not appear in the list titled Group
or user names, add it:
- Click Edit.
- Click Add.
- In the Enter the object names to select box,
type
ewservice. - Click Check Names.
- Click OK.
- In the Group or user names box, click ewservice.
- In the Permissions for ewservice list, see if
ewservice has the checkbox for Full control
permission checked. If it doesn't:
- Click Edit.
- Select ewservice.
- In the Permissions for ewservice list, check the checkbox for Full control.
- Click Apply.
- Right-click the
- Using the same process, ensure that the
ewserviceuser has Modify permission for the folders:-
C:\Windows\Microsoft.NET\Framework\v4.0.30319\Temporary ASP.NET Files -
C:\Windows\Microsoft.NET\Framework64\v4.0.30319\Temporary
                                            ASP.NET Files
-
- Ensure that the
- Open IIS Manager: From the Start Menu, select Administrative Tools, then select Internet Information Services (IIS) Manager.
- Configure the IIS application pools.
-
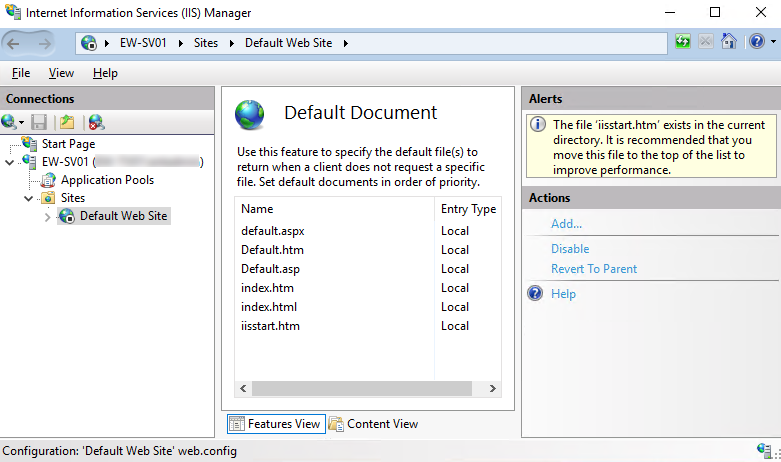
Set the Default Document file.
- In the left navigation tree, click Default Web Site.
- In the center screen, double-click the Default Document icon. The Default Document list will appear.
- If
default.aspxdoes not appear in the list of files, add it.- In the Actions menu on the right, click Add.
- The Add Default Document window will appear. In the Name
field, enter
default.aspx. - Click the OK button to save the filename and return to the Default Document window.
- If
default.aspxdoes not appear at the top of the list of files, select it, then use the Move Up button in the Actions menu to movedefault.aspxto the top of the list.
- Configure the IIS virtual directories.
-
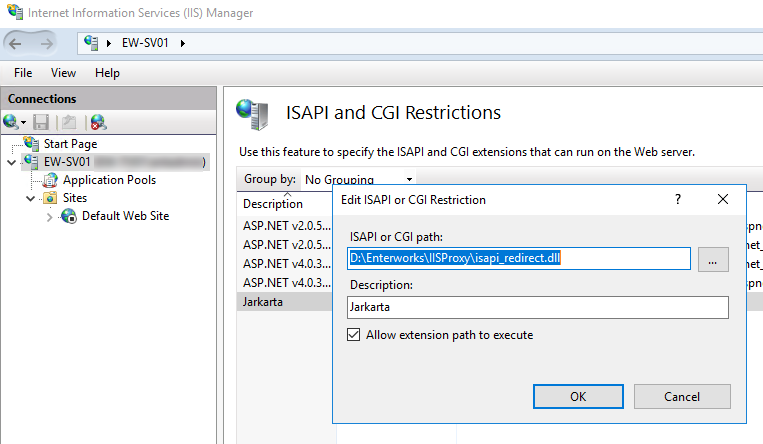
Give the
isapi_redirect.dllfile the ability to be executed:- In the IIS Manager’s left navigation tree, click the server's node.
- In the center pane, double-click ISAPI/CGI Restrictions.
- The ISAPI and CGI Restrictions page will open. It displays a list of the already allowed ISAPI’s and CGI’s. In the Actions menu on the right, click Add.
- The Add ISAPI or CGI Restriction window will open. Enter the following
configuration settings:
-
ISAPI or CGI path:
<drive>:\Enterworks\IISProxy\isapi_redirect.dll -
Description:
Jakarta -
Allow extension path to execute: Check this box.

-
- Click OK to return to the ISAPI and CGI Restrictions page.
-
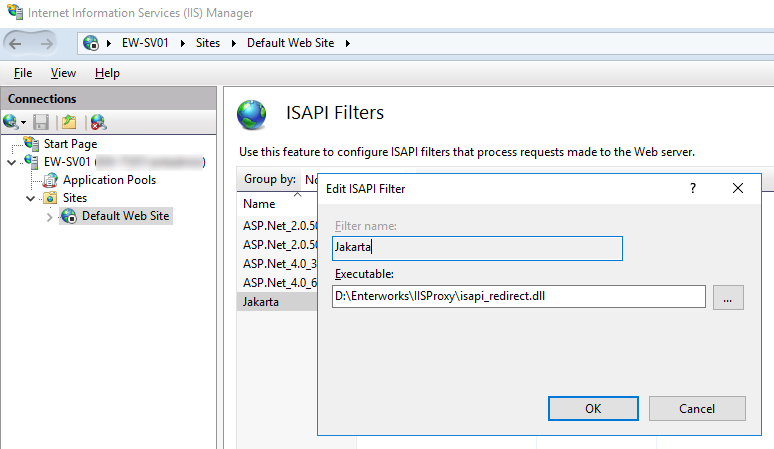
Add a new filter for the IIS Proxy:
- In the IIS Manager’s left navigation tree, select Default Web Site.
- In the center pane, double-click ISAPI Filters.
- The ISAPI Filters page will open. It displays a list of the already configured filters. In the Actions menu on the right, click Add.
- The Add ISAPI Filter window will open. Enter the following
configuration settings:
-
Filter name:
Jakarta -
Executable:
<drive>:\Enterworks\IISProxy\isapi_redirect.dll
-
- Click OK to return to the ISAPI Filters page.
-
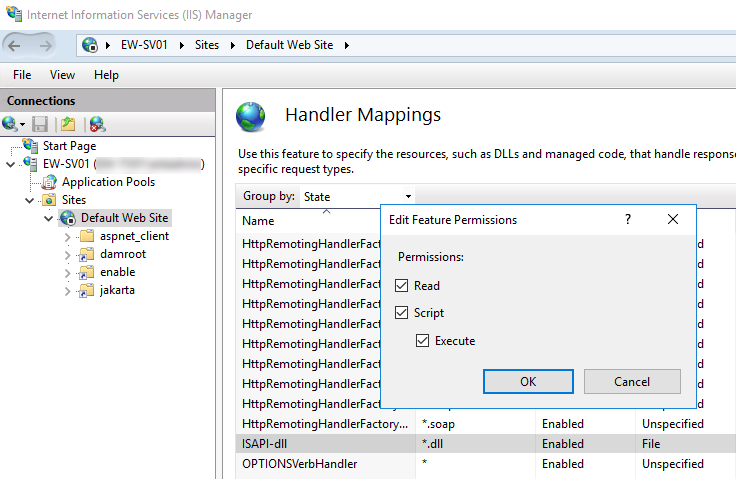
Set handler mappings:
- In the IIS Manager’s left navigation tree, double-click Default Web Site.
- In the center pane, double-click Handler Mappings.
- The list of mapped handlers will appear. The list is separated into two sections, one for disabled handlers and one for enabled handlers. In the Disabled section, select ISAPI-dll.
- In the Actions menu on the right, click Edit Feature Permissions…
- The Edit Feature Permissions window will appear. Check the following
checkboxes to set the permissions:
-
Read
-
Script
-
Execute

-
- Click OK to exit the Edit Feature Permissions window.
You have finished configuring IIS.
