
Configure IIS Virtual Directories
To configure the IIS virtual directories:
- If the IIS Manager is not already open, open it: From the Start Menu, select Administrative Tools, then select Internet Information Services (IIS) Manager.
- Add and configure the
EnableWebvirtual directory:-
In the IIS Manager’s
left navigation tree, right-click Default Web Site and select
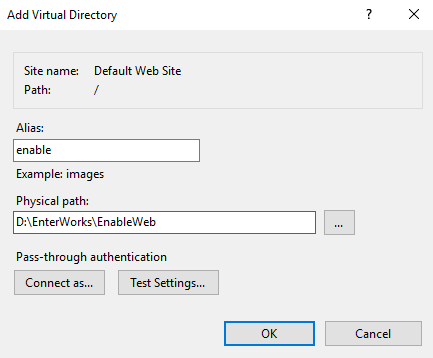
Add Virtual Directory. The Add Virtual Directory window will appear.
-
Edit the settings in the Add Virtual Directory window as follows:
-
Alias:
enable -
Physical path:
<drive>:\Enterworks\EnableWeb -
If Application user (pass-through authentication) does not appear above the Connect as button, click the Connect as button. The Connect As window will appear. Select Application user (pass-through authentication), then click OK to exit the window.
-
- Click the Test Settings button to verify the connection. The Test Connection window will open and report that the application pool identity is valid. Click Close to close the window and return to the Add Virtual Directory window.
- Click the OK button to exit the Add Virtual Directory window.
-
Edit the settings in the Add Virtual Directory window as follows:
-
In the IIS Manager’s left navigation tree, right-click the
enablevirtual directory and select Convert to Application. The Add Application window will appear. Configure it as follows:- In the Application pool dropdown, select Enable2.
- Click the Test Settings button to verify the connection. The Test Connection window will open and report the status of the connection. Click Close to close the window and return to the Add Virtual Directory window.
- Click the OK button to exit the Add Application window.
-
In the IIS Manager’s
left navigation tree, right-click Default Web Site and select
Add Virtual Directory. The Add Virtual Directory window will appear.
- Add the
Damrootvirtual directory:-
In the IIS Manager’s left navigation tree, right-click
Default Web Site and select Add Virtual Directory.
The Add Virtual Directory window will appear.
-
Edit the settings as follows:
-
Alias:
damroot -
Physical path: Open the file:
<drive>:\EnableWeb\Web.configSet Physical path to the value of
DamAssetPath, for example:<drive>:\Enterworks\Damroot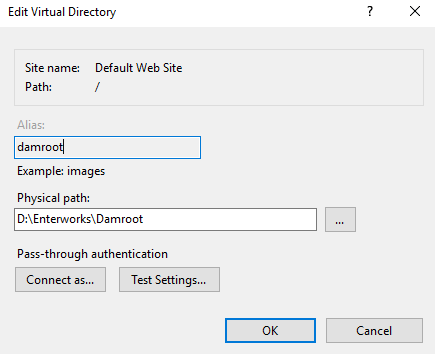
-
If Application user (pass-through authentication) does not appear above the Connect as button, click the Connect as button. The Connect As window will appear. Select Application user (pass-through authentication), then click OK to exit the window.
-
-
Click the Test Settings button to verify the connection. The Test Connection window will open and report that the application pool identity is valid. If
Damrootis stored on a UNC path to a shared folder, the Pass-through authentication will be verified, but a message will appear that says the Path cannot be verified. That is expected and is not a problem. Click Close to close the window and return to the Add Virtual Directory window. - Click the OK button to exit the Virtual Directory window.
-
Edit the settings as follows:
-
In the IIS Manager’s left navigation tree, right-click
Default Web Site and select Add Virtual Directory.
The Add Virtual Directory window will appear.
- Add the
jakartavirtual directory:-
In the IIS Manager’s left navigation tree, right-click
Default Web Site and select Add Virtual Directory. The Add
Virtual Directory window will appear.
-
Edit the settings as follows:
-
Alias:
jakarta -
Physical path:
<drive>:\Enterworks\IISProxy -
If Application user (pass-through authentication) does not appear above the Connect as button, click the Connect as button. The Connect As window will appear. Select Application user (pass-through authentication), then click OK to exit the window.
-
- Click the Test Settings button to verify the connection. The Test Connection window will open and report that the application pool identity is valid. Click Close to close the window and return to the Add Virtual Directory window.
- Click the OK button to exit the Virtual Directory window.
-
Edit the settings as follows:
-
In the IIS Manager’s left navigation tree, right-click
Default Web Site and select Add Virtual Directory. The Add
Virtual Directory window will appear.
- You are finished adding and configuring the virtual directories.