
Name Templates
Name Templates allow you to create unique alpha, numeric, or date values for your form names.
Notes: You can import and export Name Templates, at both the global and local app levels.
You can display a list of where each Name Template has been used.
You cannot use the following invalid file name characters in Name Template names: @!*,.?^&%
The Revision template function seed must be in the same format as the seed of the specified name template.
The default name for forms is the form type combined with the date and time the form was created; however, you can create a more user-friendly name for your forms using the Form Name Element and a Name Template. The Form Name Element enables you to incorporate name templates and/or field values into form names. For Custom Excel Workflows, Name Templates can also be used for data file and supporting documents.
Note: Name templates defined in a solution can only be used within the solution in which they are created. A Global Name Template (see below) is a name template stored on a Global or App level based on the selection made during template creation. It can be used across multiple solutions connecting to that Evolve setup. A standard name template is stored within a single solution and used only by that solution.
Reference counts display the number of solutions using a specific Name Template. Reference counts recognize the latest deployed version only; previous deployed versions with processes running processes are not counted.
Create a name template; link to form, data file, or supporting documents
For Form solutions, name templates must be used in conjunction with the Form Name Element .
Add or edit global name templates
- Open User App.
- Go to Solutions page.
- Select the Solution and click Edit Solution. This will open Solution Designer / Composer.
- Under Composer, go to the Solution tab.
- Click Name Templates.
-
In the Name Templates dialog box, do the following:
- Scope: Select the scope as Global/Name of the App - from the drop down.
- Click Create to create a new name template, and then follow the instructions (beginning at step 3) for Add a new name template.
Add a new name template
- Open User App.
- Go to Solutions page.
- Select the Solution and click Edit Solution. This will open Solution Designer / Composer.
- Under Composer, go to the Solution tab.
- On the ribbon, click Add Name Template.
-
Type a name for the template, and then click OK.
Note:You cannot use the following invalid file name characters in Name Template names: @!*,.?^&%
- Edit the name template values to configure the name template.
An Alternate method for adding a name template: You can also right-click Name Templates in the Solution pane, and then click Add Name Template. The new template will appear in the Solution Tree pane, under Name Templates.
Add or edit name template values
- Click Edit to edit the existing name template value or, click Add to add a new one.
-
Next to Type, click the drop arrow and select one of
the following from menu.
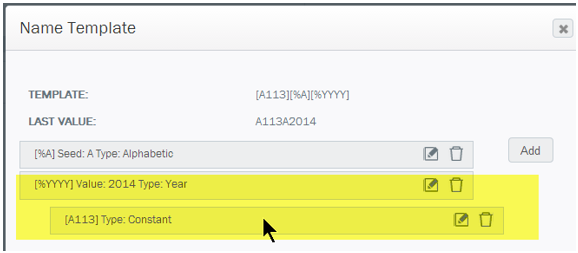
Name Template Value Description Constant Include a constant value in your name template that will not change and will be included in all generated names. For example, an HR department could include the constant TOR to create a name template to auto-generate names for Time Off Request forms. Alphabetic Include a running alphabetic identifier in your name template. For example, you could have a sequence of unique alphabetic identifiers such as AAA, AAB, ..., AAZ, ABA, etc. Number Include a running numeric value, starting with the value you enter in the Value text box in step 10. For example, if you select Number as the Type and enter 000 in the Value text box, the next name generated will be 001. Year Include the year in your name template. For example, all forms will have a unique name starting with 10. Month Include a two-digit indicator of the month in your name template. For example, all forms generated in May will have a unique name starting with 05. Day Include a two-digit indicator of the day of the month in your name template. For example, all forms generated on January 14 will have a unique name starting with 14. Quarter Include a two-digit indicator of the quarter in your name template. For example, all forms generated in the third quarter will have a unique name starting with 03. - In the Value text box, type the value you want your name scheme to begin with.
- Click OK.
Reorder name template components
To re-order Name Template components, drag-and-drop them into the new location.
Set the default name template
- In the Solution Tree window, right-click the name template.
- Click Set Default.
Configure the form name element with a name template
To use the name template for generating a name for your form:
- Add a Form Name Element to your form.
- In the header area of the form, click the Form Name Element you just inserted.
- In the Properties pane, under General Settings and next to Template, click Options[...].
- In the Form Name Builder, click Add.
-
In the Form Name Element dialog box, enter the following:
- Type : Select one of the following from the drop-down menu: Solution Name Template, Global Name Template, App Name Template or Form Field.
- Value : Select a value from the drop-down menu. The drop-down menu will be populated automatically according to what is selected underType. For example, if you select Form Field under Type, the Value drop-down menu will display a list of all the fields in your form.
- Click OK to complete the Form Name Builder or click Add if you wish to add more name templates.
Add form data to your form name
In addition to using name templates, you may also want to include form data in the name of your form. This can help users who have a large number of tasks easily identify items requiring attention.
Using a combination of static and variable name templates with form data enables you to create form names to match your particular process.
-
Highlight the form name control of your form.
- In the Properties Pane, next to Template, click the options button [...] to edit your Template.
- Click Add.
-
In the Form Name Element box:
- Under Type, select Form Field.
- Under Value, select your specific form field.
- Repeat steps 2 and 3 until you have added all your form fields, and then click OK.
- Save and deploy your solution.
- Open, complete, and then save and route your form.
- You should now see your custom form name in the Form Library.