
Record Validation
How Record Validation Works
The attribute values of a record are validated when the values are entered into the system. This typically occurs when a record is imported into the database or when a record is saved in the Detail Editor after it has been created or modified. Users can also manually start record validation jobs that produce correction files that indicate the validation status of attributes.
During validation, attribute values are checked against constraints placed by the data type, editor control settings, and explicit validation rules. These constraints are always applied. They are independent of validation levels.
Different syndication targets may have different requirements for data content, such as which attribute values are required and whether or not they accept attribute values flagged with warnings.
The use of validation levels gives an organization the ability to determine if particular validation errors and warnings are severe enough to prohibit the syndication of a record to a particular target. They allow a record to be deemed good enough for syndication to one target but not another.
Validation levels are associated with the quality of the record’s attribute values. Validation rules are assigned to validation levels; for a record to reach a level of validation, it must pass the validation checks for that level and all the validation levels beneath it.
EnterWorks supports up to five levels of validation and they are often labeled "A" through "E", such that in order for a record to be deemed valid at level A, it must satisfy all the requirement levels for E, D, C, and B as well.
Records are eligible for promotion to Production once they pass the validation rules for their Validation Level. Once promoted, they will only be available for syndication to those targets which they are ready for (have achieved a validation level high enough for). Note that since validation levels are cumulative, records that are available for syndication to one target will also be available for syndication to all targets that have the same or lesser validation level requirements.
A record’s validation status indicates whether it achieves its assigned validation level. The possible status values are:
-
Green: Promotable.
-
Yellow: Has warnings – May be promotable according to system configuration and user entry.
-
Red: Has severe errors – Unpromotable.
-
Black: Record not yet validated.
During system configuration, it is determined which validation rules map to which validation levels and whether the promotion of records allows for errors or warnings.
Record Validation Example
The following diagram illustrates how validation rules assigned to validation levels affect the validation status of records for those levels:
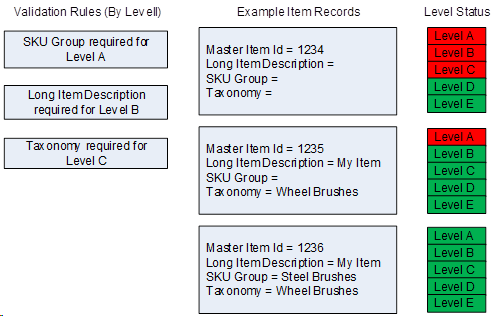
In the above example, if the first record (with Master Item Id = 1234) has a required validation level of D or E, the record will be deemed valid. But if it must reach level A, B, or C to be promotable, it would be deemed not promotable and flagged with at least one severe error.
The second record is valid if its required validation level is set to any level but A.
The third record is deemed valid regardless of what its required validation level because all validation rules have been satisfied.
Setting a Record's Validation Level
To set the required level of validation for one or more records:
- Open the desired repository in a Repository View. Open the Feature Sidebar, select the desired folder, and select the desired repository. The repository will be opened in a Repository View.
- Select the desired record or records in the Repository View.
Open the More Actions dropdown by clicking the
 on the Repository View’s Activity Bar. Select the Set
Validation Level option.
on the Repository View’s Activity Bar. Select the Set
Validation Level option. - The Set Validation Level window will appear. The title of the window will indicate how many records will be affected by the change in required validation level.
- Select the desired required validation level.
- Select Okay to save the new validation level. Click Cancel to exit without saving any change to the validation level.
Setting a Syndication Template’s Validation Level
When defining a Syndication Template to use for an export or syndication, the default validation level is set to "A". This validation level can be changed for the template during setup or modification.
Validating Selected Records
To validate one or more records:
- Open the desired repository in a Repository View. Open the Feature Sidebar, select the desired folder, and select the desired repository. The repository will be opened in a Repository View.
- Select the desired record or records in the Repository View.
The user may use a Saved Set or a Search to find the desired records.
Open the More Actions dropdown by clicking the on the Repository View’s Activity Bar. Select the
Validate option.
- A Confirmation window will appear that indicates the number of records being sent for validation.
- Select Yes to save run validation on the records. Click No to exit without validating the records.
Validating all the Records in a Repository or a Saved Set
To validate all the records in a repository or a Saved Set:
- Open the desired repository in a Repository View. Open the Feature Sidebar, select the desired folder, and select the desired repository. The repository will be opened in a Repository View.
- Open the More Actions dropdown by clicking the on the Repository View’s Activity Bar. Select the
Validate option.
- A Validate window will appear.
- Set the options in the Validate window as desired:
-
Records: Selects the records to validate.
-
All records: Validate all the records in the repository.
-
Saved Set: Select the desired Saved Set.
-
Record Type: Select to validate records that have not been already validated, records that have not already been validated and records that have errors, or all the records.
-
Perform Category Attribute validation: Select if the record’s Category Attribute values should be verified against the Taxonomy node’s Category Attributes. Note that when validation is performed, if a value is found in an attribute that is not a Category Attribute for that Taxonomy node (or no longer a Category Attribute for that Taxonomy node), the value will be removed
-
Generate correction files: Select if a correction file should be generated for each attribute. This can be used for fixing the data in the correction file and then using the files to update the records.
-
Validation Level dropdown: Select the desired required validation level to check the records against. The record validation status will be generated based on if the all validation rules for this validation level.
-
- Select Validate to validate the selected records. Select Cancel to exit without validating the records. To access any generated correction files, open a Job Monitor widget in the Dashboard.