Manage Category Attribute Assignment
- View Taxonomy Manager
-

For a description of Category Attributes, see How EnterWorks Works: Attributes.
The EnterWorks functions for managing Category Attributes are:
View Assigned Category Attributes
To view the Category Attributes assigned to a Taxonomy node:
-
Open the Taxonomy in the Taxonomy Manager, (see Taxonomy Manager).
- Drill down the Taxonomy Node Tree to find and select the
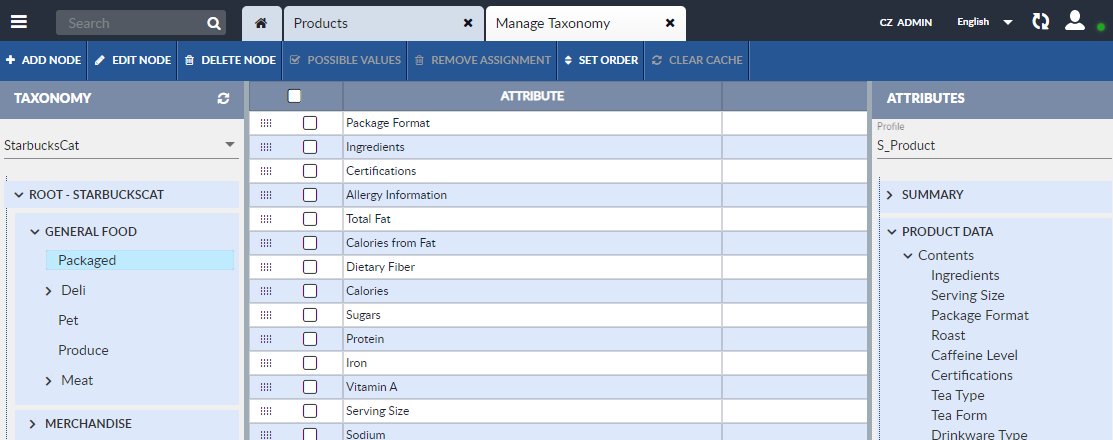
desired Taxonomy node. Category Attributes assigned to the node will
be listed in the center of the screen, in the Assigned Category
Attributes pane.

Assign a Category Attribute to a Taxonomy Node
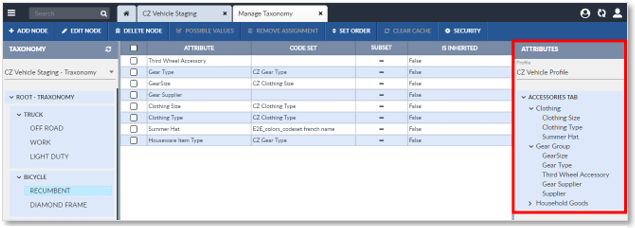
Only attributes designated as Category Attributes can be assigned to a Taxonomy node. A list of the available Category Attributes are displayed in the Available Attributes pane in the Taxonomy Manager (on the far right side).

If the desired attribute is not shown in the Available Attributes pane, ensure that the attribute has been designated as a Category Attribute, (see the Precisely EnterWorks Classic System Administration Guide ).
Depending on the configuration of the Taxonomy, Category Attributes assigned to a node may be inherited by the node’s children nodes.
To assign a Category Attribute to a Taxonomy node:
-
Open the Taxonomy in the Taxonomy Manager, (see Taxonomy Manager).
- Drill down the Taxonomy Tree to find the desired Taxonomy node and select it.
- Drill down the Available Attributes tree to select a Category Attribute or Category Attribute Group.
- Click and drag the Category Attribute or Category Attribute Group from the Available Attributes tree to the Assigned Category Attributes pane in the center of the screen.
- The attribute(s) will be assigned to the selected Taxonomy node as a Category Attribute(s). The Category Attribute(s) will appear in the Assigned Category Attributes pane in the center of the Taxonomy Manager screen.
- After any change to the Taxonomy, clear the cache and refresh displays to ensure the change has been propagated throughout the system and displays are accurately reflecting system status.
Remove a Category Attribute from a Taxonomy Node
Removing a Category Attribute from a node will result in the loss of that attribute’s value in any records assigned to that node or any of its children nodes.
To remove a Category Attribute’s assignment to a node:
-
Open the Taxonomy in the Taxonomy Manager, (see Taxonomy Manager).
- Drill down the Taxonomy Node Tree to find and select the desired Taxonomy node. Its Category Attributes will be displayed in the center of the screen in the Assigned Category Attributes pane.
- In the Assigned Category Attributes pane, select one or more Category Attribute(s) to be un-assigned from the node.
- Click the Remove Assignment button on the Taxonomy Editor’s Activity Bar.
- A confirmation message will appear that asks if you wish to delete the attribute. This will not delete the attribute; it will delete the assignment of the attribute to the node. It will remove the Category Attribute from the node. Click Yes.
- The Category Attribute will be removed from the node. The next time any records assigned to that node are validated, any value in that attribute will be erased.
- After any change to the Taxonomy, clear the cache and refresh displays to ensure the change has been propagated throughout the system and displays are accurately reflecting system status.
Set Category Attribute Display Order
To change the display order of Category Attributes assigned to a Taxonomy node:
-
Open the Taxonomy in the Taxonomy Manager, (see Taxonomy Manager).
- Click and drag one or more attributes up or down the list of Assigned Category Attributes. Clicking the Set Order button will cause an informational window to appear that tells you to drag and drop the attributes into the desired order.
- After any change to the Taxonomy, clear the cache and refresh displays to ensure the change has been propagated throughout the system and displays are accurately reflecting system status.
Restrict a Category Attribute's Possible Values
The user can restrict the set of possible values for an assigned Category Attribute associated with a Code Set to a subset of values in that Code Set. Possible values are the list of values the user may select from when entering a value for the Category Attribute.
The possible values can only be defined on the Taxonomy node to which the Category Attribute is assigned. If it is inherited, the Possible Values button is disabled.
To restrict the set of possible values for a Category Attribute:
-
Open the Taxonomy in the Taxonomy Manager, (see Taxonomy Manager).
- Select the desired Taxonomy node to display its assigned Category Attributes.
- Select the desired Category Attribute.
- Click the Possible Values button.
- A Code Set Values editor will appear. The Available Code Set Values and Allowed Code Set Values only appear if Subset is checked.
- Edit the Code Set Values options as desired:
-
Possible Values:
-
All: Select All to make all the Code Set values available for use by the Category Attribute.
-
Subset: Select Subset to make only some of the Code Set values available for use by the Category Attribute.
-
-
- If Subset is selected, the Code Set Values editor will
display the Code Set values the Category Attribute may use.
-
Available Code Set Values: A list of all the values in the Code Set that have not been added to the list of Allowed Code Set Values.
-
Allowed Code Set Values: A list of the values allowed to the Category Attribute. They determine the list of values the user may select from when entering a value for the Category Attribute.
-
- To move Code Set values between the Available Code Set Values
and the Allowed Code Set Values lists, select the desired Code
Set value(s) and use the right arrow
 button and the left arrow
  button to move the Code Set values(s) from one list to the other.
 - To save any changes to the Allowed Code Set Values list and to exit to the Code Set Value Editor, click the Save button. To exit without saving changes, click the Cancel button.
- After any change to the Taxonomy, clear the cache and refresh displays to ensure the change has been propagated throughout the system and displays are accurately reflecting system status.
