
Detail Editor
The Detail Editor allows users to select a record from a Repository View and open it in a full-screen display for editing.
Detail Editor Reference Guide

Preferences in the Detail Editor
The Preference that has been designated as the Favorite Detail Editor Preference defines how record data will be displayed in the Detail Editor and the Inline Editor. When a record is opened in the Detail Editor, it is displayed according to the Favorite Detail Editor Preference. If no Preference has been designated as the Favorite Detail Editor Preference, the record will be displayed as defined in the repository’s Default Preference. If no Default Preference has been selected, all record attributes will be shown.
Open a Record in the Detail Editor
To open a record in the Detail Editor:
- Open the desired repository in a Repository View. Open the Feature Sidebar, select the desired folder, and select the desired repository. The repository will be opened in a Repository View.
- Double-clicking on a record’s attribute field will open the record in the Detail Editor. (Clicking once on an attribute field will activate the Attribute Value Editor. For more information, see Attribute Value Editor.)
- Alternatively, a user may select the record, then click the Edit
button on the Repository View’s Activity Bar.
Edit a Record in the Detail Editor
To edit a record in the Detail Editor, first open it in the Detail Editor.
At the top of the Detail Editor is a Scroll Records controller.

The Scroll Records controller allows the user to scroll through the repository’s records without leaving the Detail Editor. The records are displayed in the order of their sequence number (which should not be confused with the records’ primary key or item id). If the user switches to the Repository View tab, sorts the records into a different order, then reopens the Detail Editor, the Scroll Records controller will use the new sort order.
Below the Scroll controllers, the Attributes List lists the record’s Attribute Tabs.

Clicking an Attribute Tab’s name expands it to display the Attribute Groups it contains. It also causes the Edit Attribute pane to display the tab’s Attribute Groups, expanded. Clicking an Attribute Group’s name in the Attribute List will cause the Edit Attribute pane to scroll to the Attribute Group. The user may also scroll through the list of attributes by using the scroll slider on the right of the Edit Attribute pane.
Repositories can be linked in parent-child link relationships. Child repositories can be configured to use the Unified Parent Child View, meaning that they can be configured such that when their records are opened in the Detail Editor, specific attributes from their parent record are displayed and can be edited, depending on the permissions of the user. The locations where the parent attributes will appear in the Detail Editor is configurable, so for more information about where specific parent attributes appear,contact your business administrator.
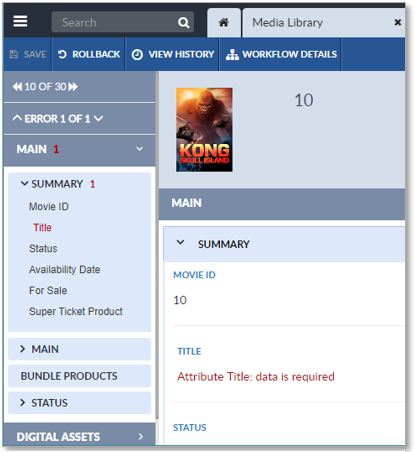
The Attribute List notes any errors or warnings the record may have, by highlighting affected attributes in red. The Attribute Groups and Attribute Tabs display a count of their attribute values with errors (in red) and warnings (in yellow). Hovering over an affected attribute will cause its error or warning message to display.
The Edit Attributes pane displays error message in red and warning messages in yellow.
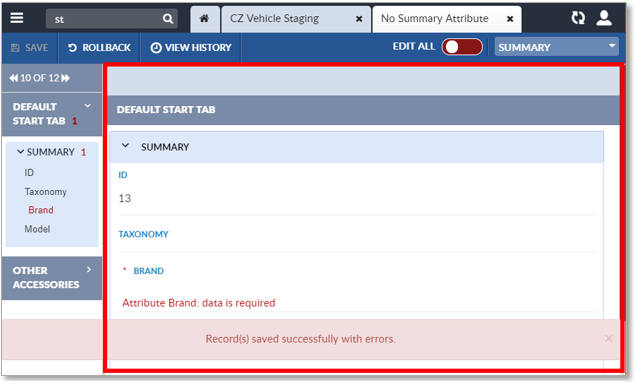
Note that records can be saved with errors. The level of each error and their effect on the record’s validation status is discussed in more detail in Record Validation. When a record with errors or warnings is saved, a warning message appears at the bottom of the Detail Editor.
The user can scroll through the Edit Attribute pane’s list of attributes by using the mouse’s scroll wheel or by using the pane’s vertical scroll slider on the right.
Hovering over an attribute’s label will cause a pop-up window to appear that displays the attribute’s history. Clicking the Full History button in the pop-up window, causes the Record History tab to open and display the attribute’s change history. (See Record Change History.)

Attribute values may be edited by clicking their attribute field. Different attribute data types determine how each attribute will be edited. For instance, clicking on a DATE field will allow the user to edit the text of the field or to select a date from a pop-up calendar.
A Multi-Language icon ![]() will appear at the far right of attribute fields configured for
Multi-Language capability. Clicking the Multi-Language icon
will appear at the far right of attribute fields configured for
Multi-Language capability. Clicking the Multi-Language icon ![]() will bring up a Multi-Language Editor window that will allow the
user to enter text to be displayed for each supported language. The list of
supported languages are determined during system configuration.
will bring up a Multi-Language Editor window that will allow the
user to enter text to be displayed for each supported language. The list of
supported languages are determined during system configuration.
An External Editor icon ![]() will appear at the far right of some attribute fields. For more
information about the External Editor, contact EnterWorks.
will appear at the far right of some attribute fields. For more
information about the External Editor, contact EnterWorks.
Clicking the Edit All toggle in the Detail Editor’s Activity Bar opens all the attribute fields for editing.
Note that the values of any attributes that are calculated fields will be generated when the record is saved. They will overwrite any values entered by the user unless EnterWorks is configured otherwise.
Click the Save button on the left end of the Detail Editor’s Activity Bar to save the changes to the record, then close the Detail Editor. To exit the Detail Editor without saving changes, close the Detail Editor without clicking the Save button.

Multi-Edit
If two or more records have an attribute whose value is the same, the value can be edited in the records at the same time. The Multi-Edit capability is available in the Detail Editor, but not in the Inline Editor or Attribute Value Editor.
To edit multiple records:
- Open the desired repository in a Repository View. Open the Feature Sidebar, select the desired folder, and select the desired repository. The repository will be opened in a Repository View.
- Select the desired records. This can be done individually, or through the use of a Search, Hierarchy, or Saved Set.
- Click the Edit button on the Repository View’s Activity
Bar to open the Detail Editor.

The Detail Editor will be opened in the Multi-Edit state. All attributes with identical values will be opened for editing. Other attributes can be edited; any changes made will be saved to all the edited records.
If an attribute value is changed while using Multi-Edit, it will be changed in all the records being multi-edited.
To clear an attribute value across all selected records, type anything into the attribute’s field then erase it. This will clear the attribute value in all the records.
To save any changes, click the Save button.
To close the Detail Editor, click the Close icon ![]() on
the Detail Editor.
on
the Detail Editor.