Applies to:
- Winshuttle Foundation
Working with Winshuttle Composer deployment profiles
On this page
- Types of deployment profiles
- Working with deployment profile variants
- Setting the active deployment profile for a solution
- Configuring deployment profiles and variants
- Best practices for using deployment profiles
Winshuttle Composer Deployment Profiles enable you to easily develop a Composer solution and move it through an environment. A workflow solution can have one or more deployment profiles for publishing solutions.
For example, you can have a development environment used for building and testing a solution, as well as profiles used for QA, testing, staging, and (finally) publishing into your live/production environment.
Types of deployment profiles

Four deployment profiles are available in a new Winshuttle Composer solution by default:
- Default
- Development
- Staging
- Production
To use or make changes to a development profile, you must set the profile as Active.
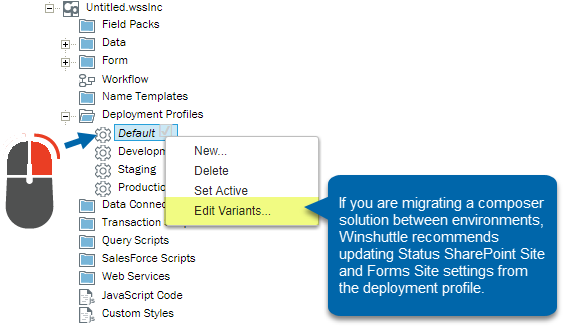
In the Solution Pane, under Deployment Profiles, right-click a profile to:
- Add a new profile
- Delete a profile
- Set a profile as Active
- Edit Variants for the selected profile
Working with deployment profile variants
Deployment profile variants
The following variants are available within deployment profiles:
- Workflow properties
- SharePoint Site
- SharePointTaskListSite
- ShareVisStatusListSite
- AutoAttachedDocumentSite
- Swim Lane users
- Form data connections
- Plugins
- Workflow participant resolvers
Variants are stored within a Deployment Profile that represent different parts of a solution. Variants can be applied to Swim Lane users, form data connections, plugins, workflow participant resolvers, and Composer elements.
Variants change based upon the environment to which the solution is deployed, and you can create unique variant definitions in a Solution file so they will not need to be changed every time the solution is moved between environments.
As you work through the development process, you may have a deployment profile for your development environment and one for your production environment. Once you have finished working in the development environment and you are ready to publish the solution to the production environment, some of your variables (or variants) may change.
Example: A solution using the Attachment element could have a different value for the file parameter depending upon which profile is used. A Development deployment profile could use a value of D:\ for the drive location, whereas the Publishing deployment profile could use a value of C:\ for the drive location.
Data Connections are a good example of something that will probably need to change when moving a solution from a development to a production environment. A data connection usually connects to a data source inside the same environment in which you are working. But when you move the solution from that environment (from staging to production, for example), that connection is severed.
Setting the active deployment profile for a solution
It's important to set a Deployment Profile as Active to apply its settings to the current Solution.
- Click the Solution tab.
- In the Solution Pane, click Deployment Profiles to expand it.
- Right-click a deployment profile, and then click Set Active.
When a solution is saved, it will be saved to the Workflow Site that is defined in the Active Deployment Profile. In addition, the solution will only be saved to the Workflow Site that is defined by the Active Profile. If you change the Active Profile, the source solution file could potentially change locations as well.
Configuring deployment profiles and variants

To view or change the general properties for a deployment profile:
In the Solution Pane, under Deployment Profiles, click a deployment profile. In the General Properties pane, you can view or change the following properties:
- Name: The name for the profile.
- Description: A meaningful description for the profile.
- Status: This is a note for the internal developer. You can mark the deployment profile as New, In Production, or Deprecated.
- Deployment Variants: Click the Options button [...] to view a complete summary for the variants associated with the solution.
Configuring deployment profile variants
- Click the Solution tab.
- In the Solution Properties pane, click Deployment Profiles to expand it.
- Click the name of the deployment profile you wish to configure.
- In the Variants pane (below the Solution pane), next to Deployment Variants, click the options button [...].
- Set the properties for the deployment profile variants.
Configuring variants (alternate method)
- Click the Solution tab.
- In the Solution Pane, click Deployment Profiles to expand it.
- Right-click a deployment profile, and then click Edit Variants.
Best Practices for using deployment profiles
Prior to deploying, right-click and set the desired profile to “active”. On changing a profile to active, Composer will request credentials to the target environment. After credentials are supplied, click Deploy in the ribbon to start the deployment profile.
Your most recent version of the solution file will be saved to the Composer Solutions library on the target form site of the active profile. If any changes have been made to the solution since the last deployment to the development environment, consider re-deploying there prior to have consistent versions between environments.
Remember to set the active profile back to default or development before making any further changes.
- Leave the 'lowest' (base) environment (i.e. Development) as the Active Profile.
- Make all changes to the base environment version of the Solution. The only place that the solution will save a copy is the environment that you’ve specified. Making changes to the 'base' version of a solution will avoid potential confusion caused by saving a 'bad' copy to a Staging or Production environment.
- If you are migrating a composer solution between environments, Winshuttle recommends updating Status SharePoint Site and Forms Site settings from the deployment profile.
-
Click the Solution Tab
-
Under Solution Properties, click Deployment Profiles.
-
Right-click the active deployment profile, and then click Edit Variants.
- In the Deployment Variants screen, change Form Site and Status SharePoint Site to your required settings, and then click OK.
Note:
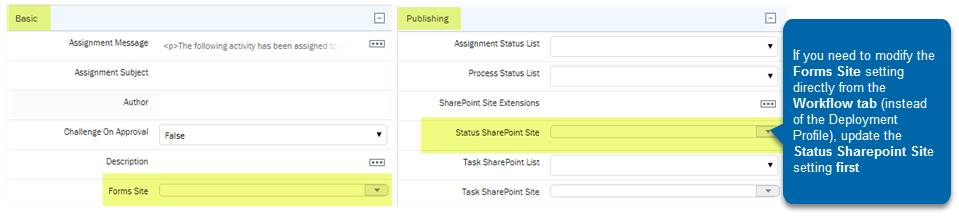
If you want to modify the Workflow Basic property Forms Site setting directly from the Composer Workflow tab (instead of through the Deployment Profile), then be aware that under Publishing you must update the Status Sharepoint Site setting first (see below).
Deployment profile best practice example
Based on the best practices described above, it is unnecessary to maintain more than one copy of a Composer solution. However, it is still recommended to maintain at least one extra Composer instance for purposes of testing and validating new versions and releases of the solution.
Example:
- A company has 3 environments: DEV (Development), QA (Quality Assurance), and PROD (Production). Winshuttle Composer is installed on a server in the QA environment.
- A developer creates a solution and sets the Active Profile to Development. The developer then deploys the solution and tests it using the Development profile. The solution is stored in the Composer Solution Library in the Development environment.
- After testing is completed, the solution developer is ready to move the solution to QA testing.
- The developer leaves the Active Profile alone, and instead edits the QA Deployment Profile to point to the correct locations in the QA environment.
- The developer deploys the solution and chooses the QA Deployment Profile from the dropdown during deployment.
- The solution is now deployed to both DEV and QA, however, the solution source still only exists within the DEV environment (because this is the Active Profile).
This same process would be repeated for the PROD environment.
Note: After any changes are made to the solution and then successfully tested and verified, the solution should be re-deployed to all applicable workflow sites (DEV, QA and/or PROD in the example above) to keep them in sync. This process ensures the solution source only lives in one location and cannot be confused by developers.
This also reinforces the concept that the Development copy should be the only one that changes, and that the other environments should not be used for making changes. Instead, other environments should be used as a conduit for promoting the solution from Development up through Production.

Copyright 2018, 2022 Precisely