 Home
Home Product Help
 Support
 Print
Print Feedback
Schedule a run
When you use the Scheduler to schedule a run in advance, Studio automatically connects to Salesforce, runs on the schedule that you set up, and then closes the connection with Salesforce.
Important: When you schedule a run, you need to provide an auto logon name.
- On the Run tab, click Schedule.
- In the Winshuttle Scheduler box, click Autologon and click an auto logon name, or click Credentials and provide your user name, password, security token, login URL and an auto logon name. Be sure that the Autologon Name box is checked.
- If the scheduled task will need to be run in batches, check the Use asynchronous(Bulk) api box. For more information, see Use the Bulk Upload API.
- In the Title box, type the title you want Studio to show in the list of scheduled tasks.
- To receive email notification when the run is completed, type email addresses, separated by semicolons, in the Send Mail Notification To box.
- Click Next.
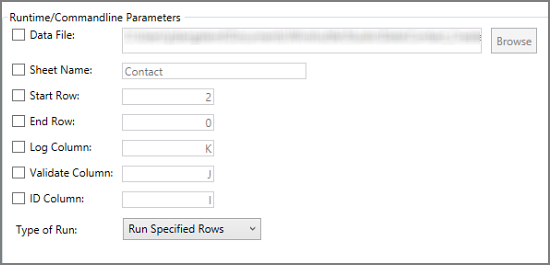
- Make any changes that you want to the run parameters, including the type of run: Run Specified Rows, Run on Errors, Run not Posted, Validate Only.
If you are scheduling a Query run, the parameter options will look like this:
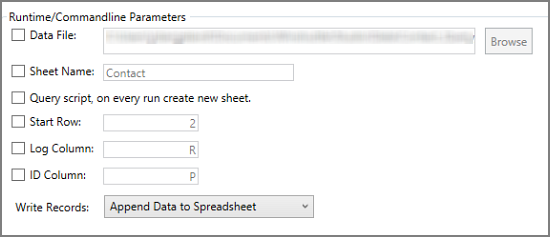
Changes made in the Scheduler will not change the settings that are in the script.
- Click Next.
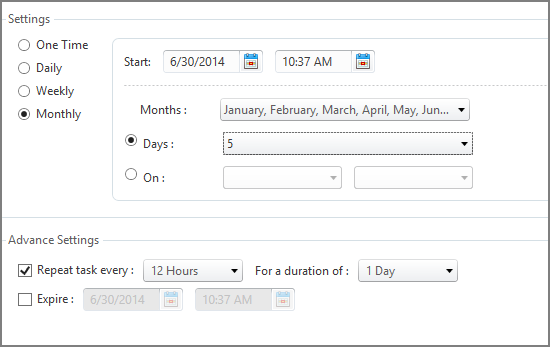
- Click One Time, Daily, Weekly, or Monthly.
- Choose the recurrence options you want. These options change depending on what you clicked in step 3.
- Under Advanced Settings, you can choose to run the script multiple times. For example, if you want to run the script monthly on the fifth day, and you want to run the script at the beginning and the end of the day, check the Repeat task every box, click 12 Hours, and click 1 Day.
- Click Finish.
View the scheduled tasks
To see a list of tasks that you have scheduled, click the File tab, and then click Scheduled Tasks.
Click a task in the list to see its details, such as the script file name and location, the script action, and when it is scheduled to run.
Change the scheduling
You can change the time or date when a script is scheduled to run, or the auto logon name that it uses, by editing the scheduled task.
- Click File.
- Click Scheduled Tasks.
- Click the task that you want to change.
- Click Edit.
- Log in to Salesforce, even if you are already logged in.
Note: You can see and choose credentials here, but you cannot make changes to them. To update credentials, click New on the File tab menu and then click the Edit button on the Select Autologon tab.
- Make the changes you want, and then click Finish.
 Trademarks