 Home
Home Product Help
 Support
 Print
Print Feedback
Run: Upload the mapped data from Excel to Salesforce
After you click the Run tab, the data file opens.
- In each column of the worksheet, enter the data you want to upload. Salesforce has tools that can help:
- If a column heading includes List of Values, click List of Values on the ribbon, choose a value for that field, and then click Copy.
- If a column heading includes Look Up, click Look Up on the ribbon, type text in the Search box to look for the values, select the value or values that you want, and then click Copy to Selected Excel Row. The % character is a wildcard character.
Tips: If you add a value that starts with 0, such as a ZIP/Postal code, type a single quotation mark (‘) before the 0.
Important: To create a new record, the cell for the ID must be empty so that the ID value can be downloaded to it.
- Click an empty cell.
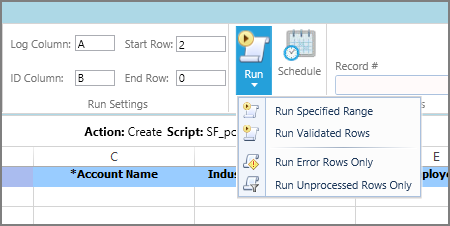
- In the Start Row box, type the number for the first row of data you want to upload.
- In the End Row box, type the number for the last row of data you want to upload.
- If you are uploading large sets of data, and it is not critical data, check the Use Bulk API box for faster processing. For more information, see Use the Bulk Upload API.
- Click Data Validation.
Salesforce checks the data for missing or invalid items and returns a message for each record in the Data Validation column.
- Click Run.
Studio for Salesforce uploads the data from the worksheet into Salesforce.
Other run features
- Data File: To create a new data file, open a different data file, or save the active data file, click Data File and click the command you want.
- Write Headers: To add the mapped columns to a new sheet, click Write Headers.
- Log Column: Winshuttle automatically adds the Log Column from the Data File Preview.
- Validate Column: Winshuttle automatically adds the Validate Log Column form the Data File Preview.
- ID Column: Winshuttle automatically adds the ID Column from the Data File Preview.
- Send email on run: Check the box to send email notifications automatically after the run. The email addresses for the sender and recipients are set on the Email Settings tab of the Application Options box.
- Run Specified Range: To run the range of rows specified in the Start Row and End Row boxes, click the arrow on the Run button and click Run Specified Range.
- Run Error Rows Only: To run only the rows that returned errors during an earlier run, click the arrow on the Run button and click Run Error Rows Only.
- Run Unprocessed Rows Only: To run rows in a data file that haven’t been run, including error rows, click the arrow on the Run button and click Run Unprocessed Rows Only. If a row has not been run and doesn’t have an error, its cell in the Log Column is empty.
- Run Selected Rows Only: Manually select rows in the data set and run only those rows. Validate will run on all rows, but only the selected rows will be uploaded to Salesforce.
- Schedule: Schedule a script to run regularly or at a later time. For more information, see Schedule a run.
 Trademarks