 Home
Home Product Help
 Support
 Print
Print Feedback
Master Detail: Upload data for multiple objects in one script
You can create a master detail script to upload, update, or upsert data for multiple objects. If you want to update or upsert data, you can first use Instant Query to download the existing data.
Note: If you want to upload data for multiple objects without linking them, see Upload unlinked data for multiple objects.
Log in and choose the objects
- Click the File tab, and then click New.
- Click Create.
- Under Select operation type, click Master Detail.
Log in
Studio for Salesforce offers three ways to log in: Web Login, Autologon, and Credentials. For Web Login, you do not need to provide a security token.
If you need to schedule a task, click the Client Login tab and log in using a stored autologon name, or click Credentials and set up a new autologon name.
Web login
- Click the Web Login tab.
- Click Read Session Data.
- In the Environment list, click Production, Sandbox, or Custom.
Studio for Salesforce provides the URL for the production or test environment. If you choose Custom, type the URL for the custom environment.
- Click Go.
- Type your user name and password and then click Log in to Salesforce.
- Click Login or Okay.
Use Auto Logon credentials
To log in with stored credentials, click the credentials you that you want to use, and then click the OK button or the Login button.
Note: If you want to change your password or security token, click Edit, make the changes, and then click the Login button.
Log in with credentials
If you do not have auto logon credentials stored in Studio for Salesforce, do the following:
- Click Credentials, and type your email address, Salesforce password, and security token.
- For the Login URL, choose an environment.
- Check the Autologon Name box, and type a name for the auto logon credentials.
Choose the objects
- Click Standard Objects, and then click the Salesforce object you want to create records for.
If you do not see the object in the list, click All Objects, and type name of the object that you want.
- Under Select Detail Objects, check the box for the object that you want to link.
If you do not see the detail object in the list, search for the name of the detail object that you want.
- Click Microsoft Excel - Column Based Mapping or Microsoft Excel - Cell Based Mapping. For more information about cell-based mapping, see Use cell-based mapping.
- Click Next.
Map the object fields in Excel
When you click Next, Studio moves to the Map tab, which includes:
- Mapper: The Mapper contains the fields you can select and the Value column.
- Data File Preview: The Data File Preview displays a preview of the Excel worksheet where the fields selected from Mapper are mapped.
The Data File Preview includes a sheet for each object that you chose, mapped to its corresponding tab in the Mapper.
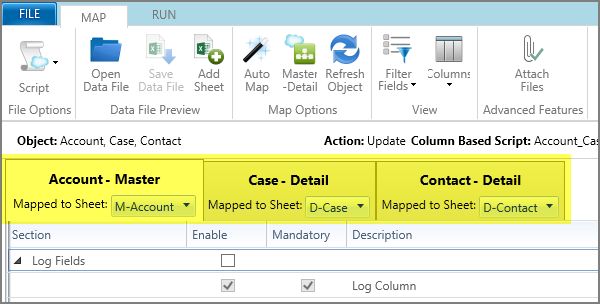
Any required fields, such as Log Column, are automatically selected.
Map the fields
- In the Mapper, on the first tab, select the check boxes for the fields that you want to include in your script.
To find a field quickly, type it in the Search box. After you select the fields you want, return to the full Mapper by deleting the text in the Search box.
Tip: To select all the fields in a group, select the group-level check box.
- Map the fields to the Excel worksheet by doing one of the following:
- On the ribbon, click Auto Map.
- Type the Excel column name that corresponds to each field in the Value column in the Mapper.
- Drag the field from the Mapper to a column in the Data File Preview.
- Click the tab for the second object.
Studio for Salesforce moves to the worksheet that is mapped to the second object.
- Repeat steps 1-2 for the second objects and any additional objects.
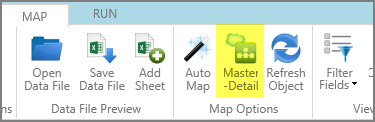
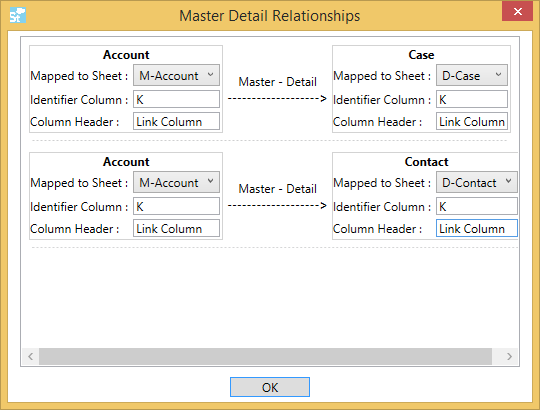
- Click Master Detail.
- In the Master Detail Relationships box, type the column letter for an empty column, type a column header—for example, type Link Column—and then click OK.
- Click Script and save the script file.
- Click Save Data and save the data file.
- Click the Run tab.
Use Instant Query to retrieve existing data
If you are updating or upserting data, you can use Instant Query to download the data that is already on Salesforce.com, make changes to it, and then upload the updates.
Run: Upload the mapped data from the Excel worksheets
- For each sheet in the data file, enter the data you want to upload. Salesforce has tools that can help:
- If a column heading includes List of Values, click List of Values on the ribbon, choose a value, and then click Copy.
- If a column heading includes Look Up, click Look Up on the ribbon, type text in the Search box to look for the values, select the value or values that you want, and then click Copy to Selected Excel Row. The % character is a wildcard character.
Tips:
If you add a value that starts with 0, such as a ZIP/Postal code, type a single quotation mark (‘) before the 0.
If you are updating data and you don't want to change the existing data for a field, see Skip or clear a field. - In the linked column for each sheet, enter a value that associates the data.
For example, in the master sheet's linked column, type Acc1 in the linked column for the first record. Then, in the detail sheet's linked column, type Acc1 for each detail record that is associated with the Acc1 record on the master sheet.
To upload the record without linking it, leave the linked column blank in that row.
Studio for Salesforce uses these columns to associate the data, but the values that are in the columns are not uploaded to Salesforce.
Notes:
If the Upload detail records whose master does not exist box (Options, Run Settings) is checked, detail records that do not have a value in the linked column will be created or updated but will not be linked to any other data.
If the Upload detail records whose master does not exist box is not checked, detail records that do not have a value in the linked column will not be created or updated. - In the Start Row box, type the number for the first row of data you want to upload.
- In the End Row box, type the number for the last row of data you want to upload.
- In the Log Column box, type the letter of the column where you want to view the run results.
- In the ID Column box, type the letter of the column where you want to see the ID created or updated by Salesforce.
- Click Data Validation on each sheet.
Salesforce checks the data for missing or invalid items and returns a message for each record in the Data Validation column.
- Click Run.
- View the Log Column in each sheet to confirm that the data was uploaded.
 Trademarks