Working with Web services
On this page
- Supported Web services and data types
- Importing Web services
- Editing an imported Web service
- Configuring Web services
- Creating a repeating section (Designer 10.6 and later only)
Supported Web services and data types
Winshuttle Workflow supports SOAP bindings only. In the event that a Web service has multiple bindings (for example, SOAP, SOAP 1.2, HTTPGet, etc.), only the operations with SOAP bindings can be used.
Winshuttle Workflow supports the following message types:
- Input Messages
- Output Messages
- Input Headers
- Output Headers
Winshuttle Workflow does not support:
- Fault Messages
In addition, Winshuttle Workflow supports the following WSDL (Web Services Description Language) data types:
Supported WSDL data types | |
|
|
Importing Web services
Note: Importing Web services applies to Designer 10.6 and later versions only.
- In the Solution Tree Window, right-click Web Services, and then click Import.
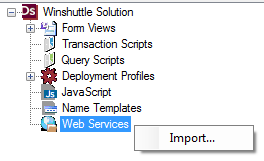
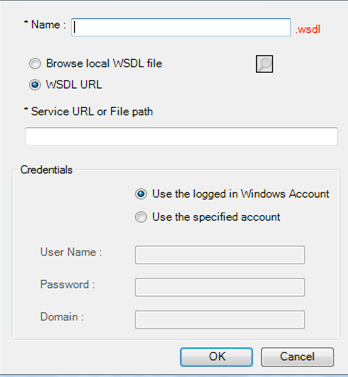
- The Web Service dialog box opens. "Web Services" will appear as displayed below and user need to provide information it asks to add a third party webservice to winshuttle solution.
Provide the following information Name: The name for your Web service. Note that whatever name you use will have ".wsdl" appended to it. Browse local WSDL file or WSDL URL: Your selection here identifies either the .wsdl file that will be imported, or a URL at which the service is available. If you're using a 3rd-party Web service, select Browse to local WSDL file. Note: Only a single file based WSDL is supported. Service URL or File Path: If you selected Browser local WSDL file, browse to (click the search button) or type the path to the file in this field. If you selected WSDL URL, then type the URL (Http://) to the service in this text box. Credentials: This section only applies if you selected WSDL URL. Select Use Specified Account to use a specific account that will be used to access the WSDL URL. Alternately, you can select "Use the logged in Windows Account" if you can access and use the service with the logged in user account. Note: This section is meant only for accessing WSDL from Designer, not for running the Web Service in your form. |
|
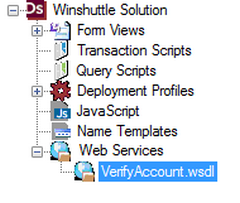
After you've provided all the information, click OK and the Web service will be added as a child node under Web Services. |
|
Editing an imported Web service
- In the Solution Tree window, under Web Services, right-click the Web service, and then click Edit.
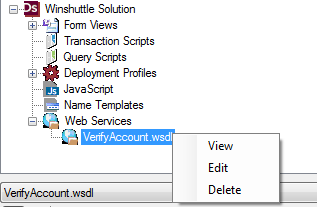
- Click one of the following:
- View: Click this top display the associated WSDL in whatever your default application is for displaying .WSDL (which are just XML) files. Any changes made to WSDL at this stage won’t be saved.
- Edit: Click this to open the Web service in Edit mode, which allows you to change the Name and the WSDL URL\File Path. Note that you can't change between "Browse local WSDL file" or "Wsdl URL" this way.
- Delete: Deletes the Web service, along with any mapping defined in the mapper that correspond to this Web service.
Configuring Web Services
Web Services can be configured to run in any of 3 different modes, each of which uses different logon credentials. These modes are:
- SAP: Enables a user to enter or use SAP credentials
- IntegratedLogon_SSO: Enables a user to enter or use Windows credentials
- IntegratedSSO_Certificate: Uses the credentials for the currently logged in user
Note that Winshuttle Server and Winshuttle Central must also both be configured properly for the corresponding mode to work. See the Winshuttle Server Install Guide and/or Winshuttle Central Administrator Guide for configuration information.
Creating a repeating section
The following information applies to Designer 10.6 (and later) only. It is also not available in Legacy Mode.
In Designer 10.6, a new Web service option called a Repeating Section is available that enables you to run a Web service more than once.
A repeating section can be used if you want to run a Web service repeatedly for each set of data. For example, if you're creating a new material and want to create the same material for multiple plants, sales organizations, etc.
To create a repeating section:
When you create a new Web service, check the Generate Repeating Section checkbox.
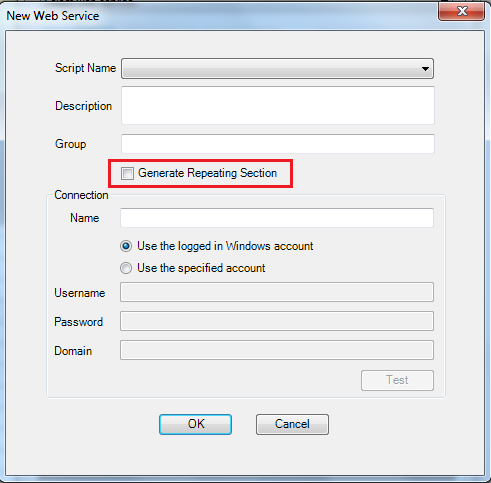
Note: The Generate Repeating Section checkbox is disabled form in Edit Web Service dialog.
Within your InfoPath form, if "Generate Repeating Section" is checked and then the form is generated, the group will be wrapped inside of a group (i.e. the repeating section). The inner group ends with "_Repeat".
In addition:
- An extra checkbox field will also be generated and named with the group's name with "_allowRun" appended to it. For example: MM_AllowRun (as shown below).
- The extra checkbox will be set to true by default.
- This checkbox governs whether or not you want to run the web service on a particular row.
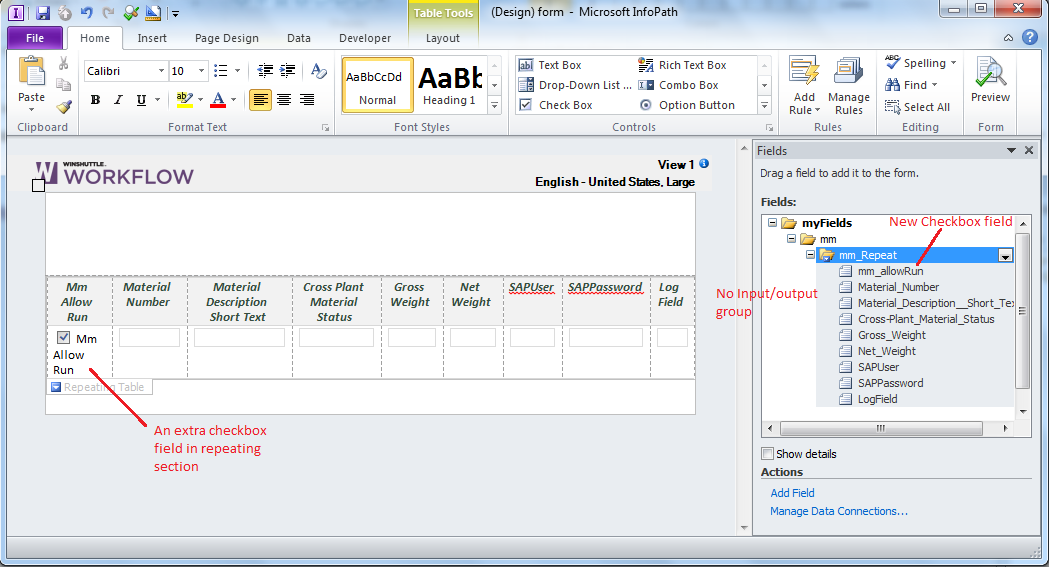
NOTE: A new key called WebServiceProgressiveResponse is added at list level that is set to true by default.
This key determines whether or not to show the response of each web service on a Workflow Form. This is useful for situations when you're running multiple web services with Form on Field Change, Button Click, or Form Load.
If want to get the results all at once, set WebServiceProgressiveResponse to false.
Workflow Server
If you are using Winshuttle Server to schedule and run Workflows, the Create Repeating Section works as follows:
- Calling a web service multiple times in a repeating section when SAP Web Service button clicked.
- Calling a web service multiple times in a repeating section only for selected rows when SAP Web Service button clicked.
- Calling a web service multiple times in a repeating section when it is called from Winshuttle update plugin.
- Calling a web service multiple times in a repeating section when it is called from Form Load.
- Calling a web service multiple times in a repeating section when it is called from Field change on Form.
- On Web Service button press or Field Change; update IE form with each service run result.
 Home
Home Help Center
 Support
 Print
Print Feedback

 Back to top
 Trademarks