 Home
Home Help Center
 Support
 Print
Print Feedback
Uploading attached documents through Web forms
Related Topics
Sales order and material processes in SAP often include the capability to attach and upload supporting documents along with the data upload. To address this, you can upload attached documents through web forms.
On this page
- Sample scenarios for attaching and uploading documents
- Supported T-Codes for attached and uploaded documents
- Step 1: Create a TRANSACTION script with document attachment upload
- Step 2: Create a web form with attached document upload
- Tips and best practices
- Attachment upload limitations
Sample scenarios for attaching and uploading documents
Some examples of using attached documents for different transactions are described below:
- Personnel (PA30) - Social Security/national insurance paperwork, proof of residency or citizenship, work permits, passport scans, personnel photos, training certificates
- Sales Order – Faxed orders, PDF files, invoices, POs, purchase requisitions
- Material Master - Drawings
- BOMs - Drawings
- Customer – Credit reference, registration certificates
- Vendor – Credit reference, registration certificates
Supported T-Codes for use with attached and uploaded documents
T-code | Required metadata |
AS02/AS03 | Company Code, Main Asset Number, Asset Subnumber |
MM02/MM03 | Material Number |
FB02/FB03 | Company Code, Document Number, Fiscal Year |
VA02/VA03 | Order Number |
ME52N/ME53N | Requisition Number |
ME22N/ME23N | Order Number |
XD02/XD03 FD02/FD03 | Customer Number
|
| |
XK02/XK03 MK02/MK03 FK02/FK03 | Vendor Number |
PA30 | Personnel Number |
Step 1: Create a TRANSACTION script with document attachment upload
Document attachment is available only for supported t-codes. Because "create" t-codes are not supported, you may need to use linked scripts to create the record with one script and then attach the document in another script. See the table below for a list of support T-codes.
- In Winshuttle Transaction, record your transaction, or open a script that was made from an appropriate transaction. See Transaction Help if you need assistance.
- Open the script in the Mapper.
- On the Edit tab, click Add File Attachment Rows
 .
.The new row is added below the Log Column row
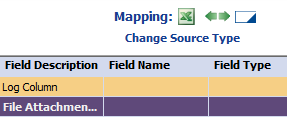 .
. - For ease of mapping, click Basic. Drag the Preview column that you want to map to the Attachment Location row. Save the Excel preview file.
- Open the Excel template in Excel. In the Attachment Location column, add the local path to the document.
- Click Run. The document is uploaded to SAP.
Step 2: Create a web form with attached document upload
- In Designer, click the Tools menu, and then click Manage Field Mappings.
- Add your Web service.
- Under Input Values, map both DocumentUploadListAttachment_Location and DocumentUploadListFILE_BYTES to FILE_BYTES.
- In the Manage Field Mappings dialog box, click Generate Form.
- In the form, open properties for the Attachment control.
- Change the binding of the DocumentUpload field to FILE_BYTES. Ensure that the binding is changed on all views of the form.
- Click the AttachProp tab. Ensure that Allow Upload is selected.
- Only one file should be uploaded per t-code. Therefore, on the AttachProp tab, set Maximum to 1. Click OK.
- Ensure that both the SAP Web Service button and the ShareVis.Attachment control are displayed on the same form view.
Tips and best practices
- In a forms-based scenario, you can upload multiple documents by adding multiple attachment controls to the form.
- Each attachment control needs to be bound to a separate script.
- Scripts run independently each other. The attachment controls are mapped to the fields of the respective scripts.
- Multiple attachment controls must be added individually.
- Repeated attachment controls are not supported.
Attachment upload limitations
- Only one document can be uploaded.
- The file attachment feature cannot be at the Start node. The user has to start the process in order to be able to upload the file and run the web service
- Max file size limit is 5MB.
- Supported file types: XLS, XLSX, TXT, DOC, DOCX, PDF, TIFF, TIF, JPEG, JPG, PNG, BMP, GIF
- Fields related to Attachment control are case sensitive. For example, if you are using an MM02 transaction with an attachment, the material number value ‘qa100' is different from ‘QA100’
- Posting data and attaching documents are independent transactions. If one operation fails, it will not affect the other.
- Uploading is not supported for Create Transactions. For this you will need to use two web services: one to create, and another to attach the document.
- Uploading is not supported for Autopost or Run Later (Server) in a Winshuttle Central environment.
 Trademarks