You are here: Getting Started > Tutorials > Tutorial 1: Creating a Time Off Request Form > T1-11. Adding Requester name and date to a form
Tutorial 1–Step 11: Adding Requester Name and Date
Tutorial 1: Creating a Time Off Request Form
- Creating a form workflow site
- Creating the form solution
- Creating development profiles
- Creating the workflow
- Submitting solutions for approval
- Publishing the Solution
- Starting a new form and process
- Completing the task assignment
- Viewing task history
- Assigning unique form names
- Adding requester name and date
- Adding email notifications
- Configuring autopost
You can further improve your Time Off Request form to automatically include the name of the person submitting the Time Off Request and the current date.
- Sign in as Steve Designer.
- In Designer, on the File menu, point to Open, and then click Retrieve Solution.
- Specify the CENTRAL site URL, and click OK.
- In the Solution list, select the solution, and then click OK.
- Click Controls on the right side.
- Scroll to the Custom Controls area. Click ShareVis.CurrentUser to add the control to the form.
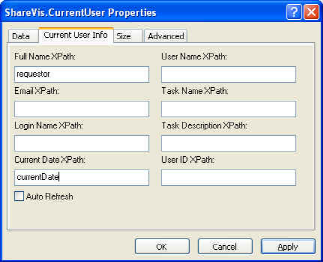
- Double-click the ShareVis.CurrentUser icon on your form.
- In the ShareVis.CurrentUser Properties dialog box,click the Current User Info tab.
- In the Full Name XPath box, type requestor.
- In the Current Date XPath box, type currentDate.

- Click OK.
- Save your changes in InfoPath.
- Close InfoPath.
- In Designer, save the solution.
The new form appears and the Requestor field is automatically filled out with Steve Designer’s name (since he is currently logged in), and the current date appears in the Current Date field.
 Home
Home Help Center
 Support
 Print
Print Feedback
 Back to top
 Trademarks