You are here: Getting Started > Tutorials > Tutorial 1: Creating a Time Off Request Form > T1-12. Adding email notifications
Tutorial 1–Step 12: Adding Email Notifications
Tutorial 1: Creating a Time Off Request Form
- Creating a form workflow site
- Creating the form solution
- Creating development profiles
- Creating the workflow
- Submitting solutions for approval
- Publishing the Solution
- Starting a new form and process
- Completing the task assignment
- Viewing task history
- Assigning unique form names
- Adding requester name and date
- Adding email notifications
- Configuring autopost
In this phase you will enhance the Time Off Request workflow used by AlphaOne Bank to send an email notification to the requestor when the assigned manager either approves or rejects the request. In this case, email notification will be sent to Mary Employee when Joe Manager either approves or rejects her Time Off Request.
- Sign in as Steve Designer.
- Open the Time Off Request workflow in Designer.
- On the toolbar, click the Notification button.
- In the Originator swimlane, click and drag the mouse to add a Notification Node.
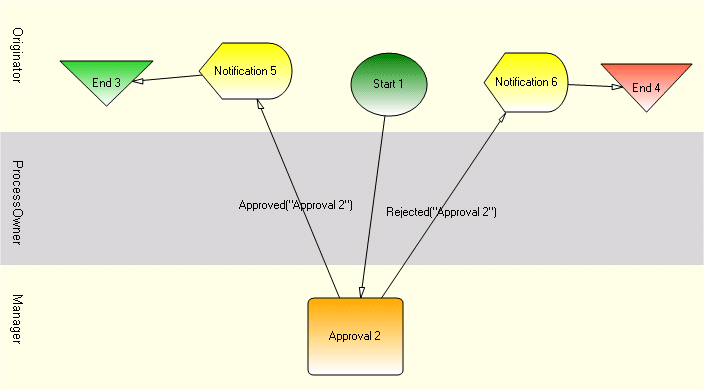
- Click the arrow in the Transition connecting Approval 2 to End 3, and move it to Notification 5. Approval 2 should now be connected to Notification 5.
- Click Notification 5 and drag to End 3
- Click Notification 5.
- In the Properties Pane, click the Message box, and click the button to the right.
- In the Edit Message dialog box, in the Text box, type Your Time Off Request was approved.
- Click OK.
- On the toolbar, click the Notification button.
- In the Originator swimlane, click and drag the mouse to add a second Notification Node.
- Click the arrow in the Transition connecting Approval 2 to End 4, and move it to Notification 6. Approval 2 is now connected to Notification 5 and Notification 6.
- Click Notification 6, and then drag to End 4.
- Click Notification 6.
- In the Properties Pane, click the Message text box, and click the button to the right.
The Edit Message dialog box appears.
- In the Text box, type Your Time Off Request was rejected.
- Click OK.
- If desired, you can move nodes around on the Designer canvas to make them easier to see and work with.
NOTE: If you move Nodes on the canvas, be careful not to change the swimlane they are placed in. This will change the person assigned to each node.
Your workflow will now look similar to the following:

- On the File menu, click Save.
- On the File menu, click Publish Process.
Email notification will now be sent to Mary Employee (using her SharePoint email address information) when a Joe Manager either approves or rejects her Time Off Request.
 Home
Home Help Center
 Support
 Print
Print Feedback


 Back to top
 Trademarks