 Home
Home Help Center
 Support
 Print
Print Feedback
Tutorial 1–Step 2: Creating the form solution
Tutorial 1: Creating a Time Off Request Form
- Creating a form workflow site
- Creating the form solution
- Creating development profiles
- Creating the workflow
- Submitting solutions for approval
- Publishing the Solution
- Starting a new form and process
- Completing the task assignment
- Viewing task history
- Assigning unique form names
- Adding requester name and date
- Adding email notifications
- Configuring autopost
In this step, you will create a Time Off Request solution that will reside on the HR Forms Form Workflow site that you created earlier. After the form and its associated workflows are completed and published, AlphaOne Bank employees can use them to request and seek approval for time off from their managers. This assumes that you have already created the necessary scripts in TRANSACTION.
On this page
Creating the solution
- In Designer, click the File menu, point to New, and then click Workflow Solution for Forms.
- Click New Process.

- Under Publishing, define the SharePoint site.
- Under Transaction Scripts, right-click, click Import, and then browse to the script.
- Select the script. Click OK.
- Click Tools, and then click Manage Field Mappings.
- Click Add. In the New Web Service dialog box, in the Script Name box, select the script that you want to add.
- Add a description.
Note:XML group name is the name of the parameter group that will be created in the InfoPath form data source.
- For the login type, select Windows Authentication or Network credentials. Add the user name and password as necessary.
- To validate credentials for retrieving script fields from CENTRAL, click Test.
Mapping fields
- In the Manage Field Mappings dialog box, you find all the fields that were retrieved from your script.
- To retain the fields with mapping, click Use existing fields.
- To create new mapping, clear Use existing fields.
Tip: It is best practice to set the IsOverwriteAllowed property to "true." As you develop and republish, your script will be overwritten and multiple copies will not accumulate. When you want to create a new solution with the same name, set the property to "false."
- To delete a field, click the x.
- If you need to reorder your fields, click the Form Field arrow
 to change the order.
Note: If field changes trigger Web services, and the Web services are dependent on the results of other Web services, ensure that the Web services are mapped in the correct order.
- Click Generate InfoPath form. The script fields are mapped. You can now design the look of the form.
Creating views
Views can correspond to user roles or activities in the workflow. With views, you can control what data is seen at a given part of the workflow and by whom. You must create solution views from within the solution. If you create a view in InfoPath, it cannot be used in Workflow.
- Right-click Form Views, and then click New.
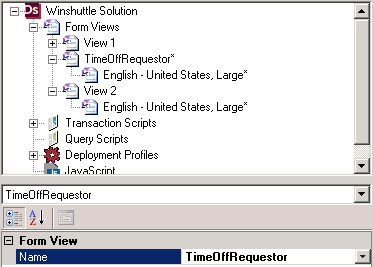
- In the Name box, type TimeOffRequestor.
Designing the Time Off Request form
- In Designer, click the TimeOffRequestor view, and then click Launch InfoPath
 .
. - Place the cursor in the blank InfoPath form and type Time Off Request.
- Select the text, set the font size to 14, and then click Bold.
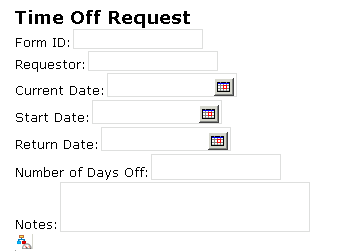
- Below the Time Off Request header, type Form ID:
- In the Controls area, click Controls.
- From the Standard area, click Text Box. The new text box should appear on your form to the right of the Form ID label.
- Right-click the new text box, then click Text Box Properties.
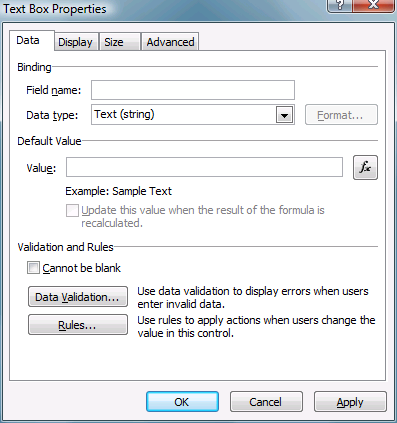
- In the Field Name box type formId.
- Click OK.
- Using the same instructions as in steps 4-9, add the following controls to your form in the order shown:
Control Name
Control Type
Field Name
Additional Settings
Requestor Text Box requestor None Current Date Date Picker currentDate None Start Date Date Picker startDate None Return Date Date Picker returnDate None Number of Days Off Text Box totalDaysOff Select Whole Number (integer) as the Data Type Notes Text Box notes On the Display tab, enable Paragraph Breaks and Wrap Text.
On the Size tab, set the Height to 50 and the Width to 250. - Place the cursor at the bottom of the form.
- In the Controls pane, in the Custom area, click ShareVis.ProcessControl.
The ShareVis.ProcessControl custom control facilitates the flow of data between your form and its associated workflows, which you will create later in this guide.
NOTE: Do not copy and paste custom controls in InfoPath.
Your Time Off Request form should now look like this:
- Click the Save
 button or close the form and wait until you are prompted to save the form.
 - Close InfoPath.
- In Designer, on the File menu, click Save Solution.
Important: Do not click Save As. If you click Save As, the form will be separated from the solution.
Tip: After saving your InfoPath file, always save your work in Designer as well.
 Trademarks